Simplicity Overdone

simplicity-feature

I was hoping to bring you something more than my ramblings about the user interface overhaul in the latest Adobe release, but unfortunately it looks like the interview with the User Experience (UX) team will not be forthcoming, despite initial positive reactions. My impatience has caught up with me, and therefore I present you with the reasons for my vocal criticism of the new UI. see more

Premiere Pro Clip Markers – Solved!

clip-markers-feature

I’ve written a lot about Premiere Pro and metadata. Surprisingly, almost as an after thought, the solution was shipped in the October 2014 release of Creative Cloud applications. It is hiding in the preference panel under the “Media” tab, and is called “Write clip markers to XMP”. I believe this is one of the most important features that was added to Premiere, because it addresses the issue of backup, archive and project sharing and also helps with on-line/off-line workflows.

see more

The Strange Maths of After Effects Timecode

For past few weeks I’ve been developing for That Studio a number of scripts for After Effects which are supposed to make one’s life easier, when dealing with an edit in Premiere that requires handling of more than a couple of VFX shots.

One thing that surprised me is that you can’t access layer’s timecode directly using scripting, even though you can do this using expressions. At first I thought that I can use the Time Remap effect to do this, since its values are supposedly shown as a timecode. But a brief experimentation shows that it’s not the case. Time Remap values are given in seconds from the start of the layer regardless of its timecode. Ouch.

Therefore one has to resort to a brutish hack to obtain the layer’s starting timecode: create a text layer, add an expression that reads the layer.sourceTime value and assigns it to the text, and then read the source text in the script. That’s hardly an elegant solution, and it would be so much better, if the layer.sourceTime was supported not only for expressions.

Perhaps I could live with it, but on top of it there is a nasty bug hidden in AE, and it can bite you rather hard, if you’re not careful.

You might be familiar with the fact that when you precompose a single footage layer, and choose to leave the effects in the main composition, the precomp will have the length of the whole footage file, and will inherit the exact timecode… more or less so.

You might not be aware, that if you are using 23.976 fps frame rate, the timecode might be off by a frame or even two when you attempt to render this layer – which you will notice only if you open the file, because even the render queue will show the correct timecode value. You can mitigate this by manually entering the starting timecode in the composition settings window.

The real problem begins when you are trying to set this timecode via scripting. Let’s say you want the composition to start at 20:20:51:22, which at 23.976 fps translates to 73325.2419085752. When you assign it to the desired composition, the internal AE procedure will truncate it to 73325.2421875, which will result in the timecode which is not frame accurate, and even though it is displayed correctly in the composition, it is incorrectly rendered and written to file. You can check it yourself by running the following script on a selected composition (make sure to first enter 20:20:51:22 into the Start Timecode of the Composition Settings dialog):

c = app.project.activeItem;
a = c.displayStartTime;
alert(a);
c.displayStartTime = a;
alert(c.displayStartTime);

Note, that the value changes by the sheer fact of assigning the code to the composition start time. My supposition is that the internal workings of AE convert the double value into a float, thereby reducing the precision at higher values. That’s definitely not nice. Depending on how critical the timecode is for your application, it might rule out automation of certain tasks, and make it more troublesome to render – you have to always manually enter the starting timecode, even if you precompose. I have not found a way to reliably code around this bug.

The conclusion so far is: forget about accurate timecode renders from AE, especially if you are using 23.976. 29.97 or higher fps and do not start from a full second. Lower integer frame rates seem not to be affected so much, as are easy dividers (12 for 24 fps, etc.). Unfortunately, even if this is fixed in the future releases, it still means that you can’t use scripts that rely on this feature for earlier versions of AE.

A Storm Or A Spoon

luma-curve

Update: The 7.1 version due out in October is going to fix the issue altogether. Great job, Adobe!

Being the one to spoil the party is no fun, especially if you like the host, or enjoy the meals. But when your favourite dish was rotten and received only a little ketchup treatment, well… sometimes you have to be vocal about it.

Let me at first say that I love the party. To have an update within a month of the release, that fixes a major multicam bug (which for some reason I have not fallen prey to) and adds plethora of new features that will make life and editing easier is awesome. This is the power of Creative Cloud that a lot of people were talking about. There’s no denying, that the party is well deserved.

If you want to learn of all the new features and improvements to Premiere Pro which come with version 7.0.1 update, take a look at the official Premiere Pro blog or reTooled.net tutorial. They will show you the goodies, and these are plenty.

But unfortunately for me, one issue is not completely resolved. And it’s not for the lack of trying.

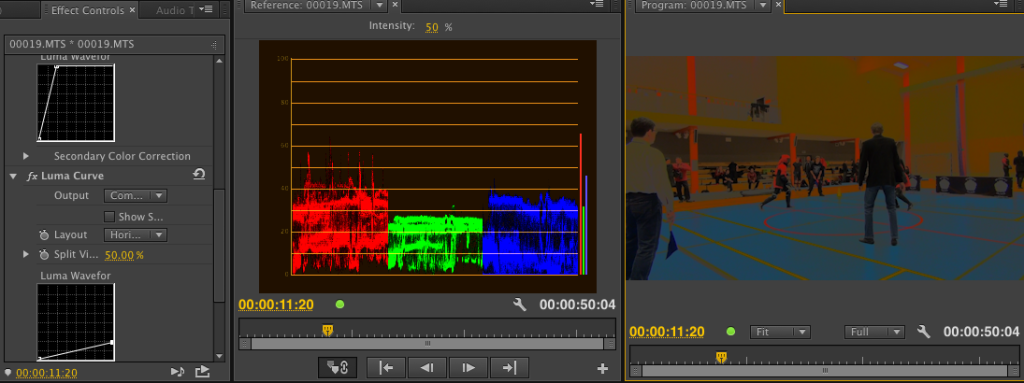
I wrote before about a nasty curves issue, and for some reason my post was not received with enthusiasm at the home of Premiere Pro. I really, really hoped it would be resolved in this update, and that I will be able to join the happy fest. Well… it is, and it isn’t.

The good news is that the curves no longer clip superwhites and superblacks on input. Depending on how you use the curves it might or it might not be the solution. If you never move the starting and ending points of the curves from their places, you’re good to go. Also, if you only move them up or down, to reduce the dynamic range, you should rejoice, because it works as it used to as well.

But if you ever move these points to the inside, namely the point on the left to the right, or the point on the right to the left, to add contrast, and you hoped to later recover the clipping, your troubles did not go away. Sometimes they might even be compounded.

Unfortunately the curves still not work as they used to. This example of course is exaggerated to the extreme to make a point.

Unfortunately the curves still do not work as they used to. This example of course is exaggerated to the extreme to make the point.

Because the curves will flatten everything what is beyond the leftmost or the rightmost curve points up until the left or right border. Then they will resume their 45 degree slope. To many it might be a non-issue. To me it is. To me it means that most of my old projects will still have to be rendered out in CS6, and I will have to be careful with the new ones, especially when using Jarle’s grading presets.

I am not happy. Depending on where you sit, this is either a storm in a teacup or a spoonful of tar that spoils the barrel of honey. Unfortunately, I belong to the second group, and it’s no fun at all.

A frame too far…

A frame too far...

In late September 1944 Field Marshall B. L. Montgomery, a very bold and talented British commander, led an ambitious offensive whose objective was to force an entry into Germany over Rhine. He aimed to  capture a series of bridges with the help of paratroopers, who would have to defend them until the main forces arrived.

Him and Premiere Pro have a few things in common: they are both audacious and tend to overreach. Monty’s boldness and wits won him a few battles, especially during his campaigns in Northern Africa. However, in this case his arrogance went a bit too far. Similarly, Premiere Pro also has its Arnhem moments.

Premiere has always included the current frame in the in/out timeline selection, but until the latest release, it has not bothered me much. CS6 introduced a plethora of new features, which made me change my previous workflow from mouse and keyboard driven to more keyboard oriented, mostly due to the new trimming interface, and the unpredictability of the ripple tool, making the problem more pronounced.

A frame too far…

The joys of old

It used to be, that the arrow tool ( V ) allowed me to perform about 80-90% of operations by having the mouse in my right hand, and the left hand on the keyboard close to the Ctrl (that’s Command for you, Mac people) key. If I wanted to trim, the arrow tool would intelligently turn into the trim cursor, when it approached the edit point. If I needed a ripple trim, I would press Ctrl , and I would always get the ripple trim tool for this operation. Then let go of the modifier, and I’m back with the arrow. If I wanted to adjust audio levels, the arrow tool would allow me to raise and lower the value in the timeline, while Ctrl would add keyframes, and allow to manipulate them. The only actual tools I used were rolling trim  (N ), slip ( Y ) and slide ( U ). Rarely rate stretch ( X ), as handling the speed changes by Premiere for interlaced footage is pretty uninspiring, and from time to time track selection tool ( A ). I don’t remember ever needing the tool palette, and found myself constantly switching it off to save some screen real estate.

Easy and fast. Combine that with a few shortcuts to add default transitions, and it turns out that using mouse and keyboard seems to be the most efficient way to go. The simplicity, ease, and flexibility of the timeline manipulation in Premiere was amazing. And for anyone using this method, opening Final Cut Pro legacy was sometimes pretty annoying. And Avid, especially before MC5? Don’t even get me started…

The mixed bag of the new

Then comes Premiere CS6 with its ability to select edit points, and improved trimming. And suddenly, this old workflow seems less and less viable. The hot zones for edit point selections are pretty wide. One has to be careful not to suddenly click on an edit point, because then the trimming mode will be activated, and ctrl will no longer act in predictable manner, giving you the ripple trim as you’d expect. It will change its behavior based on what is selected, and in general make manipulating timeline with a mouse much less efficient.

It’s understandable then, that I found myself drifting more towards the keyboard-oriented workflow, using trimming mode ( T ), setting in ( I ) and out ( O ) on the timeline, and finally learning keyboard shortcuts for lift ( ; ) and extract (apostrophe) – something, that I never needed before, because ripple delete, razor tool  (C ) and add edit ( Ctrl+K remapped to Z ) were simply quicker. I even started to enjoy the new way of doing things.

And all would be fine and dandy, were it not for the already mentioned fact, that Premiere marks the currently displayed frame as part of the selection. Which means, that if you position your playhead on the edit with the nicely defined shortcut keys (up and down arrow in my case), and press O to mark the out point, you will include also a single frame after the cut.

This is a bit problematic.

I admit I have seen it before – this has been the standard behavior of Premiere from the beginning – but because I hardly ever used in and out in the timeline, this has not bothered me much. However, when the selection started to become the core of my workflow, I found it terribly annoying, and slowing down my work. When I do any of the following operations, I need to constantly remind myself to go back one frame, to avoid the inclusion of the unwanted material:

  • lift and/or extract,
  • overlay edits with in/out in the timeline,
  • exporting based on the in/out selection.

I enjoy editing in CS6 a lot, but this “feature” literally keeps me up at night. It’s such a basic thing, that even Avid got this one right… When the playhead is positioned on an edit point, the out point is selected as the last frame of the incoming clip.

Why then does Premiere behave like Montgomery and has to go one frame too far? British Field Marshall also wanted to eat more than he could chew, and in the end he had to withdraw. Every time I have to go back a frame, I feel like I’m loosing a battle. Why?

Not one frame back, I say!
Continuing Premiere’s FCP XML export woes…

If you are familiar with my recent complaint about the issues with FCP XML export, let me throw two more problems into the mix. They might not be as important as the drop and non-drop frame issue, because no data is lost in the process, and they are fixable, although they might be quite an annoyance.

After fixing the problem with exporting zero-marker duration, we shall find out two things:

  1. Although subclips are correctly exported to FCP XML, for some reason Premiere creates additional markers in the main clip which span through the whole duration of each subclip…
  2. …but in each subclip, each marker’s in point is wrongly calculated, and their positions change, often beyond the subclip’s borders.

Example

There’s a clip that has 1 marker in it, and 1 subclip. The subclip starts at a frame 228, and ends at the frame 645 of the main clip. The marker starts at frame 355 and ends at 528. After export, you will get:

  • 2 markers on the main clip:
    • 355-528
    • 228-645
  • 2 markers on the subclip:
    • 355-300 (sic!)
    • 228-417

And what you should get:

  • 1 marker on the main clip: 355-528
  • 1 marker on the subclip: 127-300

I think you have already figured out, what’s going on – the subclip’s offset is not removed from marker’s in point. As I said – hardly a big problem. Merely an annoyance. But it requires a tool to fix it if you are using certain kind of workflow: the subclip-spanned markers should be removed, the real markers’ in points in subclips recalculated.

Depending how you look at it, the fact that the very same errors are present in FCP XML exports from Prelude, can be either disheartening – because you’d think it’s such a basic functionality that somebody should have had noticed in in the production stage – or encouraging – because if they fix it in Premiere, they will also fix it in Prelude.

On a positive note – I’ve been in contact with Jesse Zibble from Adobe about XML export in general, and I know they have been working on these issues. But judging from the release cycle of previous bug fixes, I don’t think this is going to be amended in the current release.

All of us not using Creative Cloud yet, feel free to express your disappointment now. And if any of you needs a tool to fix these markers, drop me an email.

Three features that would make Adobe Bridge useful for video review

In the video world Adobe Bridge tends to be under-appreciated. It’s true, that it was mostly designed to work with stills and assets for web development or desktop publishing. But it does have some rudimentary video preview options that most people are unaware of.

First, there is a possibility to play the video files. After clicking a video file, you will see a little playback control appear in the preview area. The control however is very basic, and makes it really hard to navigate to a specific frame, or to do anything sensible with it, for that matter

Secondly – there is an option to group pictures into so-called stacks, and set the frame rate at which the stack will be played. Simply select the whole image sequence, press ctrl/cmd+g, and voila! The stills will disappear and the thumbnail will change, giving you the possibility to see how many frames there are (upper left corner), and to play it back (the icon and slider above). The frame rate can be set by going to Stacks->Frame Rate and selecting the proper number.

Unfortunately, you can’t play the sequence in the preview area, only in the thumbnail area – I have no idea why.

I have three ideas that would make Adobe Bridge into a sensible video review tool.

  1. Frame by frame playback for video files in full screen mode using simple keystrokes.
  2. Video scrubbing like in Premiere Pro CS6.
  3. Possibility to add markers and comments for a given frame or a number of frames, which later on would be read by Prelude, Premiere, After Effects and other Adobe applications. Similar functionality was present in Adobe Clip Notes and  later in Adobe CS Review that was discontinued in April 2012. I guess it is coming back in another form to Creative Cloud, but right now we’re left in a void.

And come to think of it – why only markers? Why not set an in-point and an out-point as well? And integrate with Adobe Anywhere? Huh?

For those who are interested in supporting my ideas, here’s the link to the idea on the photoshop.com, where you can vote it up, so that people in Adobe community notice it.