The brighter side of Anywhere

Today another interesting thought about Adobe Anywhere struck me. Essentially, part of the idea of Anywhere is to totally divide the UI from the renderer. The concept in itself is nothing new, and all 3D applications use it. However, as far as I know, it is the first time that it has been applied to an NLE.

The obvious implication is the possibility of network rendering, and using more than a single machine for hefty tasks. Of course, there are a lot of caveats to multi-machine rendering, and we already know that not all problems scale well, and sometimes the overhead of distributing processes is higher, than the gain in speed. But in general, the more means the better.

The less obvious implication is the possibility of running various types of background processing, like rendering or caching parts of a sequence that are not currently being worked upon, if the resources allow. This means a quicker final render time. It also allows to run multiple processes at the same time, or even multiple parts of the rendering engine at the same time, allowing for better utilization of server’s computational power.

However, the most overlooked implication is the fact, that the renderer is UI agnostic. It doesn’t care what kind of client gets connected, it only cares that the communication is correct. And this has potentially huge implications for the future of applications in Adobe’s Video Production line.

Pipeline

Anywhere Renderer most likely already consists of several separate modules – After Effects, and Premiere, possibly even Lumetri (SpeedGrade), which can be chained in any sequence. For example, the client sends a request to render a frame at half-resolution consisting of the following stack: V1 P2 clip, V2 Red One clip with Ultra Keyer on it, V3 Dynamic Linked AE clip with lower thirds, and a color correction via Lumetri on top of it all.

Adobe Anywhere makes Premiere renderer open a Premiere sequence, finds a dynamic linked clip overlaid on a source material, and asks After Effects to render it, at the same time composits the V1 and V2, and once AE is done, composits the result together. Then it sends the whole thing to Lumetri for color correction. Each stage is most likely cached, so that when the CC or the keyer is changed, the AE does not have to re-render the thing. Then the frame is rendered and sent out to the client.

Running locally

However, it’s all in the client-server architecture – you might say. How about those of us who use the programs on a single machine? Anywhere will not have any impact here… or will it?

There is nothing stopping Adobe from installing both the server, and the client software on the same machine. After all, the communication does not care about the physical location of client and server that much. It cares about the channels, and whether the messages are being heard. Perhaps the hardware might be a little bit problematic, considering the fact that both UI, and render most likely use GPU acceleration. But other than that, all Adobe needs to do is to distribute the Adobe Anywhere Render Engine as part of any local application. It would perhaps be custom-configured for local usage, to streamline some tasks, but it’s going to be the same Anywhere.

And that, dear readers, could be huge.

Implications

Separating the UI and a renderer is a brilliant move. In the long run it allows Adobe to alter the client without rewriting or even incorporating the renderer code in the application. For all Anywhere cares, the UI could be as simple as an HTML5 application which would send and receive the proper messages. Need I say anything more? Let your imagination run wild already.

The regular readers perhaps already see where I am going with it. The newcomers are encouraged to read about my vision of Adobe conforming tool, and – why not – Stu Maschwitz’s proposition of merging Premiere Pro and After Effects, or my hopes of seeing a Smoke-like ubertool from Adobe. Any such application could access Anywhere’s backend, and could be optimized to suit specific needs, giving birth to a number of tools specific to certain needs. Tools which are easily written, quick to update, perhaps even accessible via mobile devices. And in time they might also work locally, on a single powerful machine. Or on a number of them. Wherever you prefer. Anywhere.

A frame too far…

In late September 1944 Field Marshall B. L. Montgomery, a very bold and talented British commander, led an ambitious offensive whose objective was to force an entry into Germany over Rhine. He aimed to  capture a series of bridges with the help of paratroopers, who would have to defend them until the main forces arrived.

Him and Premiere Pro have a few things in common: they are both audacious and tend to overreach. Monty’s boldness and wits won him a few battles, especially during his campaigns in Northern Africa. However, in this case his arrogance went a bit too far. Similarly, Premiere Pro also has its Arnhem moments.

Premiere has always included the current frame in the in/out timeline selection, but until the latest release, it has not bothered me much. CS6 introduced a plethora of new features, which made me change my previous workflow from mouse and keyboard driven to more keyboard oriented, mostly due to the new trimming interface, and the unpredictability of the ripple tool, making the problem more pronounced.

A frame too far…

The joys of old

It used to be, that the arrow tool ( V ) allowed me to perform about 80-90% of operations by having the mouse in my right hand, and the left hand on the keyboard close to the Ctrl (that’s Command for you, Mac people) key. If I wanted to trim, the arrow tool would intelligently turn into the trim cursor, when it approached the edit point. If I needed a ripple trim, I would press Ctrl , and I would always get the ripple trim tool for this operation. Then let go of the modifier, and I’m back with the arrow. If I wanted to adjust audio levels, the arrow tool would allow me to raise and lower the value in the timeline, while Ctrl would add keyframes, and allow to manipulate them. The only actual tools I used were rolling trim  (N ), slip ( Y ) and slide ( U ). Rarely rate stretch ( X ), as handling the speed changes by Premiere for interlaced footage is pretty uninspiring, and from time to time track selection tool ( A ). I don’t remember ever needing the tool palette, and found myself constantly switching it off to save some screen real estate.

Easy and fast. Combine that with a few shortcuts to add default transitions, and it turns out that using mouse and keyboard seems to be the most efficient way to go. The simplicity, ease, and flexibility of the timeline manipulation in Premiere was amazing. And for anyone using this method, opening Final Cut Pro legacy was sometimes pretty annoying. And Avid, especially before MC5? Don’t even get me started…

The mixed bag of the new

Then comes Premiere CS6 with its ability to select edit points, and improved trimming. And suddenly, this old workflow seems less and less viable. The hot zones for edit point selections are pretty wide. One has to be careful not to suddenly click on an edit point, because then the trimming mode will be activated, and ctrl will no longer act in predictable manner, giving you the ripple trim as you’d expect. It will change its behavior based on what is selected, and in general make manipulating timeline with a mouse much less efficient.

It’s understandable then, that I found myself drifting more towards the keyboard-oriented workflow, using trimming mode ( T ), setting in ( I ) and out ( O ) on the timeline, and finally learning keyboard shortcuts for lift ( ; ) and extract (apostrophe) – something, that I never needed before, because ripple delete, razor tool  (C ) and add edit ( Ctrl+K remapped to Z ) were simply quicker. I even started to enjoy the new way of doing things.

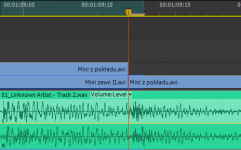
And all would be fine and dandy, were it not for the already mentioned fact, that Premiere marks the currently displayed frame as part of the selection. Which means, that if you position your playhead on the edit with the nicely defined shortcut keys (up and down arrow in my case), and press O to mark the out point, you will include also a single frame after the cut.

This is a bit problematic.

I admit I have seen it before – this has been the standard behavior of Premiere from the beginning – but because I hardly ever used in and out in the timeline, this has not bothered me much. However, when the selection started to become the core of my workflow, I found it terribly annoying, and slowing down my work. When I do any of the following operations, I need to constantly remind myself to go back one frame, to avoid the inclusion of the unwanted material:

  • lift and/or extract,
  • overlay edits with in/out in the timeline,
  • exporting based on the in/out selection.

I enjoy editing in CS6 a lot, but this “feature” literally keeps me up at night. It’s such a basic thing, that even Avid got this one right… When the playhead is positioned on an edit point, the out point is selected as the last frame of the incoming clip.

Why then does Premiere behave like Montgomery and has to go one frame too far? British Field Marshall also wanted to eat more than he could chew, and in the end he had to withdraw. Every time I have to go back a frame, I feel like I’m loosing a battle. Why?

Not one frame back, I say!

Best practices of applying 8-bit effects in Premiere Pro

Summary: Always apply your 8-bit effects as the last ones in the pipeline. 

A few years ago Karl Soule wrote a short explanation of how the 8-bit and 32-bit modes work in Premiere Pro. It’s an excellent overview, although it is a bit convoluted for my taste (says who), and does not sufficiently answer the question on when to use or not to use 8-bit effects, and what are the gains and losses of introducing them in the pipeline. Shying away from an Unsharp Mask is not necessarily an ideal solution in the long run. Therefore I decided to make a few tests on my own. I created a simple project file, which you can download and peruse ( 8-bit vs 32-bit Project file (1754 downloads ) ).

In essence, the 32-bit mode does affect two issues:

  1. Banding.
  2. Dynamic range and clipping.

For the purposes of testing them, in a Full HD sequence with Max Bit Depth enabled, I created a black video, and with a Ramp plugin I created a horizontal gradient from black to white, to see how the processing will affect the smoothness and clipping of the footage.

Settings for a simple horizontal ramp to test it.

Next I applied the following effects:

  1. Fast Color Corrector with Input White reduced to 215 (clipping white).
  2. RGB curves that roughly mirrors the Gamma 2.2
  3. RGB curves that is roughly the reverse of 2.
  4. Fast Color Corrector with Output White reduced to 215 (bringing white back to legal range)
  5. Offset 8-bit filter that does nothing, but breaks the 32-bit pipeline.

Settings for the first Fast Color Corrector.

Master curve in the first RGB Curves effect

Master curve in the second RGB Curves effect.

Settings for the second Fast Color Corrector.

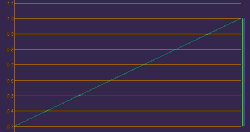
To assess the results I advise opening a large reference monitor window in the YC Waveform mode. Looking at Program monitor will not always be the best way to check the problems in the video. You should see the diagonal line running through the whole scope, like this (note, that the resolution of Premiere’s scopes is pretty low BTW):

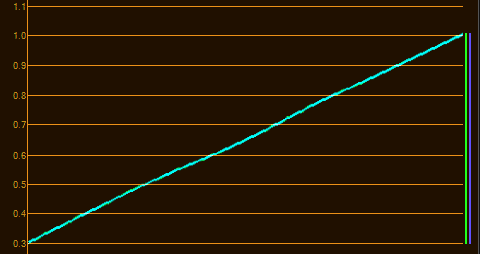
This is how the ramp looks like without any effects applied.

Now perform the following operations, and observe the results:

  1. Turn off the effect number 5 (Offset), and notice a bit more smoothness in the curve, however it’s rather superficial, and hardly likely to influence your final delivery.
  2. Turn on Offset, and move it before the second FCC. You should immediately see the clipping in the highlights. This is the result of 8-bit filter clipping the values at 255,255,255 (white), and disposing of all super-white information that the first FCC introduced.
  3. Move offset between RGB curves (between 2 and 3). Apart from the clipping, you will also notice the banding and posterization, both in the program monitor, and in the Waveform as little flat steps. This is the result of 8-bit filter rounding up or down the values to the nearest integer (123.4 is rounded to 123), and later modifications have less data to work with.
  4. Move offset before the first FCC. Most likely you will not see anything too different from when the Offset filter was the last one applied. However, if you had footage that had super-white values, they would be clipped and irrecoverable. Similarly, if you had 10-bit footage, it would have been converted to 8-bit, and all latitude and additional information would be lost as well.

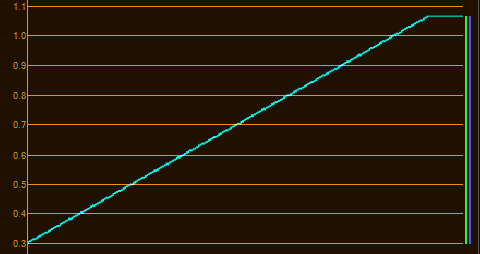
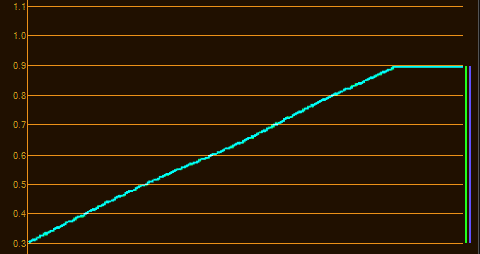
The effect of the first Fast Color Corrector on the ramp. Notice the clipping.

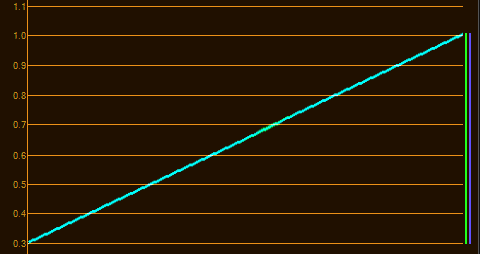
The effect of the second Fast Color Corrector on the ramp. Notice the lack of clipping.

The effect of the first RGB Curves on the ramp.

The effect of the second RGB Curves on the ramp.

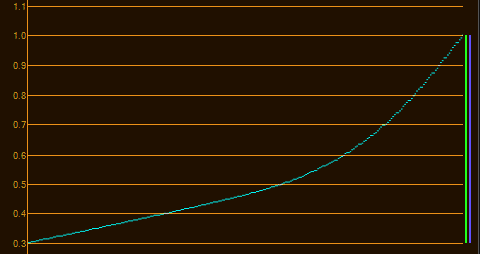
All four 32-bit effects on.

All filters on with Offset in the last place. Notice a bit less smoothness in scopes.

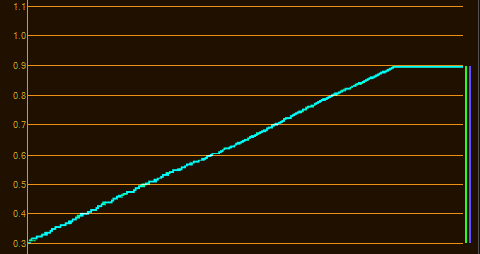
All filters on with Offset before the second FCC. 8-bit filter makes the data irrecoverable, and clips the highlights.

All filters on with Offset between the RGB Curves. Notice the irregularity in the curve, showing rounding errors and compounding problems.

All filters on with Offset after the first FCC. The curve is not as irregular, but the clipping is still present.

All filters on with Offset in the first place. Notice the similarity to the Offset in the last place. The 32-bit pipeline is not broken afterwards, although the footage is converted to 8-bit because of the filter pipeline. 

This simple experiment allows us to establish following best practices on applying 8-bit effects in Premiere Pro:

  1. Try to apply 8-bit effects as the last ones in the row, especially with footage that is 10-bit or more.
  2. Always perform your technical grade and make your image legal (ie. not clipping) before you apply any 8-bit effect in the pipeline.
  3. Ideally do all your color correction before any 8-bit effect is applied.
  4. Avoid performing heavy color correction or image processing after an 8-bit effect has been inserted to avoid banding and posterization, especially with 10-bit or RAW footage.

And that’s it. I hope this sheds some light on the mysteries of Premiere Pro’s 32-bit pipeline, and that your footage will always look great from now on.

If Premiere Pro crashes hard on Windows and you can’t open it again…

…check if the process called Adobe Premiere Pro.exe is still running and kill it.

Granted, crashes of Premiere have mostly been the thing of the past. Since upgrading to CS5 I don’t remember the time when I actually lost anything in Premiere’s crash. But then, some people still have problems from time to time. So here’s a tip.

Sometimes Premiere Pro crashes, and no matter how hard you try, you can’t reopen it by double clicking on the shortcut icon, or even directly attempting to open the Adobe Premiere Pro executable file. If you restart your machine, everything works fine. But let’s be honest – you don’t want to waste precious minutes on shutdowns and reloading Windows, especially if there is a looming deadline ahead (and we all know that weird things happen when projects get close to completion…). If you log out, and log back again, you could save a little bit of time, and things should work fine again.

But there’s much quicker way to do it. Run Windows Task Manager by right clicking on the start bar, and selecting “Start Task Manager”. Then click the “Processes” tab, and take a close look to find a usual suspect. Or perhaps click once on the “Image name” column, if the list is not already sorted this way, and then locate the “Adobe Premiere Pro.exe” process. Select that guy, and hit “End process” button. This will remove the remaining traces of crashed Premiere from the memory, and if you click your Premiere icon now – surprise, surprise, the application will load without any problems.

Windows Task Manager interface, and our culprit. I hope the foreign language does not make you wince too much 🙂

The reason for that is very simple – on startup, Premiere looks if its main process is running. If it is, it terminates what it considers to be a recently run duplicate copy of itself, and asserts that the former is running fine. It doesn’t matter that it isn’t, Premiere is too lazy or too inept to realize that it had just crashed on you, and left remains in your system’s memory.

I hope this tip saves you a moment or two in the unlikely event of such a crash. And if you are more tech-savy, you might consider downloading a free task manager replacement called Process Explorer, which gives you much more and much more detailed info about processes running on your system.

Power Window plugin for Adobe Premiere Pro

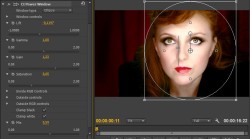
Since it’s the Christmas season, I hope you’ll appreciate the new addition to the Creative Impatience toolbox: meet the Power Window filter.

After creating the Vignette plugin, I decided that even though it did most of the things that I wanted it to, there were still some image manipulations which were pretty hard to achieve. For example, a simple operation of lightening the inside of a selected shape, turned out to be pretty problematic to perform in a decent manner.

Therefore, I set out to create a variant of the CI Vignette, which would manipulate directly lift, gamma, gain and saturation values of the pixels inside, and outside of the shape. Most of the code was reused from the Vignette, and the rest was pretty uncomplicated to write. Frankly, I spend most of the time trying to figure out how to circumvent something that I perceive to be a bug in Premiere. But then, this is the life of a software developer. We have to live with what we are given.

Without further ado: Power Window plugin for After Effects and Premiere is up and running. Be sure to visit the download page for the file, read the instructions on how to install it, and if you have problems operating the plugin, take a look at Instructions and Tutorials.

Power Window Interface.

Hopefully some day I will manage to create some decent videocast on how to use these tools. In the meantime, feel free to experiment, and let me know how it goes.

Merry Christmas, and a Happy New Year!

Continuing Premiere’s FCP XML export woes…

If you are familiar with my recent complaint about the issues with FCP XML export, let me throw two more problems into the mix. They might not be as important as the drop and non-drop frame issue, because no data is lost in the process, and they are fixable, although they might be quite an annoyance.

After fixing the problem with exporting zero-marker duration, we shall find out two things:

  1. Although subclips are correctly exported to FCP XML, for some reason Premiere creates additional markers in the main clip which span through the whole duration of each subclip…
  2. …but in each subclip, each marker’s in point is wrongly calculated, and their positions change, often beyond the subclip’s borders.

Example

There’s a clip that has 1 marker in it, and 1 subclip. The subclip starts at a frame 228, and ends at the frame 645 of the main clip. The marker starts at frame 355 and ends at 528. After export, you will get:

  • 2 markers on the main clip:
    • 355-528
    • 228-645
  • 2 markers on the subclip:
    • 355-300 (sic!)
    • 228-417

And what you should get:

  • 1 marker on the main clip: 355-528
  • 1 marker on the subclip: 127-300

I think you have already figured out, what’s going on – the subclip’s offset is not removed from marker’s in point. As I said – hardly a big problem. Merely an annoyance. But it requires a tool to fix it if you are using certain kind of workflow: the subclip-spanned markers should be removed, the real markers’ in points in subclips recalculated.

Depending how you look at it, the fact that the very same errors are present in FCP XML exports from Prelude, can be either disheartening – because you’d think it’s such a basic functionality that somebody should have had noticed in in the production stage – or encouraging – because if they fix it in Premiere, they will also fix it in Prelude.

On a positive note – I’ve been in contact with Jesse Zibble from Adobe about XML export in general, and I know they have been working on these issues. But judging from the release cycle of previous bug fixes, I don’t think this is going to be amended in the current release.

All of us not using Creative Cloud yet, feel free to express your disappointment now. And if any of you needs a tool to fix these markers, drop me an email.

Enhance your Premiere Pro productivity – keyboard shortcuts galore

There’s a tip that I wanted to share with you, which increased my productivity with Premiere Pro tremendously. And it’s very simple: customize your keyboard shortcuts. But make it wisely.

First tip: make use of the search box which is present in Keyboard Shortcuts dialog in Premiere. There is a ton of shortcuts, and if you know the proper name, or even part of the name, it’s easier to type it in the search box, and browse among the remaining entries, than to wade through all the options.

First and foremost – track selection

Separated from source patching in CS4, constantly improved, but still hardly perfect, track selection tends to be one of the most annoying things if you don’t remember about it (like wondering why match frame shortcut does not work). It has also been pretty cumbersome. But in CS5 we got a nice addition that allows us to finally make it more of a feature than a nuisance.

Assign keyboard shortcuts 18 to Toggle Target Video 1-8. By default they are assigned to multicam, and if you are doing a lot of multicam work, you might consider remapping your Select Camera shortcuts to F1F12 . This way you will overwrite the defaults for help (F1 ), capture (F5 ) and batch capture (F6 ), but the chances are you’re not using them very much, and if you do, simply find a better place for them. Like Shift+Ctrl+Alt+H 😉

Then assign 9 to Toggle All Target Video On, and 0 to Toggle All Target Video Off.

Track selection is vital to every editing operation in Premiere, and once you get used to the new shortcuts, I assure you, that you will never go back, and will be ready to strangle anyone who would like to take it away from you.

Perhaps you might also find it useful to assign Toggle Target Audio 1-8” to Ctrl+1 to Ctrl+8 , although personally I found myself using only the shortcuts to Toggle All Target Audio On/Off (Ctrl+9 /Ctrl+0 respectively).

Be mindful that shift+number shortcuts are assigned to panels, but if you change them you will not be notified about it! And there will be no undo, you’ll have to revert these changes manually.

And while we’re at it, why not map labels to Ctrl+F1 and further on? It’s a bit more complicated, you need to navigate to Edit->Label in the keyboard shorcuts dialog, and then assign keys to each label, but it also might be pretty helpful at times.

Manipulation of In and Out Points

Setting the In (I ) and Out (O ) are pretty decent standards, but some of the other shortcuts in this area are suboptimal, considering the fact that you need to perform thousands of this kind of operations a day, and adding half a second to press Shift , or even Shift+Alt+Ctrl is a pain. This time it’s worthwhile to take example from Avid, and get these under your fingertips.

The most important one: Clear In/Out – map it to G . This used to be Premiere’s default before FCP users started to put pressure on Adobe to adopt their  keyboard mapping.

Clear In and Clear Out is not something I use very often. If I want to change the In, I just set an In in another place. However, if you find yourself using them often, E and R seem to be pretty good places to put them.

On the other hand Go To In, and Go To Out tend to be useful, and I map them under Q  and W .

Mark Clip also tends to be useful for many reasons, gap removal included, and I tend to have it under the slash key / . Mark Selection – not so often used, I map it to Shift+/ .

Setting Render Entire Work Area  to Shift+Enter is worthwhile. I generally turn off the work area, and use In and Out, and this option is replaced with Render In to Out in my workflow, but the shortcut stays the same.

A few more tips

An idea that navigating markers should use the M key is quite alien to me. I prefer having Go To Next Marker as Ctrl+PgUp , and Go To Previous Marker as Ctrl+PgDn . It frees the M key for more important things, like for example assigning Edit Marker to Shift+M .

Another function that I often use is Add edit, and Add edit on all tracks. Default Ctrl+K  is not necessarily so bad, but it still requires at least two fingers. Let’s reduce it to one. Throw out the zoom tool shortcut (honestly, when did you last time use that one?), and assign Add edit to Z , and Add edit an all tracks to Shift+Z .

Speed/Duration and Audio Gain – who says that invoking dialogs needs a modifier key? Map them to D and H respectively. Who cares about the hand tool anyway?

Ripple Delete – default Alt+Backspace is almost fine, but why not map it to the del key itself? You’ll have to remember that the Backspace and del will then have different behavior but I think it’s worth it. I would map it to backspace, but then it interferes a bit with the way project panel works, so delete is the way to go for me.

Two real kickers and trimming

The next two will save you tremendous amount of time during editing. I used to perform this operation with a mouse – when I felt that I had to make a cut, I ripple-trimmed my next edit point by dragging it with a Ctrl key pressed (which was BTW the best timeline interaction I’ve ever had with any NLE) – and now I can do it without, saving quite a lot of time. There are two great shortcuts that should again be at your fingertips by default:

  • Ripple Trim Next Edit to Playhead]
  • Ripple Trim Prev Edit to Playhead – [

They take time to get used to, because the shape of the characters is opposite to what it does, but their position is correct. I still sometimes press the incorrect one, but they are a real timesaver, especially in connection with track selecting. However, if you find yourself thinking too much, you might consider switching them, and seeing if it doesn’t work better for you.

There are also two of the less often used – Extend Next Edit to Playhead and Extend Previous Edit to Playhead, which I tend to map to Shift+] and Shift+[ respectively.

I have never used Extend Selected Edit to Playhead. Ever. Perhaps I still don’t know something about editing, but I have not come upon a situation where I couldn’t replace it with any other available option.

Sometimes however I find it useful to immediately move to the nearest edit point and select correct trim mode. Therefore I usually map the following:

  • Select Nearest Edit Point as Ripple In to Ctrl+]
  • Select Nearest Edit Point as Ripple Out to Ctrl+[
  • Select Nearest Edit Point as Trim In to Shift+Ctrl+]
  • Select Nearest Edit Point as Trim Out to Shift+Ctrl+[

Transitions

For a moment I toyed with an idea to assign D to Apply Default Video Transition, but I decided against it. I needed other shortcuts much more, than I needed the transitions.

Interestingly, in CS6 you can specify a separate shortcut to add each of the following transitions:

  • Audio Crossfade
  • Video Crossfade
  • Dip To White
  • Wipe

If you tend to use any of these, definitely apply a shortcut to it. Also, if you use any other transition often, like for example Dip To Black (why it’s not in the list I have no idea), then use this one as a default transition, and apply a shortcut to Crossfade. Possibilities are really interesting, and I sincerely urge you to explore them.

Finally

Here is the .kys file for all of you lazy and impatient people to download:

Bart's keyboard shortcuts (14827 downloads )
Feel free to use it and distribute it as you wish. However, I strongly urge you to explore keyboard shortcuts on your own.

To install the shortcut keys you need to exract the .kys file to the following folder (substitue $username and $version for appropriate values):

  • c:\Users\$username\AppData\Roaming\Adobe\Permiere Pro\$version (Windows)
  • ~/Library/Application Support/Adobe/Premiere Pro/$version (OS X)

I hope you’ll find these tips as useful, as I do. Enjoy.

Three features that would make Adobe Bridge useful for video review

In the video world Adobe Bridge tends to be under-appreciated. It’s true, that it was mostly designed to work with stills and assets for web development or desktop publishing. But it does have some rudimentary video preview options that most people are unaware of.

First, there is a possibility to play the video files. After clicking a video file, you will see a little playback control appear in the preview area. The control however is very basic, and makes it really hard to navigate to a specific frame, or to do anything sensible with it, for that matter

Secondly – there is an option to group pictures into so-called stacks, and set the frame rate at which the stack will be played. Simply select the whole image sequence, press ctrl/cmd+g, and voila! The stills will disappear and the thumbnail will change, giving you the possibility to see how many frames there are (upper left corner), and to play it back (the icon and slider above). The frame rate can be set by going to Stacks->Frame Rate and selecting the proper number.

Unfortunately, you can’t play the sequence in the preview area, only in the thumbnail area – I have no idea why.

I have three ideas that would make Adobe Bridge into a sensible video review tool.

  1. Frame by frame playback for video files in full screen mode using simple keystrokes.
  2. Video scrubbing like in Premiere Pro CS6.
  3. Possibility to add markers and comments for a given frame or a number of frames, which later on would be read by Prelude, Premiere, After Effects and other Adobe applications. Similar functionality was present in Adobe Clip Notes and  later in Adobe CS Review that was discontinued in April 2012. I guess it is coming back in another form to Creative Cloud, but right now we’re left in a void.

And come to think of it – why only markers? Why not set an in-point and an out-point as well? And integrate with Adobe Anywhere? Huh?

For those who are interested in supporting my ideas, here’s the link to the idea on the photoshop.com, where you can vote it up, so that people in Adobe community notice it.