In this tutorial I’m showing how to animate the applied vignette in Premiere Pro. It’s pretty basic, but in case you didn’t know how to do it, here it is:


In this tutorial I’m showing how to animate the applied vignette in Premiere Pro. It’s pretty basic, but in case you didn’t know how to do it, here it is:

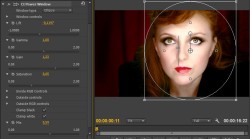
The newest tutorial is a continuation of part one, and is mostly an overview of the Vingette plugin interface, at the same time showing how you can use this filter to lighten part of the scene:

It’s the highest time for the new brief tutorial. This time I’m covering the basic application of the CI Vignette effect, and how to use the GUI to quickly adjust its shape and effect.

The third, and most likely last of the Feathered Crop basics, this time on how to animate your feathered crop using GUI in the program monitor to hasten your workflow. It’s very likely you already know it, but just in case, here it is:
In late September 1944 Field Marshall B. L. Montgomery, a very bold and talented British commander, led an ambitious offensive whose objective was to force an entry into Germany over Rhine. He aimed to capture a series of bridges with the help of paratroopers, who would have to defend them until the main forces arrived.
Him and Premiere Pro have a few things in common: they are both audacious and tend to overreach. Monty’s boldness and wits won him a few battles, especially during his campaigns in Northern Africa. However, in this case his arrogance went a bit too far. Similarly, Premiere Pro also has its Arnhem moments.
Premiere has always included the current frame in the in/out timeline selection, but until the latest release, it has not bothered me much. CS6 introduced a plethora of new features, which made me change my previous workflow from mouse and keyboard driven to more keyboard oriented, mostly due to the new trimming interface, and the unpredictability of the ripple tool, making the problem more pronounced.

A frame too far…
It used to be, that the arrow tool (
Easy and fast. Combine that with a few shortcuts to add default transitions, and it turns out that using mouse and keyboard seems to be the most efficient way to go. The simplicity, ease, and flexibility of the timeline manipulation in Premiere was amazing. And for anyone using this method, opening Final Cut Pro legacy was sometimes pretty annoying. And Avid, especially before MC5? Don’t even get me started…
Then comes Premiere CS6 with its ability to select edit points, and improved trimming. And suddenly, this old workflow seems less and less viable. The hot zones for edit point selections are pretty wide. One has to be careful not to suddenly click on an edit point, because then the trimming mode will be activated, and ctrl will no longer act in predictable manner, giving you the ripple trim as you’d expect. It will change its behavior based on what is selected, and in general make manipulating timeline with a mouse much less efficient.
It’s understandable then, that I found myself drifting more towards the keyboard-oriented workflow, using trimming mode (
And all would be fine and dandy, were it not for the already mentioned fact, that Premiere marks the currently displayed frame as part of the selection. Which means, that if you position your playhead on the edit with the nicely defined shortcut keys (up and down arrow in my case), and press
This is a bit problematic.
I admit I have seen it before – this has been the standard behavior of Premiere from the beginning – but because I hardly ever used in and out in the timeline, this has not bothered me much. However, when the selection started to become the core of my workflow, I found it terribly annoying, and slowing down my work. When I do any of the following operations, I need to constantly remind myself to go back one frame, to avoid the inclusion of the unwanted material:
I enjoy editing in CS6 a lot, but this “feature” literally keeps me up at night. It’s such a basic thing, that even Avid got this one right… When the playhead is positioned on an edit point, the out point is selected as the last frame of the incoming clip.
Why then does Premiere behave like Montgomery and has to go one frame too far? British Field Marshall also wanted to eat more than he could chew, and in the end he had to withdraw. Every time I have to go back a frame, I feel like I’m loosing a battle. Why?
Not one frame back, I say!
The second installment of Creative Impatience tutorials is up and running. This time, I’m showing how to use the Feathered Crop plugin to create a border around the cropped footage. It’s really easy, and there are a few options which allow for customization.
Watch it here:

Summary: Always apply your 8-bit effects as the last ones in the pipeline.
A few years ago Karl Soule wrote a short explanation of how the 8-bit and 32-bit modes work in Premiere Pro. It’s an excellent overview, although it is a bit convoluted for my taste (says who), and does not sufficiently answer the question on when to use or not to use 8-bit effects, and what are the gains and losses of introducing them in the pipeline. Shying away from an Unsharp Mask is not necessarily an ideal solution in the long run. Therefore I decided to make a few tests on my own. I created a simple project file, which you can download and peruse ( 8-bit vs 32-bit Project file (1754 downloads ) ).
In essence, the 32-bit mode does affect two issues:
For the purposes of testing them, in a Full HD sequence with Max Bit Depth enabled, I created a black video, and with a Ramp plugin I created a horizontal gradient from black to white, to see how the processing will affect the smoothness and clipping of the footage.

Settings for a simple horizontal ramp to test it.
Next I applied the following effects:

Settings for the first Fast Color Corrector.

Master curve in the first RGB Curves effect

Master curve in the second RGB Curves effect.

Settings for the second Fast Color Corrector.
To assess the results I advise opening a large reference monitor window in the YC Waveform mode. Looking at Program monitor will not always be the best way to check the problems in the video. You should see the diagonal line running through the whole scope, like this (note, that the resolution of Premiere’s scopes is pretty low BTW):

This is how the ramp looks like without any effects applied.
Now perform the following operations, and observe the results:

The effect of the first Fast Color Corrector on the ramp. Notice the clipping.

The effect of the second Fast Color Corrector on the ramp. Notice the lack of clipping.

The effect of the first RGB Curves on the ramp.

The effect of the second RGB Curves on the ramp.

All four 32-bit effects on.

All filters on with Offset in the last place. Notice a bit less smoothness in scopes.

All filters on with Offset before the second FCC. 8-bit filter makes the data irrecoverable, and clips the highlights.

All filters on with Offset between the RGB Curves. Notice the irregularity in the curve, showing rounding errors and compounding problems.

All filters on with Offset after the first FCC. The curve is not as irregular, but the clipping is still present.

All filters on with Offset in the first place. Notice the similarity to the Offset in the last place. The 32-bit pipeline is not broken afterwards, although the footage is converted to 8-bit because of the filter pipeline.
This simple experiment allows us to establish following best practices on applying 8-bit effects in Premiere Pro:
And that’s it. I hope this sheds some light on the mysteries of Premiere Pro’s 32-bit pipeline, and that your footage will always look great from now on.
Taking advice of other creatives, I decided to forego the unattainable expensive gear, and use whatever I had at my disposal to create a series of short tutorial on how to use my plugins.
The first installment is already available, and I plan on putting out one of these every week, keeping under 3 minutes for all of you impatient types. I’m pretty happy with the result, since it’s my very first screencast. The audio quality is not very good, but I hope the content will defend itself, and that you will find these series useful.
Comments and donations welcome.
…check if the process called Adobe Premiere Pro.exe is still running and kill it.
Granted, crashes of Premiere have mostly been the thing of the past. Since upgrading to CS5 I don’t remember the time when I actually lost anything in Premiere’s crash. But then, some people still have problems from time to time. So here’s a tip.
Sometimes Premiere Pro crashes, and no matter how hard you try, you can’t reopen it by double clicking on the shortcut icon, or even directly attempting to open the Adobe Premiere Pro executable file. If you restart your machine, everything works fine. But let’s be honest – you don’t want to waste precious minutes on shutdowns and reloading Windows, especially if there is a looming deadline ahead (and we all know that weird things happen when projects get close to completion…). If you log out, and log back again, you could save a little bit of time, and things should work fine again.
But there’s much quicker way to do it. Run Windows Task Manager by right clicking on the start bar, and selecting “Start Task Manager”. Then click the “Processes” tab, and take a close look to find a usual suspect. Or perhaps click once on the “Image name” column, if the list is not already sorted this way, and then locate the “Adobe Premiere Pro.exe” process. Select that guy, and hit “End process” button. This will remove the remaining traces of crashed Premiere from the memory, and if you click your Premiere icon now – surprise, surprise, the application will load without any problems.

Windows Task Manager interface, and our culprit. I hope the foreign language does not make you wince too much 🙂
The reason for that is very simple – on startup, Premiere looks if its main process is running. If it is, it terminates what it considers to be a recently run duplicate copy of itself, and asserts that the former is running fine. It doesn’t matter that it isn’t, Premiere is too lazy or too inept to realize that it had just crashed on you, and left remains in your system’s memory.
I hope this tip saves you a moment or two in the unlikely event of such a crash. And if you are more tech-savy, you might consider downloading a free task manager replacement called Process Explorer, which gives you much more and much more detailed info about processes running on your system.
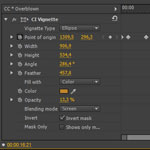
Since it’s the Christmas season, I hope you’ll appreciate the new addition to the Creative Impatience toolbox: meet the Power Window filter.
After creating the Vignette plugin, I decided that even though it did most of the things that I wanted it to, there were still some image manipulations which were pretty hard to achieve. For example, a simple operation of lightening the inside of a selected shape, turned out to be pretty problematic to perform in a decent manner.
Therefore, I set out to create a variant of the CI Vignette, which would manipulate directly lift, gamma, gain and saturation values of the pixels inside, and outside of the shape. Most of the code was reused from the Vignette, and the rest was pretty uncomplicated to write. Frankly, I spend most of the time trying to figure out how to circumvent something that I perceive to be a bug in Premiere. But then, this is the life of a software developer. We have to live with what we are given.
Without further ado: Power Window plugin for After Effects and Premiere is up and running. Be sure to visit the download page for the file, read the instructions on how to install it, and if you have problems operating the plugin, take a look at Instructions and Tutorials.

Power Window Interface.
Hopefully some day I will manage to create some decent videocast on how to use these tools. In the meantime, feel free to experiment, and let me know how it goes.
Merry Christmas, and a Happy New Year!

