Full disclosure: I was offered a full version of Resolve Studio from Blackmagic Design in exchange for this review with no other strings attached. While this perk might have influenced my opinion about the company and the product, it’s no secret that I have liked Resolve for a long time, used it on my projects since version 9, and trained people how to work with it. It’s simply a great, affordable grading tool, a worthy replacement of Apple Color. Now it is attempting to take over your edit suite, and this is what I decided to focus on in my assessment.
With the release of version 11, Resolve started to aggressively expand from purely grading tool into non-linear editing. Regardless of the initial hype and of impressive initial toolset, editing in Resolve 11 was clunky, the experience far from seamless, and in the end not really suited to anything but casual editing or correcting bad conforms. There were some brave souls who attempted to try it out on their projects, and even some universities decided to forego installing an NLE in their suites, in favour of Resolve. But I have not seen any projects edited purely from start to finish in Resolve 11. After the initial waves of enthusiasm, Resolve editing faded into background and became little more than a curiosity.
The recent release of Resolve 12 is supposed to change that. There are quite a few significant improvements, especially in the audio area, like the possibility to use VST and AU effects, more priority given to audio over video playback, a brand new audio track mixer, as well as new editing tools – multicam clips and compound or nested timelines plus any trim type that you can possibly imagine. This brings the editing toolset almost to the completeness, at least in the sense of 2015 NLEs.
The new editing toolset
Most of your usual suspects are there, including such useful things as head and tail edit, and a sync lock, which actually works properly and predictably, unlike in certain other applications. In fact, one thing that Resolve should be commended for is the way it handles track collisions on rippling – it’s intuitive, clever and saves a lot of time in the end. Similarly, the way you switch modes from Normal Edit (no operation changes timeline length) to Trim Edit (all operations are now rippling) is clever, possibly not innovative, but very clear and agreeable to my way of operating. Dynamic trimming is also there, available with a single keystroke. The only thing I can complain about is the discoverability. It takes a moment to realise what the modes do and how they work, apart from being just tools; that to open a timeline in the source monitor you have to drag it there; or that to perform Lift you have to use Delete Selected with in and out set. Some tools are simply hidden too well, not present in any menu. Another example: creating subclips is only possible when you right-click on the selected in-out range in the source monitor.

The additions to Resolve 12 trimming and editing make it a viable tool for creative editing. Some options are pretty well hidden though!
There are also a few nifty features speeding up the editing process that Resolve is still lacking – one of them is the ability to set in and out point of the clip while scrubbing over the thumbnails or the filmstrip in the project media browser. While editing using the source monitor is important, and a lot of people do work that way, it is not always the most efficient, and especially the newer brand of editors might be missing them.
Where it’s still the big iron
How does editing in Resolve 12 feel though? After all, the editors are used to an immediate feedback, seamless, realtime playback experience and working with tons of media. Does Resolve 12 live up to the expectations?
I’d say yes and no.
Resolve needs a powerful machine to work properly. While any other NLE can fly on my MacBook Pro 2012 Retina, Resolve struggles, and sometimes fails, especially with heavily compressed H.264 media. I need my heavy-weight Windows workstation to get the performance which makes me comfortable. Coming from the high-end, big iron background, Resolve has not yet transcended its legacy limitations. It lives purely on a GPU, so if your edit is anything more than straightforward cut and occasional dissolve, or your resolution is high, you are going to encounter performance issues, if your graphics card is not good enough. Simple playback might be fine, but even going backwards of fast forward using JKL is not that responsive, often you will notice a significant lag between key being pressed and the reaction to it.
Also, if you are using effects and third party transitions, these are hardly ever rendered in the real-time. Arguably, this is also the case on other platforms, but in Resolve there is no way to just render part of the timeline, and it takes much more time for the software to recover from dropped frames. Yes, there is a nice background rendering option, very similar to what we can find in FCPX, but there is no granular control over what gets rendered – it’s either something not specific or nothing.
There are workarounds, like using cache, using proxy media, reducing playback resolution. They are not without their own issues, and very often require significant amount of hard drive space. In fact, the whole Chapter 5 in the excellent Resolve 12 User Manual is dedicated towards the topic of performance tuning, and it’s definitely worth reading. However, when compared to other NLEs, and especially on the lower end platforms, the smooth experience is not to be expected, when not sitting on a powerful workstation. Way better than in version 11, but we editors are a picky, spoiled bunch.
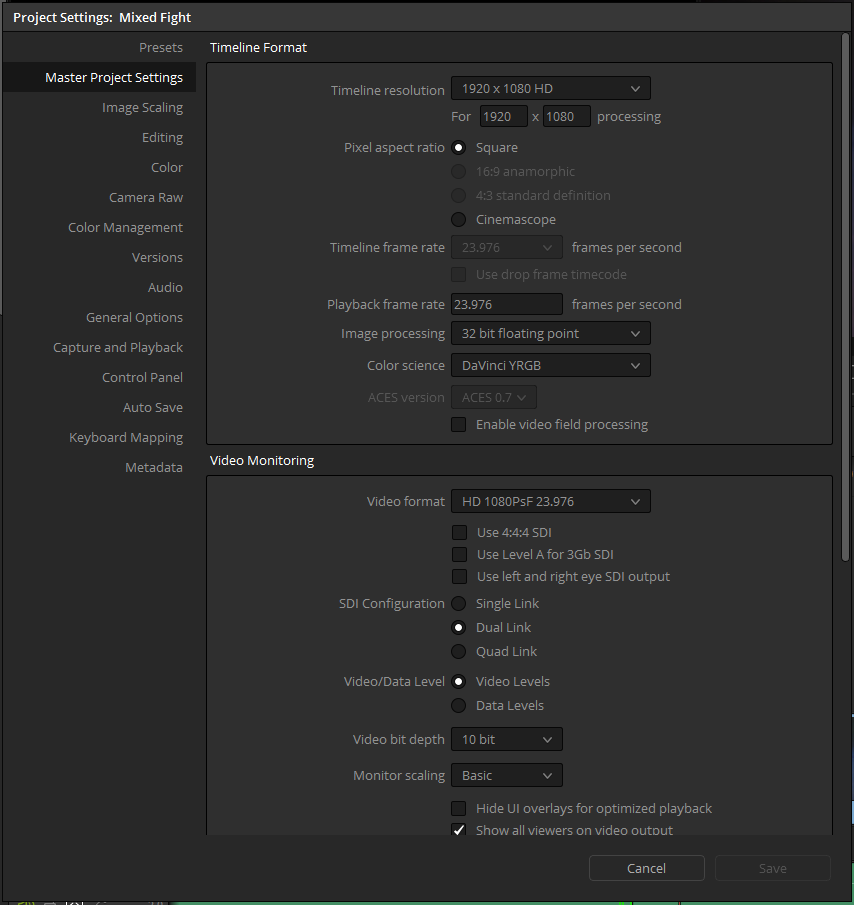
Project settings window can be intimidating to the uninitiated. Defaults are sensible, but still it is worthwhile to read the manual that comes with the software or ask someone with more experience.
Finally, there’s the question of Resolve project management. It has definitely been simplified from the previous versions where a database server was used. One needs to remember though, that all the projects are still saved in a single location, and to move them to a different place you have to export them. Setting up Resolve for use in networked shared environment is not a task an average editor will be able to perform though, and it might be at times problematic, so before you get yourself in trouble either read the manual, or ask a person who has experience in this matter. Thankfully, you can move projects between computers using the drp files without much hassle. It’s definitely something to be aware of and get used to.
Where it falls short
There are still some legacy limitations like the need for all timelines to be of the same size and frame rate. It might not be a huge deal, but some of the more complex projects involve various deliveries. Hopefully this gets addressed in one of the future updates. Come to think about it, the project settings window contains a lot of options dealing with colour grading workflow, which for an average editor might be hard to understand.
Another limitation is the size of the timeline window, and inability to customise user interface to the extent that we know from Avid or Premiere. With some edits, it is not uncommon to have a 10 or even 12 edit tracks containing various elements – live action, motion graphics, visual effects, subtitles, and so on. For audio you definitely need twice that, or even more. Resolve’s current interface is best suited for flat timelines of 3-5 video tracks at the most – unless you are using a 4k or higher resolution display or dual monitors with full screen timeline option on. Therefore some projects will feel great, while others will make you wish for some more screen real-estate or workspace flexibility.

Editing is smooth on a powerful machine, but your average laptop might turn out not to be enough to seamlessly run Resolve.
Also, editors live by their keyboard shortcuts, and this is where Resolve has significant room for improvement. For one, keyboard shortcuts are stored per project, and are available via project settings. True, you can save your presets, and set the defaults, but at the same time, it would make much more sense, if they were stored as a user preference. Some of the shortcuts are great – kudos for all nudging and clip selection – but some come as defaults from FCP legacy and make less sense. A few common operations require pressing adjustment keys like shift or alt, sometimes multiple of those. Therefore the very first thing that one needs to do is to redefine them. Unfortunately, the keyboard shortcuts editor is not great and feels clunky and dated. At least a search box a la Adobe Premiere would make it easier to find relevant commands, and of course nothing beats the graphic representation of a keyboard, like in FCP.
Where it just works
Media organisation and metadata management is good – nothing revolutionary, it just works as it should and like an editor is used to. If you had used previous versions of Resolve, you will notice that the project structure is now more similar to the one in a traditional NLE – and for the better. There are bins, timelines can reside in any bin, bins are searchable. Any clip can have traditional metadata attached to it, which you can also look for, sort by and fill in, if necessary. Resolve 12 introduces Smart Bins – basically saved searches that update in real-time. Unfortunately, metadata entered in Resolve is project-specific, and won’t be shared between various projects.

Media management in Resolve just works.
Audio editing is usually smooth, if you discount the timeline size limitation. It’s great to have the ability to use audio effects and plug-ins. Right now Resolve does not ship with any, and I have not found a way to incorporate VST plug-ins shipped with Adobe Premiere. On the other hand, on OS X it recognises your standard Audio Units, which is great. At the time I was writing this review (Resolve version 12.1) there was one bug, which might or might not be a deal-breaker for you: AAC-encoded audio will distort when two such files are interacting with one another – either on separate layers, or via cross fade transition. Hopefully this gets fixed soon, as sometimes we do work on really strange types of footage, and encountering AAC-encoded audio is unfortunately not that uncommon.
Of course, coming from the world of grading, Resolve supports most interchange formats, including OMF and AAF, which you might want to use to pass your sound edit to an actual sound mixing application like Pro Tools or Audition. It also imports and exports XML and FCPX XML edits, so if it comes to worst, you can always execute your escape plan and move to an NLE of choice.
One of the potentially more useful features is the searchable Edit Index (aka Timeline Index in FCPX), being essentially an EDL representation of your timeline. Absent duplicate clip markers, it’s a handy tool for manual checking. You can also use it to browse the markers and flags present in the current timeline, though I am missing the marker list for a clip open in the source monitor, where it would be really, really handy as well.
Where it shines
The timeline interaction is often great – very similar to FCPX, ways ahead of Avid and Premiere. Moving clips around feels snappy, adjusting the edits is also fun. Audio levels are adjusted in real-time – of course, not accounting for effects, but this I would not expect – adding crossfades and editing transition curves with often just a single click and drag of a mouse. The expandable keyframe editor, similar to the one present in After Effects, is terrific. A lot of great thought went into this design. It is both simple, and at the same time efficient and powerful, definitely one of the high points of this software. I miss a bit more control over audio transition envelopes or logarithmic audio fade-ins and fade-outs, but that’s about it. Also, did I already mention that the track sync-lock actually works predictably?
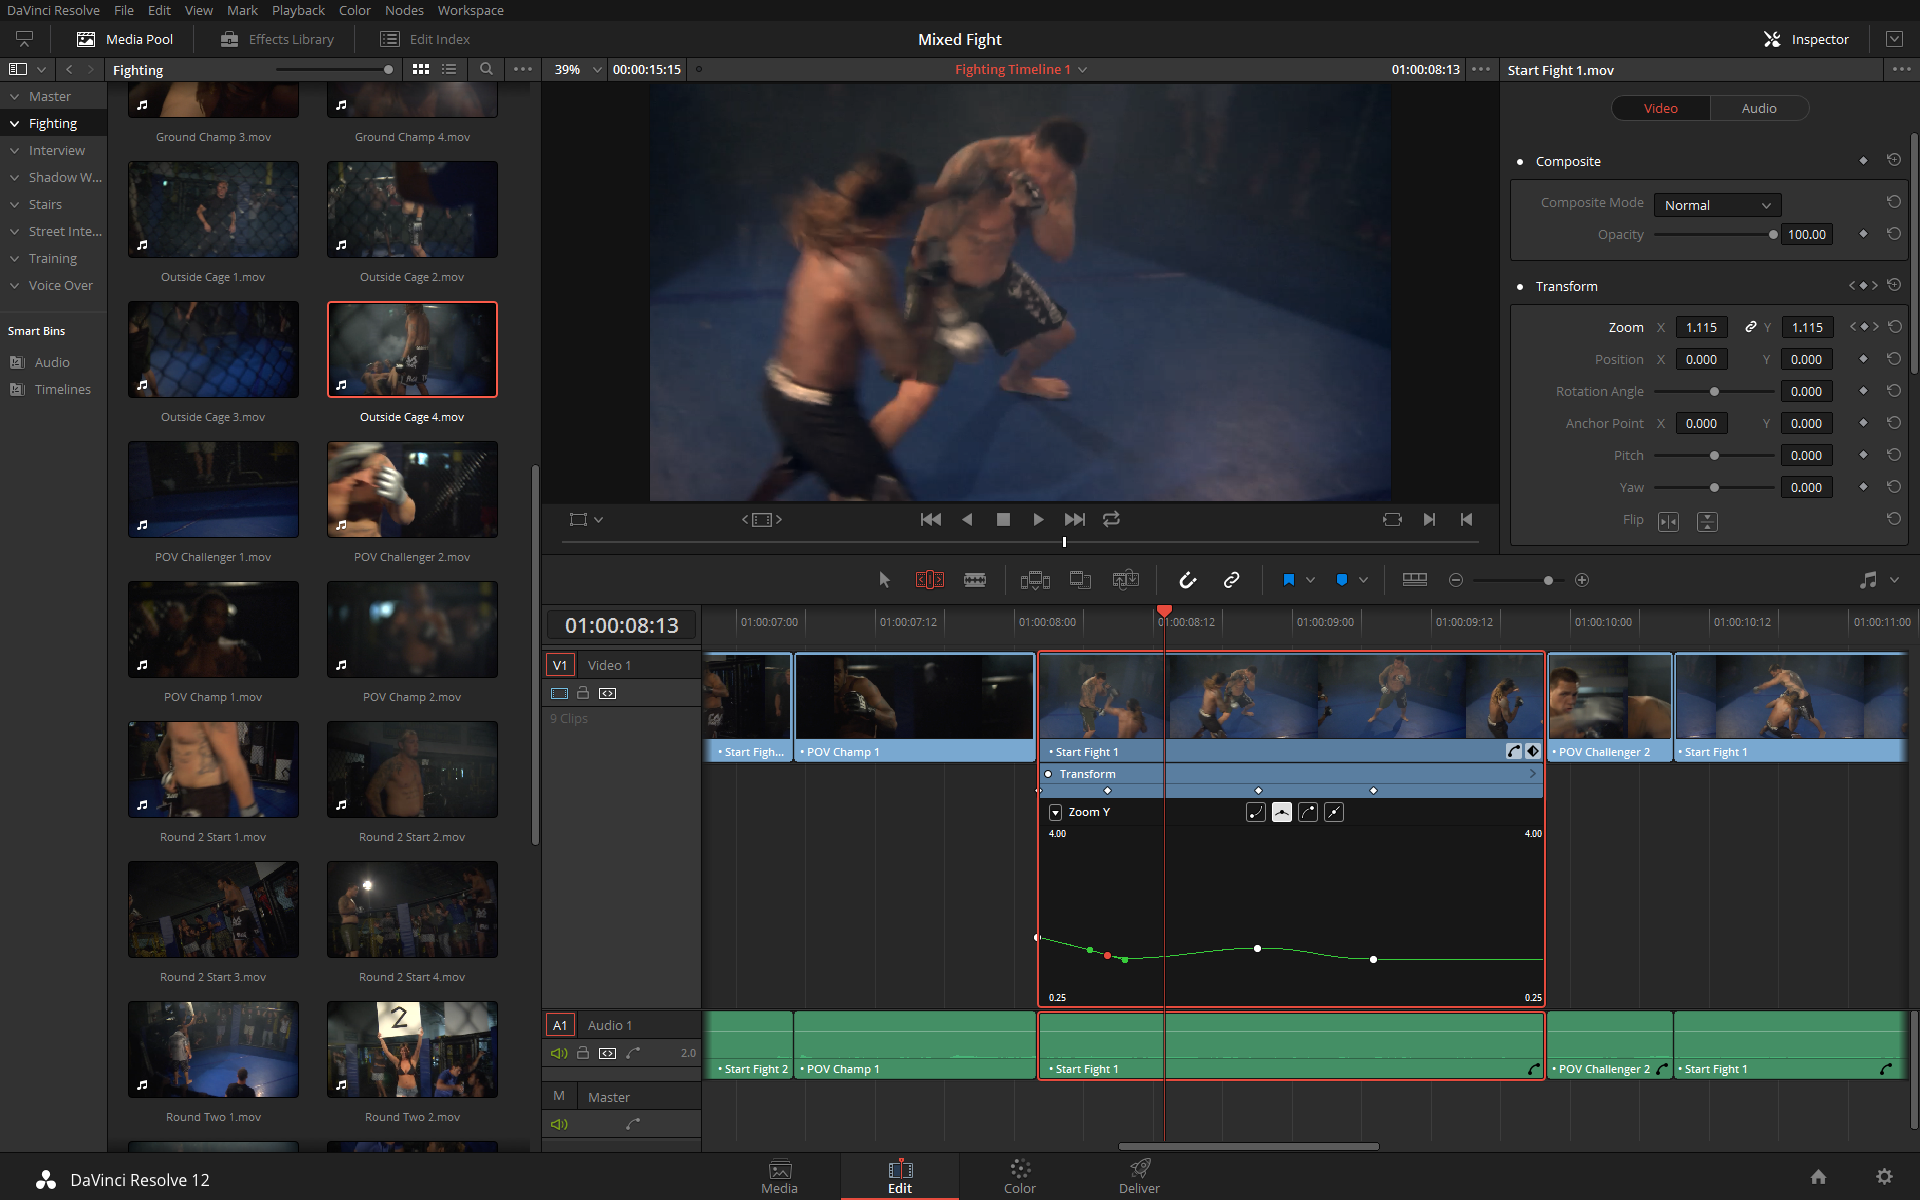
It takes two clicks to get to the keyframe editor, but once you’re there, you don’t want to go back.
Newly added multicam is smooth and nicely done. All the required options, including syncing by audio waveform, are there. Playback is good, switching between the angles does not seem to cause any hiccups. In general, the experience is satisfying.
While a lot of effects, generators and transitions were already present in Resolve 10, most of them of limited use, Resolve 12 adds the “Smooth Cut” transition, an equivalent of Avid’s Fluidmorph, or Adobe’s Morph Cut – a mix between cross-fade and optical flow morphing from form one shot to the next. It does seem to work a bit better than Fluidmorph, and it is not limited to the shots containing visible and discernible faces, like the Morph Cut is. While I’m not often impressed by bells and whistles, this feature alone is sometimes worth the effort of at least moving your edit to Resolve.
Where it excels
Since this piece is dedicated to editing in Resolve, I’m not going to do a detailed overview of grading tools. But there are two things new to Resolve 12 which can help you even at the editing stage. One, there is the Resolve Color Management – among other things it allows you to specify the colour space profile that should be attached to any clip that you bring into the project. It will make sure that the flat footage gets a preliminary correction which brings you into your timeline colour space – for example, making the flat log files more contrasty and saturated, ready for Rec709, DCI P3 or even HDR delivery. Previously this could have been achieved with the use of LUTs, but the downside was that any data that got clipped in the process was lost. Resolve Color Management takes care of it without this drawback.
The second feature that might save an editor a great amount of time is the Shot Matcher. Similarly to its SpeedGrade counterpart, it aims to analyse the source clip, and then attempts to bring the selected clips into line with it colour-wise. For any documentary editor or a person who deals with a lot of footage that is not exposed evenly, it’s a blessing. Of course, at best it can be a starting point for the proper grade, but when you’re editing, the contrast and colour continuity can make for an easier, swifter experience, especially with people not used to ignoring colour differences while watching rough cuts.

The Shot Matcher can be a great time-saver when using a lot of unevenly shot media.
As a grading application, Resolve brings to the table excellent colour management from start to finish, top class grading toolset that now slowly moves into compositing territory, version management, numerous delivery options, remote and collaborative work, and last but not least – control surface integration. While not essential to an editor who just edits, for one who wants to expand into other areas, especially grading, these are a huge benefit, and could be the main reason to start your new projects directly in Resolve. And if you have been using Resolve to grade already, you can now perform creative editing there as well, or move your rough cuts from your NLE, finesse, grade and finish in a single application.
Verdict
What’s my opinion of Resolve 12 for an editor then? Still not there as a pure NLE tool. Not sure if it ever is going catch up to dedicated applications, considering its underlying architecture and limitations. But if you intend to profit from Resolve grading toolset, want to avoid the pain of conforming, don’t want to spend money on a tool you would rarely use, or have a project which does not require you to juggle tons of media, and have a decent piece of hardware to run it on, by all means give it a go. I know a few people using Resolve 12 as a supporting NLE already, and they are praising it.
Resolve has been developing extremely fast, considering that it is only the third version to have editing capabilities. The promises from Resolve 11 have been finally realised in 12. If this trend continues, I believe the new version will have smooth editing experience, and even more interesting features that will help solidify its position in the online/finishing world (including more Fusion integration). This would go a long way towards making it almost a one-stop shop for post-production, from dailies to delivery. And when Tangent Ripple comes out next year, you will most likely see it alongside Resolve in many editing suites around the globe.
If you are interested in learning how to use Resolve, Alexis van Hurkman has recently released another of his tutorials, this time dedicated to editing in Resolve 12. You can get it on Ripple Training website.