The Bane of UI Minimalism

I am appalled at some trends in the User Interface design these days. Touch screen devices became an entrenched market a couple years ago, and suddenly everyone and their mother decided to optimise the User Experience (UX) to take into account this new animal. Nothing bad about the general idea, but unfortunately in some cases the results seem to have been the apparent devolution of the UI design.

see more

Simplicity Overdone

I was hoping to bring you something more than my ramblings about the user interface overhaul in the latest Adobe release, but unfortunately it looks like the interview with the User Experience (UX) team will not be forthcoming, despite initial positive reactions. My impatience has caught up with me, and therefore I present you with the reasons for my vocal criticism of the new UI. see more

D is for “Deselect Before Applying a Default Transition”

The very first thing that you should do… no, let me try again. The very first thing that you must do after installing and opening the new Premiere Pro CC is to set a keyboard shortcut for Deselect All. Trust me. This will save you a lot of trouble later.

This is something that you must do as well, if you think that applying transitions in Premiere no longer works.

Open the Edit menu, choose Keyboard Shortcuts…, and in the search box type “deselect”. Fortunately only one option will be visible, the one that appears in the Edit group – “Deselect All”. Assign a shortcut to it which will be easy for you to remember. I sincerely recommend D , because D is also used to apply default transitions. And if you have used Premiere before CC, you will have to learn this new shortcut combination:  DCmd /Ctrl + D to apply the default video transition, or  DShift + Cmd /Ctrl +D for audio transitions.


shortcut

Set this shortcut right now!

Why?

Premiere Pro CC introduces what is called “the primacy of selection”. Translated to plain English it means, that if you have anything selected in the timeline, Premiere will attempt to use the selection for any operation you choose, disregarding track selections, playhead position, etc. While there is an argument to be made that it’s more effective, more consistent (well, perhaps some day), it is changing the behavior which was long established in Premiere – using the playhead position for applying transitions.

Here’s how the new behavior works: if a clip is selected, and it is between two other clips, nothing happens. If the clip has at least one edit point where it does not touch anything, then the selected transition is applied to the loose ends. And if multiple clips are selected, the transitions are additionally applied between these clips. Not very obvious, right?

before

The clip on track V2 is selected. You might not even notice it. At least I didn’t!

after

And here’s the result – instead of applying the transition to the edit point under the playhead, the selected clip receives the transitions on both sides.

If you are like me, and you select and deselect clips all the time, whether to adjust effects or for any other reason, then this new behavior is going to bite your muscle memory hard. Before you learn the  DCmd /Ctrl +D combination, you will find yourself cursing two times: once when the desired transition does not appear in the place you think it should, and the second time, when during preview you find stray transitions in various places.

This is the collateral damage or “the primacy of selection”. If you forgot to deselect, and want to use the old way of applying transitions – by the track selection and playhead position – then you are screwed, and need to adjust. It does not help to know that this behavior is the result of Final Cut Pro’s inability to select multiple edit points at once, and was introduced there as a remedy to this limitation. Supposedly a lot of FCP users asked for this functionality in Premiere. They got it, and it came at a cost to established workflows. Like the introduction of patch panels in CS4, only more mischievous, because the results may not be immediately visible.

before-2

Here the selection is a bit more obvious. Watch what happens, when the shortcut is pressed now.

after-2

The transitions are applied at the end, and in between the clips. Remember to learn the new combination of keys – D, cmd/ctrl+D – if you want to use the playhead to apply the transitions.

To add confusion, there is a keyboard shortcut to “Apply Default Transition to Selection”, which works exactly like Apply Default Transition if clips are selected, although it applies both audio, and video transitions.

My little mind can’t comprehend the idea behind this change, especially since I’m not the only one who was taken aback upon the first encounter with the new behavior. But I know of others who are happy about it, and I found some use of it as well… only to encounter a stray transition during the final viewing of a recent production.

So remember – D , Cmd /Ctrl +D is your new shortcut for Apply Default Transition at the Playhead.

The Case For Three-Button Mouse Editing

RzrNaga2012_view3Mouse-driven editing has usually been associated with the lower end of video editing, and to a certain extent justifiably so. If I see a person using only his or her mouse to edit, I don’t consider them very seriously. Editing is a tough job, and a human being has two hands, so why not put both of them to work? Put that left hand on the keyboard right now!

The question of whether the right hand should spend more time there as well or not is debatable. Even though I have been driven through CS6 mixed bag of innovations to make more extensive use of my touch-typing skills during editing, I am still looking to improve on the mouse side of things, because the hybrid mouse + keyboard editing has been historically the fastest way to use Premiere.

When it comes to mouse mastery, nothing can beat 3D artists, especially modellers. The necessity to constantly change the point of view in three dimensions clearly showed that not only a single mouse button is not enough, but that even two will not suffice. You need a 3-button mouse to work in a 3D application. Period.

Granted, using the middle button with most mice is something that requires a bit of practice, since often it entails pushing on the scroll wheel. However, the newly acquired skill gives you more flexibility, and options. Why then not use a 3-button mouse in editing? And why not take advantage of the fact, that pushing the middle button is not as easy, as pushing the other ones?

One thing that I found myself using a lot during mouse-driven editing was delete and ripple delete. Even after remapping my keyboard, it still remained a two-click process. First select the clip, then hit delete. Fortunately you can use both hands, but still, there is some space for optimization here. The middle mouse button could be used to perform a single click ripple delete.

Another idea for middle mouse button is to map it to “Deselect all”, and it might become pretty handy with the incoming CS Next confusion about the primacy of selection over playhead, or targeted tracks for example during applying transitions.

Both of these options are available now via many macro recording and automation pieces of software. Personally I use the ones that came with my mice – either Microsoft’s IntelliMouse or Razer Synapse. They both allow remapping the middle mouse click for certain applications to a macro or a shortcut key (and much more, if you wish to explore them further). Therefore I first make sure to create the keyboard shortcuts to “Ripple Delete” or “Deselect All”, and then to map these shortcuts to the middle mouse button. And voila! Single click ripple delete or deselect all are literally at your fingertips now.

The quest for ever more efficient editing continues, and I hope to have some exciting information for you soon.

A frame too far…

In late September 1944 Field Marshall B. L. Montgomery, a very bold and talented British commander, led an ambitious offensive whose objective was to force an entry into Germany over Rhine. He aimed to  capture a series of bridges with the help of paratroopers, who would have to defend them until the main forces arrived.

Him and Premiere Pro have a few things in common: they are both audacious and tend to overreach. Monty’s boldness and wits won him a few battles, especially during his campaigns in Northern Africa. However, in this case his arrogance went a bit too far. Similarly, Premiere Pro also has its Arnhem moments.

Premiere has always included the current frame in the in/out timeline selection, but until the latest release, it has not bothered me much. CS6 introduced a plethora of new features, which made me change my previous workflow from mouse and keyboard driven to more keyboard oriented, mostly due to the new trimming interface, and the unpredictability of the ripple tool, making the problem more pronounced.

A frame too far…

The joys of old

It used to be, that the arrow tool ( V ) allowed me to perform about 80-90% of operations by having the mouse in my right hand, and the left hand on the keyboard close to the Ctrl (that’s Command for you, Mac people) key. If I wanted to trim, the arrow tool would intelligently turn into the trim cursor, when it approached the edit point. If I needed a ripple trim, I would press Ctrl , and I would always get the ripple trim tool for this operation. Then let go of the modifier, and I’m back with the arrow. If I wanted to adjust audio levels, the arrow tool would allow me to raise and lower the value in the timeline, while Ctrl would add keyframes, and allow to manipulate them. The only actual tools I used were rolling trim  (N ), slip ( Y ) and slide ( U ). Rarely rate stretch ( X ), as handling the speed changes by Premiere for interlaced footage is pretty uninspiring, and from time to time track selection tool ( A ). I don’t remember ever needing the tool palette, and found myself constantly switching it off to save some screen real estate.

Easy and fast. Combine that with a few shortcuts to add default transitions, and it turns out that using mouse and keyboard seems to be the most efficient way to go. The simplicity, ease, and flexibility of the timeline manipulation in Premiere was amazing. And for anyone using this method, opening Final Cut Pro legacy was sometimes pretty annoying. And Avid, especially before MC5? Don’t even get me started…

The mixed bag of the new

Then comes Premiere CS6 with its ability to select edit points, and improved trimming. And suddenly, this old workflow seems less and less viable. The hot zones for edit point selections are pretty wide. One has to be careful not to suddenly click on an edit point, because then the trimming mode will be activated, and ctrl will no longer act in predictable manner, giving you the ripple trim as you’d expect. It will change its behavior based on what is selected, and in general make manipulating timeline with a mouse much less efficient.

It’s understandable then, that I found myself drifting more towards the keyboard-oriented workflow, using trimming mode ( T ), setting in ( I ) and out ( O ) on the timeline, and finally learning keyboard shortcuts for lift ( ; ) and extract (apostrophe) – something, that I never needed before, because ripple delete, razor tool  (C ) and add edit ( Ctrl+K remapped to Z ) were simply quicker. I even started to enjoy the new way of doing things.

And all would be fine and dandy, were it not for the already mentioned fact, that Premiere marks the currently displayed frame as part of the selection. Which means, that if you position your playhead on the edit with the nicely defined shortcut keys (up and down arrow in my case), and press O to mark the out point, you will include also a single frame after the cut.

This is a bit problematic.

I admit I have seen it before – this has been the standard behavior of Premiere from the beginning – but because I hardly ever used in and out in the timeline, this has not bothered me much. However, when the selection started to become the core of my workflow, I found it terribly annoying, and slowing down my work. When I do any of the following operations, I need to constantly remind myself to go back one frame, to avoid the inclusion of the unwanted material:

  • lift and/or extract,
  • overlay edits with in/out in the timeline,
  • exporting based on the in/out selection.

I enjoy editing in CS6 a lot, but this “feature” literally keeps me up at night. It’s such a basic thing, that even Avid got this one right… When the playhead is positioned on an edit point, the out point is selected as the last frame of the incoming clip.

Why then does Premiere behave like Montgomery and has to go one frame too far? British Field Marshall also wanted to eat more than he could chew, and in the end he had to withdraw. Every time I have to go back a frame, I feel like I’m loosing a battle. Why?

Not one frame back, I say!

Enhance your Premiere Pro productivity – keyboard shortcuts galore

There’s a tip that I wanted to share with you, which increased my productivity with Premiere Pro tremendously. And it’s very simple: customize your keyboard shortcuts. But make it wisely.

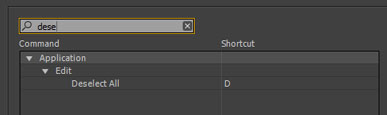
First tip: make use of the search box which is present in Keyboard Shortcuts dialog in Premiere. There is a ton of shortcuts, and if you know the proper name, or even part of the name, it’s easier to type it in the search box, and browse among the remaining entries, than to wade through all the options.

First and foremost – track selection

Separated from source patching in CS4, constantly improved, but still hardly perfect, track selection tends to be one of the most annoying things if you don’t remember about it (like wondering why match frame shortcut does not work). It has also been pretty cumbersome. But in CS5 we got a nice addition that allows us to finally make it more of a feature than a nuisance.

Assign keyboard shortcuts 18 to Toggle Target Video 1-8. By default they are assigned to multicam, and if you are doing a lot of multicam work, you might consider remapping your Select Camera shortcuts to F1F12 . This way you will overwrite the defaults for help (F1 ), capture (F5 ) and batch capture (F6 ), but the chances are you’re not using them very much, and if you do, simply find a better place for them. Like Shift+Ctrl+Alt+H 😉

Then assign 9 to Toggle All Target Video On, and 0 to Toggle All Target Video Off.

Track selection is vital to every editing operation in Premiere, and once you get used to the new shortcuts, I assure you, that you will never go back, and will be ready to strangle anyone who would like to take it away from you.

Perhaps you might also find it useful to assign Toggle Target Audio 1-8” to Ctrl+1 to Ctrl+8 , although personally I found myself using only the shortcuts to Toggle All Target Audio On/Off (Ctrl+9 /Ctrl+0 respectively).

Be mindful that shift+number shortcuts are assigned to panels, but if you change them you will not be notified about it! And there will be no undo, you’ll have to revert these changes manually.

And while we’re at it, why not map labels to Ctrl+F1 and further on? It’s a bit more complicated, you need to navigate to Edit->Label in the keyboard shorcuts dialog, and then assign keys to each label, but it also might be pretty helpful at times.

Manipulation of In and Out Points

Setting the In (I ) and Out (O ) are pretty decent standards, but some of the other shortcuts in this area are suboptimal, considering the fact that you need to perform thousands of this kind of operations a day, and adding half a second to press Shift , or even Shift+Alt+Ctrl is a pain. This time it’s worthwhile to take example from Avid, and get these under your fingertips.

The most important one: Clear In/Out – map it to G . This used to be Premiere’s default before FCP users started to put pressure on Adobe to adopt their  keyboard mapping.

Clear In and Clear Out is not something I use very often. If I want to change the In, I just set an In in another place. However, if you find yourself using them often, E and R seem to be pretty good places to put them.

On the other hand Go To In, and Go To Out tend to be useful, and I map them under Q  and W .

Mark Clip also tends to be useful for many reasons, gap removal included, and I tend to have it under the slash key / . Mark Selection – not so often used, I map it to Shift+/ .

Setting Render Entire Work Area  to Shift+Enter is worthwhile. I generally turn off the work area, and use In and Out, and this option is replaced with Render In to Out in my workflow, but the shortcut stays the same.

A few more tips

An idea that navigating markers should use the M key is quite alien to me. I prefer having Go To Next Marker as Ctrl+PgUp , and Go To Previous Marker as Ctrl+PgDn . It frees the M key for more important things, like for example assigning Edit Marker to Shift+M .

Another function that I often use is Add edit, and Add edit on all tracks. Default Ctrl+K  is not necessarily so bad, but it still requires at least two fingers. Let’s reduce it to one. Throw out the zoom tool shortcut (honestly, when did you last time use that one?), and assign Add edit to Z , and Add edit an all tracks to Shift+Z .

Speed/Duration and Audio Gain – who says that invoking dialogs needs a modifier key? Map them to D and H respectively. Who cares about the hand tool anyway?

Ripple Delete – default Alt+Backspace is almost fine, but why not map it to the del key itself? You’ll have to remember that the Backspace and del will then have different behavior but I think it’s worth it. I would map it to backspace, but then it interferes a bit with the way project panel works, so delete is the way to go for me.

Two real kickers and trimming

The next two will save you tremendous amount of time during editing. I used to perform this operation with a mouse – when I felt that I had to make a cut, I ripple-trimmed my next edit point by dragging it with a Ctrl key pressed (which was BTW the best timeline interaction I’ve ever had with any NLE) – and now I can do it without, saving quite a lot of time. There are two great shortcuts that should again be at your fingertips by default:

  • Ripple Trim Next Edit to Playhead]
  • Ripple Trim Prev Edit to Playhead – [

They take time to get used to, because the shape of the characters is opposite to what it does, but their position is correct. I still sometimes press the incorrect one, but they are a real timesaver, especially in connection with track selecting. However, if you find yourself thinking too much, you might consider switching them, and seeing if it doesn’t work better for you.

There are also two of the less often used – Extend Next Edit to Playhead and Extend Previous Edit to Playhead, which I tend to map to Shift+] and Shift+[ respectively.

I have never used Extend Selected Edit to Playhead. Ever. Perhaps I still don’t know something about editing, but I have not come upon a situation where I couldn’t replace it with any other available option.

Sometimes however I find it useful to immediately move to the nearest edit point and select correct trim mode. Therefore I usually map the following:

  • Select Nearest Edit Point as Ripple In to Ctrl+]
  • Select Nearest Edit Point as Ripple Out to Ctrl+[
  • Select Nearest Edit Point as Trim In to Shift+Ctrl+]
  • Select Nearest Edit Point as Trim Out to Shift+Ctrl+[

Transitions

For a moment I toyed with an idea to assign D to Apply Default Video Transition, but I decided against it. I needed other shortcuts much more, than I needed the transitions.

Interestingly, in CS6 you can specify a separate shortcut to add each of the following transitions:

  • Audio Crossfade
  • Video Crossfade
  • Dip To White
  • Wipe

If you tend to use any of these, definitely apply a shortcut to it. Also, if you use any other transition often, like for example Dip To Black (why it’s not in the list I have no idea), then use this one as a default transition, and apply a shortcut to Crossfade. Possibilities are really interesting, and I sincerely urge you to explore them.

Finally

Here is the .kys file for all of you lazy and impatient people to download:

Bart's keyboard shortcuts (14827 downloads )
Feel free to use it and distribute it as you wish. However, I strongly urge you to explore keyboard shortcuts on your own.

To install the shortcut keys you need to exract the .kys file to the following folder (substitue $username and $version for appropriate values):

  • c:\Users\$username\AppData\Roaming\Adobe\Permiere Pro\$version (Windows)
  • ~/Library/Application Support/Adobe/Premiere Pro/$version (OS X)

I hope you’ll find these tips as useful, as I do. Enjoy.

Three features that would make Adobe Bridge useful for video review

In the video world Adobe Bridge tends to be under-appreciated. It’s true, that it was mostly designed to work with stills and assets for web development or desktop publishing. But it does have some rudimentary video preview options that most people are unaware of.

First, there is a possibility to play the video files. After clicking a video file, you will see a little playback control appear in the preview area. The control however is very basic, and makes it really hard to navigate to a specific frame, or to do anything sensible with it, for that matter

Secondly – there is an option to group pictures into so-called stacks, and set the frame rate at which the stack will be played. Simply select the whole image sequence, press ctrl/cmd+g, and voila! The stills will disappear and the thumbnail will change, giving you the possibility to see how many frames there are (upper left corner), and to play it back (the icon and slider above). The frame rate can be set by going to Stacks->Frame Rate and selecting the proper number.

Unfortunately, you can’t play the sequence in the preview area, only in the thumbnail area – I have no idea why.

I have three ideas that would make Adobe Bridge into a sensible video review tool.

  1. Frame by frame playback for video files in full screen mode using simple keystrokes.
  2. Video scrubbing like in Premiere Pro CS6.
  3. Possibility to add markers and comments for a given frame or a number of frames, which later on would be read by Prelude, Premiere, After Effects and other Adobe applications. Similar functionality was present in Adobe Clip Notes and  later in Adobe CS Review that was discontinued in April 2012. I guess it is coming back in another form to Creative Cloud, but right now we’re left in a void.

And come to think of it – why only markers? Why not set an in-point and an out-point as well? And integrate with Adobe Anywhere? Huh?

For those who are interested in supporting my ideas, here’s the link to the idea on the photoshop.com, where you can vote it up, so that people in Adobe community notice it.

Adobe conforming tool – my vision solidifies

I have been pondering over my recent discussion with David McGavran, the Engineering Manager for Adobe Premiere Pro about the limitations of Premiere’s own XML format when it comes to interchange. I am grateful for this exchange. I realized that my ideas are not possible to be implemented in Adobe Premiere Pro itself. After all, it is a relatively uncomplicated tool with the sole specialization in editing. I hoped it could become a Smoke-like base for other applications to work from, but it turns out not to be feasible in any foreseeable future.

However, instead of letting go of my dreams, I decided to take a wider look on the problem, and paint the vision in even broader strokes. Fortune favors the brave.

Right now the Production Premium suite is still a patchwork of applications with significantly different structures stemming from various technologies that Adobe acquired along the way. The interchange between them is sometimes very good (especially with Photoshop files), but sometimes mediocre (like sending Premiere project to SpeedGrade), and often limited to a single workstation running all the applications (like the Dynamic Link). Even though I remain amazed on how much Adobe Engineers have been able to achieve within the limitations of software architectures, some dating from over 20 years ago, there are times when the integration is still sorely lacking.

With recent switch in Adobe policy towards the Creative Cloud solution it makes even more sense to give broader structure to this patchwork of loosely related applications, especially in the world of post-production, where the effective teamwork, alongside with project and asset management are some of the vital keys to success.

Adobe had already made an attempt to create an asset management system in the past, although it turned out to be a dead-end. I don’t know the exact reasons why they cancelled Version Cue in CS5, but for me and a few companies that I worked for at the time, the issue was stability. After three consecutive crashes of VC database, and literally days of attempts to recover the assets, we gave up on this quite promising solution. Clearly it was not production ready, even after a few years of work.

The void however remains, and the suite still lacks an application that would bind everything together, at least in post-production world: a comprehensive project management, and conforming tool.

Let’s take a look at a sample, deliberately vague workflow involved in film post-production:

  1. Dailies ingest and grading
  2. Rough Cut
  3. VFX work alongside the editorial
  4. Audio engineering and mixing
  5. Final grading
  6. Finishing and mastering

Hopefully there is a picture lock between 3 and 4, however the pride of Adobe has always been the possibility of retaining flexibility up to the very end of the process, and personally I would love to retain it.

Even though the production suite does contain the applications that can take care separately for each part of the process, tying them all together mostly still involves at least a well thought out folder structure, and perhaps a third-party asset management tool, and is prone to human error, especially during backup and archiving and in an environment involving more than one person. Any sensible version control is also lacking, and when it is implemented in a rudimentary fashion (raising version number in After Effects project file name) it can break other dependencies, like Dynamic Link.

What would the missing application need to do?

  1. Media ingest, transcoding and metalogging – similarly to Prelude but also importing from already partially created Premiere project if some editing was done in the field already
  2. Sending media to SpeedGrade or via FCP XML to any other grading app
  3. Receiving graded media either with .look files or as color corrected new versions (ie. track versions of a clip regardless of its filename and/or extension)
  4. Sending media to Premiere projects, supporting templates and bin organization
  5. Conforming Premiere projects with graded media and relinking without opening Premiere
  6. Preparing and managing assets for VFX work in AE or Photoshop on a shot by shot basis with templates and bin organization
  7. Tracking versions of VFX assets, including rendering and review
  8. Reviewing and exporting Premiere sequences without opening Premiere
  9. Conforming Premiere projects for FCP XML or AAF export and import and keeping track of conformed/rendered files
  10. Re-conforming XML or AAF import for Premiere
  11. Outputting any project from any of the suite apps
  12. Archiving and backup options for projects
  13. Managing meta-assets like templates, grades, presets, user preferences and other
  14. Possibly a few other important things that I forgot to include

All of this – of course – with the possibility of working with many users, many separate workstations, and in both stand-alone and integrated version.

In the end, I’d love to have the functionality or integration with Shotgun or any other “big iron” project management system. Right now it is partly being done with the use of Panel API that Adobe has added in CS6 to Premiere, but it’s just a single application patch, which works only in certain kinds of workflow. Granted, it’s a step ahead – and I hope that fully-featured scripting is the next big step in proper direction – but it’s still not enough.

Am I asking for too much? A lot of the necessary bricks seem already in place. I hope that you can see how such an application would contribute towards even greater usability of the Production Premium suite, especially in the more collaborative environment. Even though it seems like another patch on top of the patchwork, it would be more like a gate to the outside world, and a useful internal interchange manager, rather than half-hearted attempts to fix problems on the level of a single application that leave some of us wanting.

Is it feasible to give more structure to the patchwork of Adobe Production Premium? Can Adobe Engineers do it by theselves, or should they acquire a technology that is already somewhat mature like CatDV? Who knows. However, perhaps passing these ideas to Wes Plate or other brilliant guys on Adobe team would make them excited enough about such development project, that they would be interested in following it, and that the management would consider such a project worthwhile. Think big, Adobe! Audaces fortuna iuvat!

Exporting FCP XML from Premiere is a dead end

To give credit where one is due, the creators of Final Cut Pro did create one of the more popular standards of exchanging the project information, alongside the old EDL, and Avid’s AAF and OMF. Exporting XML from FCP was very versatile and allowed for various workflows to appear, passing data from FCP to Soundtrack Pro, and Color, but also to many other applications from vendors other than Apple.

For many years Adobe also tried to implement project sharing via exporting to AAF, and FCP XML. However, the exporting and reimporting still remains a pretty troublesome process, regardless of how much Adobe touts their horn. Many transitions can’t be converted, most of the effects do not translate, and there are problems with stills, time remapping, and Dynamic Link compositions. Not ideal under any circumstances.

People accustomed to XML interchange push Adobe to do a better job in this exporting – rightfully, especially in the short run. However, being so focused on their workflow, they seem to be unaware that there seems to be a better option, right around the corner, and that even Apple already considers FCP XML a legacy. The more time passes since the demise of FCP 7, the more constraining FCP XML will become, and with no support in development from Apple, the stagnant standard will at some point become problematic.

This is where the unrealized potential of Adobe Premiere comes in. Many people are not aware of the fact that Premiere’s project files are already XML! There is no need to export anything anywhere, the file is easily readable – and writeable! – by any application. Of course, it is not compatible with FCP’s implementation of XML, and its documentation is not publicly available in any way, but – as I wrote in a few of my earlier posts – the basis for the universal interchange container are already in place. The only thing that stops other vendors from accessing Premiere files is the lack of specification and – more likely – lack of demand from the users and lack of aggressive promotion of this de facto standard on the part of Adobe.

Therefore, instead of putting most resources into – mostly futile – attempts to translate Premiere sequences into FCP XML sequences to make them readable by other applications, why not promote Adobe XML standard that is already present?  This way we would get rid of numerous hurdles on the way, avoid all the problems and limitations of FCP XML, and in the end create the possibility for new, more flexible workflows.

Are you listening, Adobe?