Farmacie online Farmacia Millefolia cu cele mai bune prețuri din România.

Joining Forces with Cinema Grade

Some time has passed since I told you that I’m back in the game. And in the meantime this happened: Cinema Grade for Windows. As you can see, I am again directly involved in reducing your pains in using color grading tools during editing. Take a look at that Kickstarter page and then come back, I’ll tell you a story of how it came to pass.

see more

The Inevitable Convergence III – The NLE/Grading Edition

With the introduction of Resolve 12, suddenly the race towards a unified NLE/Grading tool become very interesting. It’s hard to argue, that colour correction and grading became an integral part of post-production workflow. It’s also seemingly one of the low-hanging fruits, as opposed to visual effects and audio. Let’s see what is going on for all major players in this regard.

see more

No smart rendering in Premiere Pro?

SIYAH: Premiere Pro for rendering divides the timeline into sections based on clips and edit points. If you cancel the rendering process it discards the results of the section that was being rendered at the time, not the whole render.

Many people who switched from Final Cut Pro to Premiere are thrown off by the fact that if they cancel rendering, Premiere seems to throw away what has been rendered so far. At least this is the impression that you would get listening to several opinionated individuals like Chris Fenwick (whose point of view I like to listen to, especially at the Digital Convergence Podcast, even if I disagree with him from time to time). However, the way Premiere handles renders is a bit different.

First, let’s give credits, where they are due – Final Cut Pro had a great feature: when you stopped rendering, it did not discard anything that you rendered. I wish Premiere were as clever as that.

However, not all is rotten in the state of Denmark. The way Premiere handles rendering might not be as clever as many would like, but it is not as dumb, as this single problem might lead you to believe.

In the rest of my article I’m going to assume that you indeed have to render clips in question, especially since Premiere does so much stuff in the real-time these days.

Premiere handles renders on the sub-clip basis. At the simplest level, the timeline is divided into sections based on clips’ visibility and edit points. Therefore each applied transition creates its own section, because it consists of two clips. Also, if you stack clips one on top of the other, each start or end point on the top layer creates a new render section. Opacity and blending modes are a bit more complicated, but it mostly comes down to which edit points and transitions are visible. Once you understand that, it’s really not that complicated.
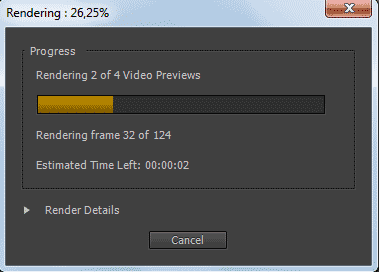
Premiere Pro divides the timeline into sections called Video Previews, and after cancelling discards only this section that was being rendered at the time. All the remaining previews are kept.

Take a good look at Premiere’s render progress window, and apart from the number of frames, you will also see the number of video previews – this is the amount of sections that the selected part of the timeline was divided into. If you cancel your rendering at any point, you lose “only” what was rendered within the last clip. Granted, if this was a long – or time consuming – part, you might be a bit unhappy, and justifiably so. However this is a bit different, than the picture painted by a few prominent individuals.

What is perhaps most funny is that at least some of the code necessary for the so-called Smart Render is already in place. If you start rendering in the middle of a clip (via Render Work Area or Render In To Out options), then the new section will be created at the point where the render started. Rendering will also stop at the end point, even if it is in the middle of a clip. So partial renders are already possible. It’s just that for some reason these few lines of code necessary for saving them after hitting “cancel” are still waiting to be written. Hopefully not for that long.

That said, there is one exception, when you can indeed lose all your currently rendered files – it happens if the application crashes (unlikely, however possible), and/or if you don’t save your project after render. The render files will be present on your drive, but there will be no way to link them, because Premiere did lose reference. Come to think of it, unless the render sections’ IDs (and filenames) are calculated randomly, there is little reason for it, and it should be possible to find the missing render files and relink them even after a crash. A feature request perhaps?

Another not so clever way of handling renders is the visibility problem – if you have two clips stack upon each other, even of the base layer is not visible, and you manipulate it, for example by changing an effect underneath, Premiere will force you to render again. Which is plain stupid in my not so humble opinion, and if my memory serves well, it was not always the case, although I might be wrong.

Premiere’s rendering however is smart in a different way – it does not lose what it once rendered. If you stack two clips one upon another, add some effects, render them, and then move them or change the keyframes, it will of course make you render again. However, if you move the clip back at some point, change the keyframes back, or in any other way return to a previously rendered state, Premiere is wise enough to bring back the rendered files. Good luck trying it with FCP with anything except an immediate undo!

That said I am waiting for the moment when Premiere Pro embraces Really Smart Rendering, perhaps on the par of Global Performance Cache in After Effects, Background Rendering on the par of Digital Vision Film Master (which unlike FCP X does manage resources and allows you to work during rendering) and Smart Auto-Save during render. At that point the editing is going to be strictly fun, and you’d better enjoy it, because your coffee breaks will be gone 🙂

Exporting FCP XML from Premiere is a dead end

To give credit where one is due, the creators of Final Cut Pro did create one of the more popular standards of exchanging the project information, alongside the old EDL, and Avid’s AAF and OMF. Exporting XML from FCP was very versatile and allowed for various workflows to appear, passing data from FCP to Soundtrack Pro, and Color, but also to many other applications from vendors other than Apple.

For many years Adobe also tried to implement project sharing via exporting to AAF, and FCP XML. However, the exporting and reimporting still remains a pretty troublesome process, regardless of how much Adobe touts their horn. Many transitions can’t be converted, most of the effects do not translate, and there are problems with stills, time remapping, and Dynamic Link compositions. Not ideal under any circumstances.

People accustomed to XML interchange push Adobe to do a better job in this exporting – rightfully, especially in the short run. However, being so focused on their workflow, they seem to be unaware that there seems to be a better option, right around the corner, and that even Apple already considers FCP XML a legacy. The more time passes since the demise of FCP 7, the more constraining FCP XML will become, and with no support in development from Apple, the stagnant standard will at some point become problematic.

This is where the unrealized potential of Adobe Premiere comes in. Many people are not aware of the fact that Premiere’s project files are already XML! There is no need to export anything anywhere, the file is easily readable – and writeable! – by any application. Of course, it is not compatible with FCP’s implementation of XML, and its documentation is not publicly available in any way, but – as I wrote in a few of my earlier posts – the basis for the universal interchange container are already in place. The only thing that stops other vendors from accessing Premiere files is the lack of specification and – more likely – lack of demand from the users and lack of aggressive promotion of this de facto standard on the part of Adobe.

Therefore, instead of putting most resources into – mostly futile – attempts to translate Premiere sequences into FCP XML sequences to make them readable by other applications, why not promote Adobe XML standard that is already present?  This way we would get rid of numerous hurdles on the way, avoid all the problems and limitations of FCP XML, and in the end create the possibility for new, more flexible workflows.

Are you listening, Adobe?

Premiere Pro positive

Some of you might wonder why do I keep complaining about Premiere Pro, and not move to some “more professional” software like FCP or Avid.

It so happens that there is a number of features that Premiere Pro has, which make it a really great tool for video editor like me who often needs to work on a project from start to finish – from ingest to distribution – under a relatively tight time constraints.

I like the fact, that I can do 90% of my audio in Premiere Pro – it has basic mixing tools, automation and support for VST plugins for whole audio tracks, works in 32-bit, and even though the basic plugins are of mediocre quality, one can always supplement them with more advanced ones, and the output is usually acceptable. I certainly could achieve better results in Audition or Protools, but in most of the cases there is no need to. Also there is no problem with importing most of the audio files format (good luck handling mp3 files in FCP), although again Mac version does have some strange issues with audio that was not sampled in 48k, and the workaround is simply moving to PC or converting the files. It might be hard if your operator used 32k sound though…

Speaking about various formats – CS5 is really amazing at handling almost anything that you throw at it – image sequences, AVCHD, AVCCAM, DVCPRO, XDCAM, RED footage… Call it what you will, PPro will swallow it, and allow you to work with it without the need to transcode the files. If you want a professional intermediate, you can always obtain Cineform codec or on Mac even use ProRes. But there is no need to – and it is a huge timesaver.

It is especially true with CS5 and CUDA graphic cards. I put a few XDCAM EX clips in a sequence, and on an i7 PC with GTX 460 I threw some of the color correction filters that I routinely use. Fast Color was a blast – no wonder, it always is. Luma Curve was a blast – nice. Three-way color corrector – no problem. Seven additional Three-ways? You bet CS5 could handle them in real time. It gave up only after I threw four more Luma Curves just to see how much is too much. I got a few seconds of playback, and then it stopped. Whew. Essentially, anything that I would be needing will be handled in real time… on a PC. If I wanted the same for Mac, I would either have to buy an outdated and no longer supported nVidia 285 or a Quadro which costs over $1000.

Color correction in Premiere is certainly not as easy and streamlined as in dedicated tools like Color or daVinci, and I must admit that basic CC is much better resolved in Avid, but still, you do have presets, you do have most of the tools that you need (basic color corrector, three-ways with secondaries, luma and rgb curves, keying and other important stuff). There are a few things missing – vignettes or saturation curve – but these can be remedied by installing additional plugins like Colorista.

I must admit, that I miss real-time scopes. All the scopes are present in Premiere, but they don’t update during playback, which is a pity. Kudos go to FCP for having those, and also for icons on color correctors to copy settings to next or second next clip on the timeline. In Premiere changing your settings in the clips is a little more troublesome. However, at least you don’t have to double click them to see their effects control window, like you have to in FCP.

Premiere also has great management of render files. FCP can loose them upon any movement on your part, and if you combine it with the FCP’s tendency to force you to render almost anything that is not a color-corrector or a transition, it can be a major drawback. Premiere remembers the position of files and filters, and there is always a chance of going back, if the clips realign themselves properly, even in a different place in the timeline. Huge, huge advantage.

What I like about Premiere the most though is that it is really the most flexible editing software that I have ever used. FCP is not so close second, Avid, even with the recent updates, still lags far behind. Work really goes fast (when there are no nasty surprises on the way), much faster than in the rest of them. Even though I’m pretty proficient in operating both FCP and PPro, I find the latter smoother, quicker and more intuitive to work with.

Therefore the only reason I’m whining so much is that this certain piece of software could have been much more reliable, and much better, if it was free from the bugs and weird gotchas that tend to happen from time to time. And if the Mac version did have all the plugins and transitions that are available on PC… oops, I did it again. Sorry 🙂