Look At My Video

The days of using Vimeo or Dropbox for video review are very quickly coming to an end. True, it still works, and in many cases it is still free of charge, but the only thing that either of these two offers is the ability to play the uploaded video files or download them. These days we want more than to pass notes over email.

see more

Rumours That Leave Some Terrified…

When the news first came out that The Foundry is going to be available for sale in 2015, and my friend told me that there were rumours that Adobe might be interested in acquiring it, at first I dismissed it as rather unlikely. However, this week, first an Adobe employee tweeted The Foundry’s reel, and soon after an article in Telegraph confirmed this possibility, which makes things almost official.

Some of the early tweeter world reactions were not very enthusiastic, to say the least:

twitter

If you are familiar with the profiles of these two companies, the initial wariness is understandable. Adobe delivers tools for everyone, while The Foundry has been traditionally associated with high-end workflows for larger visual effects studios. Perhaps the dismay of some The Foundry users comes from the fact, that The Foundry does not really need anything from Adobe to supplement their great products in the niche that they positioned themselves at. Were it not for the venture capital (The Carlyle Group in this case) that simply wants to profit from their investment, there would hardly be any interest for The Foundry in mingling with Adobe. From Adobe’s perspective though, acquiring The Foundry is a perfect opportunity to fill in the areas, which have always been their weak points – true 3D (Modo, Mari, Katana) and high-end compositing (Nuke).

Personally I would not mind having an additional set of icons added to my Creative Cloud license. Depending on how this (potential) marriage is handled, it can be a beginning of something great, or a potential disaster to some. I am cautiously optimistic.

Both companies have their own mature line-up of products that are mostly self-sufficient. The real challenge is immediately obvious: integrating these is not going to be a piece of cake. For example, Adobe’s internal scripting platform revolves around JavaScript, while The Foundry’s is centered around Python. These are not compatible in any way, shape or form. Adobe has their own UI framework called Drover, while The Foundry is using a Linux-gone-multiplatform standard of QT. This is also very unlikely to change, and perhaps shouldn’t. To cater for the needs of large studios, The Foundry delivers not only for Windows and OS X, but also – and perhaps most importantly – for Linux. This is an area where Adobe has arguably limited experience – they released one version of Photoshop for Unix once, which was subsequently discontinued because of a total lack of interest. Will Adobe then have to develop at least the Creative Cloud Desktop application for Linux to handle licensing? This might be interesting.

The questions appear almost instantaneously: what will happen to the alliance between Adobe and Maxon, when they acquire their own 3D software package (Modo)? If Nuke becomes the main compositing tool for Adobe, how it will impact the development of After Effects as a platform, and what will happen with quite a few compositing plug-ins? This is the most obvious place where these technologies can clash, and some third-party developers might be left out in the cold. How much of the development power will be focused on integration, and creation of Dynamic-Link engines in all applications that talk to each other, as opposed to implementing new, cutting-edge features or fixing bugs? Without a doubt, it would be great to see a link to Nuke composition in Premiere Pro – and this might in fact be not so difficult to achieve, since Nuke can already run in the render mode in the background. However, how will it impact the development of “Flame Killer” Nuke Studio itself? Hard-core Nuke users will most definitely see the necessity to use Premiere as a hub as a step back, especially when it comes to conforming – an area, which is known to be an Achilles heel for Premiere (see my previous notes about it) – and the vfx workflow. And if we are to take hint from what happened with the acquisition of SpeedGrade, when most development resources were moved towards creating Dynamic Link with Premiere, and the actual development on SpeedGrade itself almost stalled, this might be worrying.

Certainly there are some valid concern about responsiveness of Adobe towards the usual clients of The Foundry, as the market audience for the products will inevitably shift. At the same time Adobe does crave to work on the higher end, and it’s much easier for high-profile people like David Fincher to ask for the features, and receive them, as opposed to common folks like you and me. So the studios will still have the leverage on Adobe. However, a challenge will come in the fact, that The Foundry tools (with the exception of Modo) are not as accessible and intuitive, as Adobe’s, and very often require extensive personal training to use properly. Again, Iridas acquisition being an example, Adobe will try to make small changes in the UI, where necessary, but in general the efforts will be spent elsewhere. Personally I don’t ever envision myself using a Katana which is most definitely a specialised relighting tool for high-end 3D workflows, mostly working with assets coming from the software owned by Autodesk. If I were to name a single product that is most likely to be dropped after the acquisition, it would be Katana. It would take quite a pressure from the studios using it to keep it in development. Adobe would have no skin in this game – in fact, possibly quite the opposite. One way or another, I highly doubt Katana will make it to the hands of Adobe’s typical end-user. It might become a separate purchase, like Adobe Anywhere is now.

On a good side, this acquisition will indeed make Adobe’s video pipeline next to complete. We used to snicker at the slides and demos suggesting or even insisting, that it’s possible to do everything within the Creative Cloud. We knew that making even a simple 3D projection in After Effects was an effort often destined to fail. A lot of great work has been made in After Effects despite its shortcomings, but the workarounds are often time-consuming – with Nuke at our disposal this would no longer be the case. It indeed has the potential to make Adobe a one-stop shop in post-production. And even more good news? The drop in price is inevitable, especially with the recent acquisition of Eyeon by Blackmagic Design.

If I am to make predictions, I’d say that initially some The Foundry products (After Effects plug-ins, Modo, Nuke, Mari and Mischief, if it doesn’t get integrated into Photoshop/Illustrator) will immediately become part of the Creative Cloud offer. Adobe will be showcasing Modo and Nuke to sell more CC licenses. A lot of users who just shelled out thousands of dollars for their Nuke licenses will be unhappy, but Adobe will most likely give some grace period for them – maybe in the form of free Creative Cloud licenses to current The Foundry users without active CC subscription or something similar. However, to avoid legal issues with Linux users, where Adobe is not able, and will most likely never be able to deliver their full line of Creative Cloud products, a separate offering will be made for this platform – perhaps on custom order, similarly to CC for Enterprise customers. Linux versions will keep up feature-wise at the beginning with their counterparts, but depending on the number of licenses sold this way, they might stall or be discontinued. Katana is most likely the first to go. The whole Nuke line will be integrated into a single product – hopefully Nuke Studio, but possibly to what is now known as NukeX. The latter would be unfortunate, as there is quite a lot of potential in Nuke Studio, but I’m not sure Adobe folks will understand it at the moment, as they seem to be only now learning about high-end vfx workflow. Hopefully outcry from the clients will be enough. Hiero, however will also most likely be dropped, as it essentially is redundant to conform part of Nuke Studio.

I hope some of the original The Foundry branding will be retained, but I am a bit afraid that we will quite fast see either square icons with Nuke symbol, or even letters Nu, Mo, Ma, Mc. Hopefully someone can point Adobe Media Encoder icon as a precedent, and at least the Nuke symbol remains intact. Adobe letter salad becomes a bit tedious to keep up with.

Again, if we are to take hint from Iridas acquisition, The Foundry development team will remain mostly the way it is – unless people decide that they don’t want to have anything to do with Adobe as a company, which does happen from time to time – but it will be integrated into Adobe culture. Adobe seems to be pretty good in this kind of thing, so the falloff should be minimal. Development-wise, most certainly the attempts at making exchange between various application easier will get priority right after making sure Creative Cloud licensing works. An importer of Modo files into After Effects, perhaps a bridge between After Effects and Nuke, sharing cameras, tracking data, scene geometry, and some layers; or attempts at Dynamic Link between Nuke and Premiere – these are my initial guesses. Perhaps even the XML exchange between Premiere and Hiero/Nuke Studio will finally be fixed, and at some point The Foundry applications will be able to read and/or write Premiere Pro project files. Adobe’s XMP model of metadata will most likely be employed throughout the Collective.

On a good side, it will allow The Foundry to focus – I had the impression that for some time this company began to behave like Adobe in times of CS5-CS6 – trying to expand the market, pumping out new flashy features instead of focusing on stability and bug fixing, and diluting Nuke line, or in general trying out to lure people to buy their products or updates. Creative Cloud subscription model, regardless of how it was perceived when introduced about two years ago, helps in this regard quite dramatically, as there is less pressure on the developers to cater to the needs of marketing department (vide introduction of Text node in Nuke) and maintaining various versions of the software. This should translate into more time and manpower being directed towards the “core” development – the good stuff.

I think this is promising – if it ever happens. There already has been a precedent of a lower-end company acquiring high-end tools and making them available for public without necessarily watering down their value. We’ve all seen it. Most of us loved it. The company’s name is Blackmagic Design, and the tools were daVinci Resolve and Eyeon Fusion. Here’s to hoping that Adobe handles this acquisition in a similarly efficient and successful manner, bringing the high-end 3D and compositing tools to the hands of many. That is, if this buyout ever happens. Because you know what? Why wouldn’t Blackmagic simply outbid them just for the sheer thrill of disrupting the market?

Layer Stripper – It’s Not What You Think It Is

As I’m getting ready for this year’s NAB, I think it’s great time to release a new nifty tool for After Effects – CI Layer Stripper. This script deftly removes all unused layers from your project – the ones that are not visible, and not referenced by other layers as parents, track mattes, or even simple expressions. This will allow you to trim and collect these items in your project which are actually being used.

see more

Finally a Viable After Effects Archive Solution

While developing Conform Studio I stumbled upon an application of the CS Extract script which I considered interesting, but did not have enough time to code and test properly. It was only a matter of time when other people attempted to use the Studio in this manner, therefore I even included a note in the manual about it. see more

Move That Anchor!

Being a casual After Effects user I find myself sometimes creating an animation path only to find out that I need to later reposition the anchor point of the layer to add rotation or scale. To my surprise, even with the abundance of AE Scripts on the market, I could not find a simple tool to remedy this problem. So I wrote one myself. see more

Power Window plugin for Adobe Premiere Pro

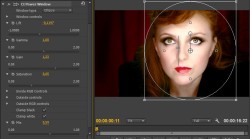
Since it’s the Christmas season, I hope you’ll appreciate the new addition to the Creative Impatience toolbox: meet the Power Window filter.

After creating the Vignette plugin, I decided that even though it did most of the things that I wanted it to, there were still some image manipulations which were pretty hard to achieve. For example, a simple operation of lightening the inside of a selected shape, turned out to be pretty problematic to perform in a decent manner.

Therefore, I set out to create a variant of the CI Vignette, which would manipulate directly lift, gamma, gain and saturation values of the pixels inside, and outside of the shape. Most of the code was reused from the Vignette, and the rest was pretty uncomplicated to write. Frankly, I spend most of the time trying to figure out how to circumvent something that I perceive to be a bug in Premiere. But then, this is the life of a software developer. We have to live with what we are given.

Without further ado: Power Window plugin for After Effects and Premiere is up and running. Be sure to visit the download page for the file, read the instructions on how to install it, and if you have problems operating the plugin, take a look at Instructions and Tutorials.

Power Window Interface.

Hopefully some day I will manage to create some decent videocast on how to use these tools. In the meantime, feel free to experiment, and let me know how it goes.

Merry Christmas, and a Happy New Year!

Green screen primer

Having recently had an opportunity to do some green screen work, which at first glance seemed to be a quick job, and later turned out to require some pretty hefty rotoscopy and compositing, I decided to write down another caveat, this time on using a green screen. Please note, that the pictures are for illustrative purposes only. For convenience, wherever they are labelled as YCbCr colorspace, I used Photoshop Lab/YUV to create them, which is very similar, but not identical to YCbCr. Also, many devices use clever conversion and filters during chroma subsampling, which reduces aliasing and generally are better at preserving the detail, than Photoshop is in its RGB->Lab->RGB conversion, so the loss of detail and differences might be a little smaller, than depicted here, but are real nevertheless.

Green screen mostly came about because of the way that digital camera sensors are built. The most common bayer pixel pattern in CMOS sensors used by virtually all single-chip cameras consists of two green sensors, and a single blue and red ones (RGGB). Which is a sensible design, if you consider the fact that the human eye is the most sensitive in green-yellowish regions of the light spectrum. It also means, that you will automatically get twice as much resolution from the green channel of a typical single-chip camera, than from either red or blue one. Add to this the fact that the blue sensors most often have the most noise, due to the fact that the blue light has the least energy to deposit in a sensor, and the signal is simply the lowest there, and you might start to get a clue why green screen seems to be such a good idea for digital acquisition.

RGGB sensor mosaic

Typical CMOS RGGB pixel mosaic. There are two times as many green pixels than red or blue.

So far this discussion did not concern 3-sensor cameras or the newest Canon C300 with the sensor twice the size of encoded output, however the next part does.

Green channel has the most input (over 71% in Rec 709 color space specification) in the calculated luma (Y) value, which is most often the only one that gets encoded at full resolution when compression scheme called chroma subsampling is used – which is almost a given in most cases. All color information is usually compressed in one way or another. In 4:2:0 chroma subsampling scheme – common to AVCHD in DSLRs and XDCAM EX – the color channels are encoded at 1/4th of their resolution (half width and half height), and in 4:2:2 at half resolution (full height, half width). These encoding schemes were developed based upon the observation that a human eye is less sensitive to loss of detail in color than in brightness, and in horizontal plane, than in vertical. Regardless of how well they function as delivery codecs (4:2:2 is in this matter rather indistinguishable from uncompressed), they can have serious impact on compositing, especially on keying.

Various chroma subsampling methods

Graphical example of how various chroma subsampling methods compress color information

Recording 4:4:4 RGB gives you an uncompressed color information, and is ideal for any keying work, but it is important to remember, that you won’t get more resolution from the camera, than its sensor can give you. With typical RGGB pattern, and sensor resolution not significantly higher, than final delivery, you will still be limited by the debayering algorithm and the lowest number of pixels. It’s excellent if you can avoid introducing compression and decompression artifacts, which will inevitably happen with any sort of chroma subsampling, but it might turn out that there is little to be gained in pursuing 4:4:4 workflow due to the lack of proper signal path, as is for example with any HDMI interface from DSLRs, which outputs 8-bit 4:2:0 YCbCr signal anyway, or many cameras not having proper dual-link SDI to output digital 4:4:4 RGB. Analog YCbCr output signal (component) is always at least 4:2:2 compressed.

A good alternative to 4:4:4 is a raw output from camera sensor – provided that you remember about everything what I wrote before about the actual sensor resolution. So far there are only two sensible options in this regard – RED R3D and ArriRaw.

There are also not very many codecs and acquisition devices that allow you to record 4:4:4 RGB, and most still require fast and big storage arrays, and thus its application is rather limited to bigger productions with bigger budgets. It is slowly changing due to falling prices of SSD drives that easily satisfy the writing speed requirements, and portable recorders like Convergent Design Gemini, but storage space and archiving of such footage still remains a problem, even in the days of LTO-5.

Artifacts introduced by chroma subsampling

Chroma subsampling introduces artifacts that are mostly invisible to the naked eye, but can make proper keying hard or even impossible

Readers with more technical aptitude can consult two more detailed descriptions of problems associated with chroma subsampling:

  1. Merging computing with studio video: Converting between R’G’B’ and 4:2:2
  2. Towards Better Chroma Subsampling

The higher sensitivity of human eye and cameras to green color means also, that you don’t need as much light to light the green screen, as you would for the blue one. The downside however is that the green screen does have much more invasive spill, and due to the fact that it is not a complementary color to red, it is much more noticeable and annoying than the blue spill, and requires much more attention during removal. Plus spending a whole day in a green screen environment can easily give you a headache as well.

Generally it is understandable why the green screen is a default choice for digital pipeline. However, as with all rules of the thumb, there is more than meets (or irritates) the eye.

When considering keying, you need to remember that it is not enough that you get the highest resolution in the channel where your screen is present (assuming that it is correctly lit, does not spill into other channels, and there is not much noise in the footage). Keying algorithms still rely on contrasting values and/or colors, using separate RGB color channels. Those channels – if chroma subsampled – are reconstructed from YCbCr in your composition software.

Therefore, even assuming little or no spill from the green screen to the actors, if you have a gray object (let it be a shirt), which has similar value in green channel to the green screen, then this channel is made useless for keying by this very fact. You can’t get any contrast from it. You and your keying algorithm are left to try obtaining the proper separation in the remaining channels, first red, and then blue (where most likely most of the noise resides, and which has meager 7% input in luminance), which automatically reduces your resolution, also introducing more noise. In the best case you get a less crispy and a little unstable edge. In the worst, you have to resort to rotoscoping, defeating the purpose of shooting on the green screen in the first place.

Now consider the same object on a blue screen – when your blue screen has the same luminance as a neutral object, then you throw the blue channel away, and most likely can use green and red channels for keying. Much better option, wouldn’t you say?
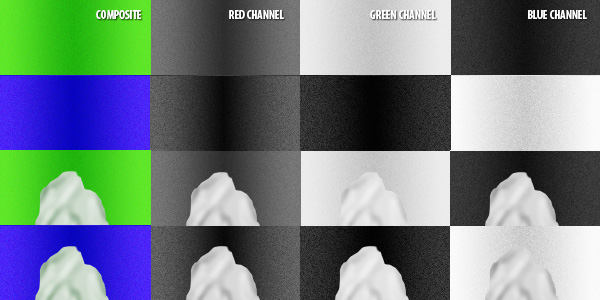
Difference of blue screen and green screen keying with improper exposition

If the green value of an object on a green screen is similar to the screen itself, keying will be a problem

Of course this caveat holds true only for items with green channel level close to the level of the screen. If we want to extract shadows, it’s a completely different story – we need to get contrast in the shadows as well, and to this end green screen will most likely be more appropriate. But if we don’t, then choosing a color of the screen entails more than simply looking what color the uniforms or props are or a basic rule of the thumb that “green is better for digital”. You need to look at the exposure as well.

There are a few other ways to overcome this problem. One is to record 4:4:4 using a camera that can deliver proper signal, then you are only limited by the amount of noise in each channel. Another is to shoot at twice the resolution of final image (4K against 2K delivery), and then to reduce the footage size before keying and compositing. This way the noise will be seriously reduced, and the resolution in every channel will be improved. Of course, then it is advisable to output the intermediates to any 4:4:4 codec (most VFX software will make excellent use of DPX files) to retain the information.

Another sometimes useful – and cheap – solution might be to shoot vertically (always progressive, right?), thus gaining some resolution, however remember that in 4:2:2, and in 4:1:1 compression schemes, it is the horizontal (and now vertical) resolution that gets squashed, so the gain might not be as high as you hoped, and in the dimension that is more critical for perception, so make sure that you’re not making your situation worse.

The key in keying is not only to know what kind of algorithm or plugin to use. The key is also to know what kind of equipment, codec and surface should be used to obtain the optimal results, and it all starts – as with most things – even before the set is build. Especially if you’re on a budget.

To sum up:

  • Consult your VFX supervisor, and make sure he’s involved throughout the production process.
  • Use field monitoring to see how the exposition in the green channel looks like, and if you are gettting proper separation.
  • Consider different camera and/or codec for green/blue screen work.
  • Try to avoid chroma subsampling. If it’s not feasible, try to get the best possible signal from your camera.
  • Consider shooting VFX scenes in twice the final resolution to get the best resolution and the least noise.