How To Fix Hiero XML Export For Premiere… Sort Of

hiero-fix

Some time ago, if you ever tried to export XML from Hiero to Premiere, you got a generic importer error message and that was it. This issue – audio related – was thankfully fixed in later versions of Hiero. However, another hydra reared its ugly head, and this time attempted XML interchange resulted in something along these lines: see more

A Storm Or A Spoon

luma-curve

Update: The 7.1 version due out in October is going to fix the issue altogether. Great job, Adobe!

Being the one to spoil the party is no fun, especially if you like the host, or enjoy the meals. But when your favourite dish was rotten and received only a little ketchup treatment, well… sometimes you have to be vocal about it.

Let me at first say that I love the party. To have an update within a month of the release, that fixes a major multicam bug (which for some reason I have not fallen prey to) and adds plethora of new features that will make life and editing easier is awesome. This is the power of Creative Cloud that a lot of people were talking about. There’s no denying, that the party is well deserved.

If you want to learn of all the new features and improvements to Premiere Pro which come with version 7.0.1 update, take a look at the official Premiere Pro blog or reTooled.net tutorial. They will show you the goodies, and these are plenty.

But unfortunately for me, one issue is not completely resolved. And it’s not for the lack of trying.

I wrote before about a nasty curves issue, and for some reason my post was not received with enthusiasm at the home of Premiere Pro. I really, really hoped it would be resolved in this update, and that I will be able to join the happy fest. Well… it is, and it isn’t.

The good news is that the curves no longer clip superwhites and superblacks on input. Depending on how you use the curves it might or it might not be the solution. If you never move the starting and ending points of the curves from their places, you’re good to go. Also, if you only move them up or down, to reduce the dynamic range, you should rejoice, because it works as it used to as well.

But if you ever move these points to the inside, namely the point on the left to the right, or the point on the right to the left, to add contrast, and you hoped to later recover the clipping, your troubles did not go away. Sometimes they might even be compounded.

Unfortunately the curves still not work as they used to. This example of course is exaggerated to the extreme to make a point.

Unfortunately the curves still do not work as they used to. This example of course is exaggerated to the extreme to make the point.

Because the curves will flatten everything what is beyond the leftmost or the rightmost curve points up until the left or right border. Then they will resume their 45 degree slope. To many it might be a non-issue. To me it is. To me it means that most of my old projects will still have to be rendered out in CS6, and I will have to be careful with the new ones, especially when using Jarle’s grading presets.

I am not happy. Depending on where you sit, this is either a storm in a teacup or a spoonful of tar that spoils the barrel of honey. Unfortunately, I belong to the second group, and it’s no fun at all.

The Case For Three-Button Mouse Editing

RzrNaga2012_view3

RzrNaga2012_view3Mouse-driven editing has usually been associated with the lower end of video editing, and to a certain extent justifiably so. If I see a person using only his or her mouse to edit, I don’t consider them very seriously. Editing is a tough job, and a human being has two hands, so why not put both of them to work? Put that left hand on the keyboard right now!

The question of whether the right hand should spend more time there as well or not is debatable. Even though I have been driven through CS6 mixed bag of innovations to make more extensive use of my touch-typing skills during editing, I am still looking to improve on the mouse side of things, because the hybrid mouse + keyboard editing has been historically the fastest way to use Premiere.

When it comes to mouse mastery, nothing can beat 3D artists, especially modellers. The necessity to constantly change the point of view in three dimensions clearly showed that not only a single mouse button is not enough, but that even two will not suffice. You need a 3-button mouse to work in a 3D application. Period.

Granted, using the middle button with most mice is something that requires a bit of practice, since often it entails pushing on the scroll wheel. However, the newly acquired skill gives you more flexibility, and options. Why then not use a 3-button mouse in editing? And why not take advantage of the fact, that pushing the middle button is not as easy, as pushing the other ones?

One thing that I found myself using a lot during mouse-driven editing was delete and ripple delete. Even after remapping my keyboard, it still remained a two-click process. First select the clip, then hit delete. Fortunately you can use both hands, but still, there is some space for optimization here. The middle mouse button could be used to perform a single click ripple delete.

Another idea for middle mouse button is to map it to “Deselect all”, and it might become pretty handy with the incoming CS Next confusion about the primacy of selection over playhead, or targeted tracks for example during applying transitions.

Both of these options are available now via many macro recording and automation pieces of software. Personally I use the ones that came with my mice – either Microsoft’s IntelliMouse or Razer Synapse. They both allow remapping the middle mouse click for certain applications to a macro or a shortcut key (and much more, if you wish to explore them further). Therefore I first make sure to create the keyboard shortcuts to “Ripple Delete” or “Deselect All”, and then to map these shortcuts to the middle mouse button. And voila! Single click ripple delete or deselect all are literally at your fingertips now.

The quest for ever more efficient editing continues, and I hope to have some exciting information for you soon.

NAB Special – KEM roll and a multicam trick in Premiere Pro next

02.-KEM-Roll-and-a-multicam-trick

No typical tutorial this week, but a small demonstration of the KEM roll (sequence editing) feature in the next version of Premiere Pro, and a little multicam trick which can help you to “unnest” your clips from a sequence. I hope you’ll enjoy it, even if the software is not available yet.

A frame too far…

A frame too far...

In late September 1944 Field Marshall B. L. Montgomery, a very bold and talented British commander, led an ambitious offensive whose objective was to force an entry into Germany over Rhine. He aimed to  capture a series of bridges with the help of paratroopers, who would have to defend them until the main forces arrived.

Him and Premiere Pro have a few things in common: they are both audacious and tend to overreach. Monty’s boldness and wits won him a few battles, especially during his campaigns in Northern Africa. However, in this case his arrogance went a bit too far. Similarly, Premiere Pro also has its Arnhem moments.

Premiere has always included the current frame in the in/out timeline selection, but until the latest release, it has not bothered me much. CS6 introduced a plethora of new features, which made me change my previous workflow from mouse and keyboard driven to more keyboard oriented, mostly due to the new trimming interface, and the unpredictability of the ripple tool, making the problem more pronounced.

A frame too far…

The joys of old

It used to be, that the arrow tool ( V ) allowed me to perform about 80-90% of operations by having the mouse in my right hand, and the left hand on the keyboard close to the Ctrl (that’s Command for you, Mac people) key. If I wanted to trim, the arrow tool would intelligently turn into the trim cursor, when it approached the edit point. If I needed a ripple trim, I would press Ctrl , and I would always get the ripple trim tool for this operation. Then let go of the modifier, and I’m back with the arrow. If I wanted to adjust audio levels, the arrow tool would allow me to raise and lower the value in the timeline, while Ctrl would add keyframes, and allow to manipulate them. The only actual tools I used were rolling trim  (N ), slip ( Y ) and slide ( U ). Rarely rate stretch ( X ), as handling the speed changes by Premiere for interlaced footage is pretty uninspiring, and from time to time track selection tool ( A ). I don’t remember ever needing the tool palette, and found myself constantly switching it off to save some screen real estate.

Easy and fast. Combine that with a few shortcuts to add default transitions, and it turns out that using mouse and keyboard seems to be the most efficient way to go. The simplicity, ease, and flexibility of the timeline manipulation in Premiere was amazing. And for anyone using this method, opening Final Cut Pro legacy was sometimes pretty annoying. And Avid, especially before MC5? Don’t even get me started…

The mixed bag of the new

Then comes Premiere CS6 with its ability to select edit points, and improved trimming. And suddenly, this old workflow seems less and less viable. The hot zones for edit point selections are pretty wide. One has to be careful not to suddenly click on an edit point, because then the trimming mode will be activated, and ctrl will no longer act in predictable manner, giving you the ripple trim as you’d expect. It will change its behavior based on what is selected, and in general make manipulating timeline with a mouse much less efficient.

It’s understandable then, that I found myself drifting more towards the keyboard-oriented workflow, using trimming mode ( T ), setting in ( I ) and out ( O ) on the timeline, and finally learning keyboard shortcuts for lift ( ; ) and extract (apostrophe) – something, that I never needed before, because ripple delete, razor tool  (C ) and add edit ( Ctrl+K remapped to Z ) were simply quicker. I even started to enjoy the new way of doing things.

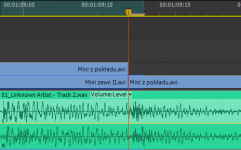
And all would be fine and dandy, were it not for the already mentioned fact, that Premiere marks the currently displayed frame as part of the selection. Which means, that if you position your playhead on the edit with the nicely defined shortcut keys (up and down arrow in my case), and press O to mark the out point, you will include also a single frame after the cut.

This is a bit problematic.

I admit I have seen it before – this has been the standard behavior of Premiere from the beginning – but because I hardly ever used in and out in the timeline, this has not bothered me much. However, when the selection started to become the core of my workflow, I found it terribly annoying, and slowing down my work. When I do any of the following operations, I need to constantly remind myself to go back one frame, to avoid the inclusion of the unwanted material:

  • lift and/or extract,
  • overlay edits with in/out in the timeline,
  • exporting based on the in/out selection.

I enjoy editing in CS6 a lot, but this “feature” literally keeps me up at night. It’s such a basic thing, that even Avid got this one right… When the playhead is positioned on an edit point, the out point is selected as the last frame of the incoming clip.

Why then does Premiere behave like Montgomery and has to go one frame too far? British Field Marshall also wanted to eat more than he could chew, and in the end he had to withdraw. Every time I have to go back a frame, I feel like I’m loosing a battle. Why?

Not one frame back, I say!

Best practices of applying 8-bit effects in Premiere Pro

This is how the ramp looks like without any effects applied.

Summary: Always apply your 8-bit effects as the last ones in the pipeline. 

A few years ago Karl Soule wrote a short explanation of how the 8-bit and 32-bit modes work in Premiere Pro. It’s an excellent overview, although it is a bit convoluted for my taste (says who), and does not sufficiently answer the question on when to use or not to use 8-bit effects, and what are the gains and losses of introducing them in the pipeline. Shying away from an Unsharp Mask is not necessarily an ideal solution in the long run. Therefore I decided to make a few tests on my own. I created a simple project file, which you can download and peruse ( 8-bit vs 32-bit Project file (1750 downloads) ).

In essence, the 32-bit mode does affect two issues:

  1. Banding.
  2. Dynamic range and clipping.

For the purposes of testing them, in a Full HD sequence with Max Bit Depth enabled, I created a black video, and with a Ramp plugin I created a horizontal gradient from black to white, to see how the processing will affect the smoothness and clipping of the footage.

Settings for a simple horizontal ramp to test it.

Next I applied the following effects:

  1. Fast Color Corrector with Input White reduced to 215 (clipping white).
  2. RGB curves that roughly mirrors the Gamma 2.2
  3. RGB curves that is roughly the reverse of 2.
  4. Fast Color Corrector with Output White reduced to 215 (bringing white back to legal range)
  5. Offset 8-bit filter that does nothing, but breaks the 32-bit pipeline.

Settings for the first Fast Color Corrector.

Master curve in the first RGB Curves effect

Master curve in the second RGB Curves effect.

Settings for the second Fast Color Corrector.

To assess the results I advise opening a large reference monitor window in the YC Waveform mode. Looking at Program monitor will not always be the best way to check the problems in the video. You should see the diagonal line running through the whole scope, like this (note, that the resolution of Premiere’s scopes is pretty low BTW):

This is how the ramp looks like without any effects applied.

Now perform the following operations, and observe the results:

  1. Turn off the effect number 5 (Offset), and notice a bit more smoothness in the curve, however it’s rather superficial, and hardly likely to influence your final delivery.
  2. Turn on Offset, and move it before the second FCC. You should immediately see the clipping in the highlights. This is the result of 8-bit filter clipping the values at 255,255,255 (white), and disposing of all super-white information that the first FCC introduced.
  3. Move offset between RGB curves (between 2 and 3). Apart from the clipping, you will also notice the banding and posterization, both in the program monitor, and in the Waveform as little flat steps. This is the result of 8-bit filter rounding up or down the values to the nearest integer (123.4 is rounded to 123), and later modifications have less data to work with.
  4. Move offset before the first FCC. Most likely you will not see anything too different from when the Offset filter was the last one applied. However, if you had footage that had super-white values, they would be clipped and irrecoverable. Similarly, if you had 10-bit footage, it would have been converted to 8-bit, and all latitude and additional information would be lost as well.

The effect of the first Fast Color Corrector on the ramp. Notice the clipping.

The effect of the second Fast Color Corrector on the ramp. Notice the lack of clipping.

The effect of the first RGB Curves on the ramp.

The effect of the second RGB Curves on the ramp.

All four 32-bit effects on.

All filters on with Offset in the last place. Notice a bit less smoothness in scopes.

All filters on with Offset before the second FCC. 8-bit filter makes the data irrecoverable, and clips the highlights.

All filters on with Offset between the RGB Curves. Notice the irregularity in the curve, showing rounding errors and compounding problems.

All filters on with Offset after the first FCC. The curve is not as irregular, but the clipping is still present.

All filters on with Offset in the first place. Notice the similarity to the Offset in the last place. The 32-bit pipeline is not broken afterwards, although the footage is converted to 8-bit because of the filter pipeline. 

This simple experiment allows us to establish following best practices on applying 8-bit effects in Premiere Pro:

  1. Try to apply 8-bit effects as the last ones in the row, especially with footage that is 10-bit or more.
  2. Always perform your technical grade and make your image legal (ie. not clipping) before you apply any 8-bit effect in the pipeline.
  3. Ideally do all your color correction before any 8-bit effect is applied.
  4. Avoid performing heavy color correction or image processing after an 8-bit effect has been inserted to avoid banding and posterization, especially with 10-bit or RAW footage.

And that’s it. I hope this sheds some light on the mysteries of Premiere Pro’s 32-bit pipeline, and that your footage will always look great from now on.