Feathered Crop tutorial – 01. Basic usage

Taking advice of other creatives, I decided to forego the unattainable expensive gear, and use whatever I had at my disposal to create a series of short tutorial on how to use my plugins.

The first installment is already available, and I plan on putting out one of these every week, keeping under 3 minutes for all of you impatient types. I’m pretty happy with the result, since it’s my very first screencast. The audio quality is not very good, but I hope the content will defend itself, and that you will find these series useful.

Comments and donations welcome.

If Premiere Pro crashes hard on Windows and you can’t open it again…

…check if the process called Adobe Premiere Pro.exe is still running and kill it.

Granted, crashes of Premiere have mostly been the thing of the past. Since upgrading to CS5 I don’t remember the time when I actually lost anything in Premiere’s crash. But then, some people still have problems from time to time. So here’s a tip.

Sometimes Premiere Pro crashes, and no matter how hard you try, you can’t reopen it by double clicking on the shortcut icon, or even directly attempting to open the Adobe Premiere Pro executable file. If you restart your machine, everything works fine. But let’s be honest – you don’t want to waste precious minutes on shutdowns and reloading Windows, especially if there is a looming deadline ahead (and we all know that weird things happen when projects get close to completion…). If you log out, and log back again, you could save a little bit of time, and things should work fine again.

But there’s much quicker way to do it. Run Windows Task Manager by right clicking on the start bar, and selecting “Start Task Manager”. Then click the “Processes” tab, and take a close look to find a usual suspect. Or perhaps click once on the “Image name” column, if the list is not already sorted this way, and then locate the “Adobe Premiere Pro.exe” process. Select that guy, and hit “End process” button. This will remove the remaining traces of crashed Premiere from the memory, and if you click your Premiere icon now – surprise, surprise, the application will load without any problems.

Windows Task Manager interface, and our culprit. I hope the foreign language does not make you wince too much 🙂

The reason for that is very simple – on startup, Premiere looks if its main process is running. If it is, it terminates what it considers to be a recently run duplicate copy of itself, and asserts that the former is running fine. It doesn’t matter that it isn’t, Premiere is too lazy or too inept to realize that it had just crashed on you, and left remains in your system’s memory.

I hope this tip saves you a moment or two in the unlikely event of such a crash. And if you are more tech-savy, you might consider downloading a free task manager replacement called Process Explorer, which gives you much more and much more detailed info about processes running on your system.

Continuing Premiere’s FCP XML export woes…

If you are familiar with my recent complaint about the issues with FCP XML export, let me throw two more problems into the mix. They might not be as important as the drop and non-drop frame issue, because no data is lost in the process, and they are fixable, although they might be quite an annoyance.

After fixing the problem with exporting zero-marker duration, we shall find out two things:

  1. Although subclips are correctly exported to FCP XML, for some reason Premiere creates additional markers in the main clip which span through the whole duration of each subclip…
  2. …but in each subclip, each marker’s in point is wrongly calculated, and their positions change, often beyond the subclip’s borders.

Example

There’s a clip that has 1 marker in it, and 1 subclip. The subclip starts at a frame 228, and ends at the frame 645 of the main clip. The marker starts at frame 355 and ends at 528. After export, you will get:

  • 2 markers on the main clip:
    • 355-528
    • 228-645
  • 2 markers on the subclip:
    • 355-300 (sic!)
    • 228-417

And what you should get:

  • 1 marker on the main clip: 355-528
  • 1 marker on the subclip: 127-300

I think you have already figured out, what’s going on – the subclip’s offset is not removed from marker’s in point. As I said – hardly a big problem. Merely an annoyance. But it requires a tool to fix it if you are using certain kind of workflow: the subclip-spanned markers should be removed, the real markers’ in points in subclips recalculated.

Depending how you look at it, the fact that the very same errors are present in FCP XML exports from Prelude, can be either disheartening – because you’d think it’s such a basic functionality that somebody should have had noticed in in the production stage – or encouraging – because if they fix it in Premiere, they will also fix it in Prelude.

On a positive note – I’ve been in contact with Jesse Zibble from Adobe about XML export in general, and I know they have been working on these issues. But judging from the release cycle of previous bug fixes, I don’t think this is going to be amended in the current release.

All of us not using Creative Cloud yet, feel free to express your disappointment now. And if any of you needs a tool to fix these markers, drop me an email.

Enhance your Premiere Pro productivity – keyboard shortcuts galore

There’s a tip that I wanted to share with you, which increased my productivity with Premiere Pro tremendously. And it’s very simple: customize your keyboard shortcuts. But make it wisely.

First tip: make use of the search box which is present in Keyboard Shortcuts dialog in Premiere. There is a ton of shortcuts, and if you know the proper name, or even part of the name, it’s easier to type it in the search box, and browse among the remaining entries, than to wade through all the options.

First and foremost – track selection

Separated from source patching in CS4, constantly improved, but still hardly perfect, track selection tends to be one of the most annoying things if you don’t remember about it (like wondering why match frame shortcut does not work). It has also been pretty cumbersome. But in CS5 we got a nice addition that allows us to finally make it more of a feature than a nuisance.

Assign keyboard shortcuts 18 to Toggle Target Video 1-8. By default they are assigned to multicam, and if you are doing a lot of multicam work, you might consider remapping your Select Camera shortcuts to F1F12 . This way you will overwrite the defaults for help (F1 ), capture (F5 ) and batch capture (F6 ), but the chances are you’re not using them very much, and if you do, simply find a better place for them. Like Shift+Ctrl+Alt+H 😉

Then assign 9 to Toggle All Target Video On, and 0 to Toggle All Target Video Off.

Track selection is vital to every editing operation in Premiere, and once you get used to the new shortcuts, I assure you, that you will never go back, and will be ready to strangle anyone who would like to take it away from you.

Perhaps you might also find it useful to assign Toggle Target Audio 1-8” to Ctrl+1 to Ctrl+8 , although personally I found myself using only the shortcuts to Toggle All Target Audio On/Off (Ctrl+9 /Ctrl+0 respectively).

Be mindful that shift+number shortcuts are assigned to panels, but if you change them you will not be notified about it! And there will be no undo, you’ll have to revert these changes manually.

And while we’re at it, why not map labels to Ctrl+F1 and further on? It’s a bit more complicated, you need to navigate to Edit->Label in the keyboard shorcuts dialog, and then assign keys to each label, but it also might be pretty helpful at times.

Manipulation of In and Out Points

Setting the In (I ) and Out (O ) are pretty decent standards, but some of the other shortcuts in this area are suboptimal, considering the fact that you need to perform thousands of this kind of operations a day, and adding half a second to press Shift , or even Shift+Alt+Ctrl is a pain. This time it’s worthwhile to take example from Avid, and get these under your fingertips.

The most important one: Clear In/Out – map it to G . This used to be Premiere’s default before FCP users started to put pressure on Adobe to adopt their  keyboard mapping.

Clear In and Clear Out is not something I use very often. If I want to change the In, I just set an In in another place. However, if you find yourself using them often, E and R seem to be pretty good places to put them.

On the other hand Go To In, and Go To Out tend to be useful, and I map them under Q  and W .

Mark Clip also tends to be useful for many reasons, gap removal included, and I tend to have it under the slash key / . Mark Selection – not so often used, I map it to Shift+/ .

Setting Render Entire Work Area  to Shift+Enter is worthwhile. I generally turn off the work area, and use In and Out, and this option is replaced with Render In to Out in my workflow, but the shortcut stays the same.

A few more tips

An idea that navigating markers should use the M key is quite alien to me. I prefer having Go To Next Marker as Ctrl+PgUp , and Go To Previous Marker as Ctrl+PgDn . It frees the M key for more important things, like for example assigning Edit Marker to Shift+M .

Another function that I often use is Add edit, and Add edit on all tracks. Default Ctrl+K  is not necessarily so bad, but it still requires at least two fingers. Let’s reduce it to one. Throw out the zoom tool shortcut (honestly, when did you last time use that one?), and assign Add edit to Z , and Add edit an all tracks to Shift+Z .

Speed/Duration and Audio Gain – who says that invoking dialogs needs a modifier key? Map them to D and H respectively. Who cares about the hand tool anyway?

Ripple Delete – default Alt+Backspace is almost fine, but why not map it to the del key itself? You’ll have to remember that the Backspace and del will then have different behavior but I think it’s worth it. I would map it to backspace, but then it interferes a bit with the way project panel works, so delete is the way to go for me.

Two real kickers and trimming

The next two will save you tremendous amount of time during editing. I used to perform this operation with a mouse – when I felt that I had to make a cut, I ripple-trimmed my next edit point by dragging it with a Ctrl key pressed (which was BTW the best timeline interaction I’ve ever had with any NLE) – and now I can do it without, saving quite a lot of time. There are two great shortcuts that should again be at your fingertips by default:

  • Ripple Trim Next Edit to Playhead]
  • Ripple Trim Prev Edit to Playhead – [

They take time to get used to, because the shape of the characters is opposite to what it does, but their position is correct. I still sometimes press the incorrect one, but they are a real timesaver, especially in connection with track selecting. However, if you find yourself thinking too much, you might consider switching them, and seeing if it doesn’t work better for you.

There are also two of the less often used – Extend Next Edit to Playhead and Extend Previous Edit to Playhead, which I tend to map to Shift+] and Shift+[ respectively.

I have never used Extend Selected Edit to Playhead. Ever. Perhaps I still don’t know something about editing, but I have not come upon a situation where I couldn’t replace it with any other available option.

Sometimes however I find it useful to immediately move to the nearest edit point and select correct trim mode. Therefore I usually map the following:

  • Select Nearest Edit Point as Ripple In to Ctrl+]
  • Select Nearest Edit Point as Ripple Out to Ctrl+[
  • Select Nearest Edit Point as Trim In to Shift+Ctrl+]
  • Select Nearest Edit Point as Trim Out to Shift+Ctrl+[

Transitions

For a moment I toyed with an idea to assign D to Apply Default Video Transition, but I decided against it. I needed other shortcuts much more, than I needed the transitions.

Interestingly, in CS6 you can specify a separate shortcut to add each of the following transitions:

  • Audio Crossfade
  • Video Crossfade
  • Dip To White
  • Wipe

If you tend to use any of these, definitely apply a shortcut to it. Also, if you use any other transition often, like for example Dip To Black (why it’s not in the list I have no idea), then use this one as a default transition, and apply a shortcut to Crossfade. Possibilities are really interesting, and I sincerely urge you to explore them.

Finally

Here is the .kys file for all of you lazy and impatient people to download:

Bart's keyboard shortcuts (14942 downloads )
Feel free to use it and distribute it as you wish. However, I strongly urge you to explore keyboard shortcuts on your own.

To install the shortcut keys you need to exract the .kys file to the following folder (substitue $username and $version for appropriate values):

  • c:\Users\$username\AppData\Roaming\Adobe\Permiere Pro\$version (Windows)
  • ~/Library/Application Support/Adobe/Premiere Pro/$version (OS X)

I hope you’ll find these tips as useful, as I do. Enjoy.

The proper way of using transitions in Adobe Premiere Pro

SIYAH (Summary If You Are in a Hurry): If you want your clip to fade to black, apply simple cross-fade at its end. Use dip to black only as a transition between two clips, not at the beginning or at the end of a clip.

There seems to be some misunderstanding about how and when to apply transitions like Dip to Black or Dip to White in Premiere Pro. It is even propagated in some training videos and this is pretty unfortunate. I hope this article makes the issue clearer.

First, let’s take a look at how transitions work in Premiere in general.

You can apply any transition as a transition between two clips (“Normal transition”). By default it will be centered on the edit point, although you can easily change it either in the timeline, or in the effect control panel. The transition will then be applied between the two clips – applying the cross-fade, slide, wipe, swush and any other wild effect that you choose to use.

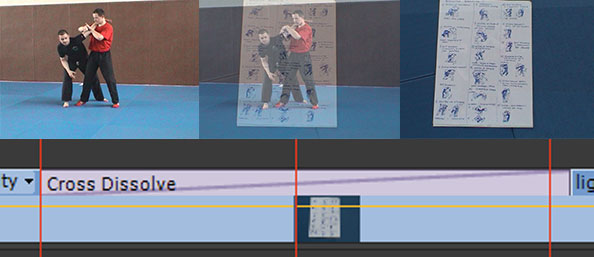
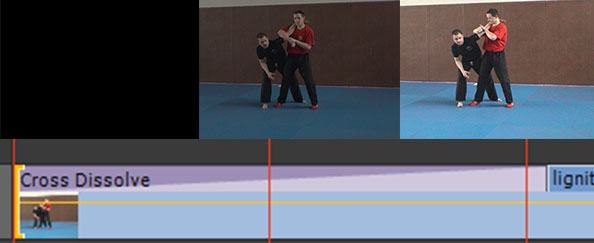
Standard cross-fade transition applied between two clips gives an expected result.

You can also apply a transition at the beginning, or at the end of a given clip (“Single transition”). In that case, Premiere will act as if it was applied between your clip, and a transparent video clip, revealing (but not proplerly transitioning to) the layers beneath, and if there are no layers, the black background.

Cross-fade transition applied at the beginning of a single clip. It is the proper way to fade the clip from or to black.

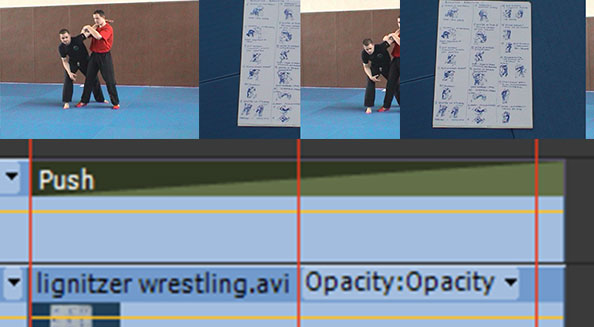
Push is a good example of the difference between transition and reveal. If you apply it between two clips, you will see both pictures moving. However, if you only apply it to a clip on a layer above, only the clip with the transition will move, revealing a static clip beneath. There are times that you might want to use one way or the other, depending on your artistic preference. No way is necessarily more proper than another, just be aware of the difference.

Push transition applied as the transition between two clips. Both clips take part in the movement.

Push transition applied at the end of a clip reveals the underlying static layer. Only the clip with the transition is moving.

Now let’s take a look at how Dip to Black or Dip to White transitions work.

Each is an equivalent to creating a single frame of black or white, and cross-fading first the outgoing clip into the given color, and then fading in the incoming clip from this color.

Dip to Black as a transition fades the outgoing clip to black, and then reveals the incoming clip by fading from black.

It means, that if you apply it at the beginning, or at the end of the clip you will see the clip fading to the color in the middle of the transition, not at the end of it. I’ve seen people compensating for it by tweaking the transition end point in the effect panel, which seems to me the worst possible way to do it. Let me repeat: you should never use Dip to Black or Dip to White at the beginning or at the end of a single clip. Use it only as a transition between two clips.

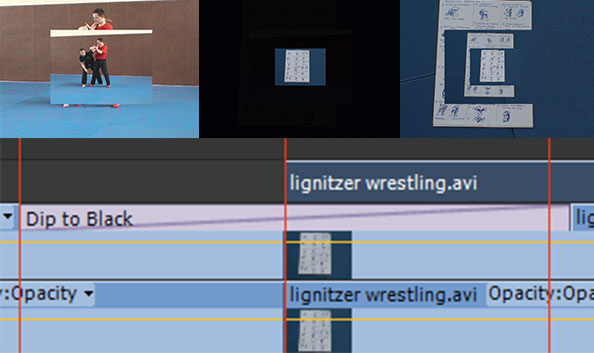
Dip to Black applied to the beginning of the clip will produce the first half of the transition as black frames. You should never do that. Ever.

Dip to black might also produce some weird results with multiple layers or transitions stacked upon each other. It used to be worse in previous versions (the example shown in the video mentioned at the beginning would fade the whole sequence to black upon encountering the video due to a bug in render order in CS3), but still dip to black will fade all layers below itself to black, not only the clip that you apply the transition to. It might surprise you, especially if you don’t know how exactly the effect works.

Dip to Black applied to a given layer will fade to black not only this layer, but also all the layers beneath, and in earlier versions of Premiere also the layer above. Unless you know what you are doing, stay away from this method of applying this effect.

I hope this clears the issue.

Tips

Additionally I’d like to offer a few productivity tips regarding the transitions in Premiere Pro CS6:

  • Keyboard shortcut for “Apply Video Transition” is set by default to ctrl/cmd+D. Set your default transition to Film Dissolve or Dip to Black, and redefine as ctrl+alt/cmd+opt + D.
  • Define a keyboard shortcut for “Apply Video Crossfade Transition” as ctrl/cmd+D.
  • You can also customize “Apply Video Dip To White Transition” and “Apply Video Wipe Transition” in a similar manner, if you so choose.
  • To apply a transition at the beginning or at the end of the clip that is adjacent to another clip, hold ctrl/cmd while dragging the transition from the bin – unfortunately, no keyboard equivalent exists yet. This tip also applies to earlier versions of Premiere.

Green screen primer

Having recently had an opportunity to do some green screen work, which at first glance seemed to be a quick job, and later turned out to require some pretty hefty rotoscopy and compositing, I decided to write down another caveat, this time on using a green screen. Please note, that the pictures are for illustrative purposes only. For convenience, wherever they are labelled as YCbCr colorspace, I used Photoshop Lab/YUV to create them, which is very similar, but not identical to YCbCr. Also, many devices use clever conversion and filters during chroma subsampling, which reduces aliasing and generally are better at preserving the detail, than Photoshop is in its RGB->Lab->RGB conversion, so the loss of detail and differences might be a little smaller, than depicted here, but are real nevertheless.

Green screen mostly came about because of the way that digital camera sensors are built. The most common bayer pixel pattern in CMOS sensors used by virtually all single-chip cameras consists of two green sensors, and a single blue and red ones (RGGB). Which is a sensible design, if you consider the fact that the human eye is the most sensitive in green-yellowish regions of the light spectrum. It also means, that you will automatically get twice as much resolution from the green channel of a typical single-chip camera, than from either red or blue one. Add to this the fact that the blue sensors most often have the most noise, due to the fact that the blue light has the least energy to deposit in a sensor, and the signal is simply the lowest there, and you might start to get a clue why green screen seems to be such a good idea for digital acquisition.

RGGB sensor mosaic

Typical CMOS RGGB pixel mosaic. There are two times as many green pixels than red or blue.

So far this discussion did not concern 3-sensor cameras or the newest Canon C300 with the sensor twice the size of encoded output, however the next part does.

Green channel has the most input (over 71% in Rec 709 color space specification) in the calculated luma (Y) value, which is most often the only one that gets encoded at full resolution when compression scheme called chroma subsampling is used – which is almost a given in most cases. All color information is usually compressed in one way or another. In 4:2:0 chroma subsampling scheme – common to AVCHD in DSLRs and XDCAM EX – the color channels are encoded at 1/4th of their resolution (half width and half height), and in 4:2:2 at half resolution (full height, half width). These encoding schemes were developed based upon the observation that a human eye is less sensitive to loss of detail in color than in brightness, and in horizontal plane, than in vertical. Regardless of how well they function as delivery codecs (4:2:2 is in this matter rather indistinguishable from uncompressed), they can have serious impact on compositing, especially on keying.

Various chroma subsampling methods

Graphical example of how various chroma subsampling methods compress color information

Recording 4:4:4 RGB gives you an uncompressed color information, and is ideal for any keying work, but it is important to remember, that you won’t get more resolution from the camera, than its sensor can give you. With typical RGGB pattern, and sensor resolution not significantly higher, than final delivery, you will still be limited by the debayering algorithm and the lowest number of pixels. It’s excellent if you can avoid introducing compression and decompression artifacts, which will inevitably happen with any sort of chroma subsampling, but it might turn out that there is little to be gained in pursuing 4:4:4 workflow due to the lack of proper signal path, as is for example with any HDMI interface from DSLRs, which outputs 8-bit 4:2:0 YCbCr signal anyway, or many cameras not having proper dual-link SDI to output digital 4:4:4 RGB. Analog YCbCr output signal (component) is always at least 4:2:2 compressed.

A good alternative to 4:4:4 is a raw output from camera sensor – provided that you remember about everything what I wrote before about the actual sensor resolution. So far there are only two sensible options in this regard – RED R3D and ArriRaw.

There are also not very many codecs and acquisition devices that allow you to record 4:4:4 RGB, and most still require fast and big storage arrays, and thus its application is rather limited to bigger productions with bigger budgets. It is slowly changing due to falling prices of SSD drives that easily satisfy the writing speed requirements, and portable recorders like Convergent Design Gemini, but storage space and archiving of such footage still remains a problem, even in the days of LTO-5.

Artifacts introduced by chroma subsampling

Chroma subsampling introduces artifacts that are mostly invisible to the naked eye, but can make proper keying hard or even impossible

Readers with more technical aptitude can consult two more detailed descriptions of problems associated with chroma subsampling:

  1. Merging computing with studio video: Converting between R’G’B’ and 4:2:2
  2. Towards Better Chroma Subsampling

The higher sensitivity of human eye and cameras to green color means also, that you don’t need as much light to light the green screen, as you would for the blue one. The downside however is that the green screen does have much more invasive spill, and due to the fact that it is not a complementary color to red, it is much more noticeable and annoying than the blue spill, and requires much more attention during removal. Plus spending a whole day in a green screen environment can easily give you a headache as well.

Generally it is understandable why the green screen is a default choice for digital pipeline. However, as with all rules of the thumb, there is more than meets (or irritates) the eye.

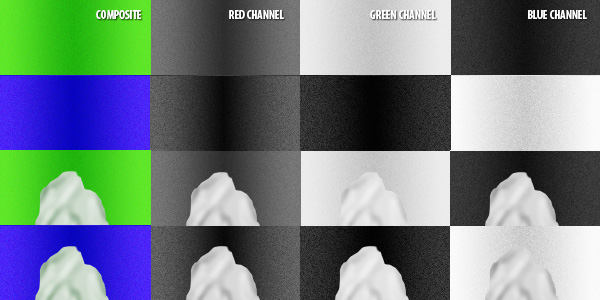
When considering keying, you need to remember that it is not enough that you get the highest resolution in the channel where your screen is present (assuming that it is correctly lit, does not spill into other channels, and there is not much noise in the footage). Keying algorithms still rely on contrasting values and/or colors, using separate RGB color channels. Those channels – if chroma subsampled – are reconstructed from YCbCr in your composition software.

Therefore, even assuming little or no spill from the green screen to the actors, if you have a gray object (let it be a shirt), which has similar value in green channel to the green screen, then this channel is made useless for keying by this very fact. You can’t get any contrast from it. You and your keying algorithm are left to try obtaining the proper separation in the remaining channels, first red, and then blue (where most likely most of the noise resides, and which has meager 7% input in luminance), which automatically reduces your resolution, also introducing more noise. In the best case you get a less crispy and a little unstable edge. In the worst, you have to resort to rotoscoping, defeating the purpose of shooting on the green screen in the first place.

Now consider the same object on a blue screen – when your blue screen has the same luminance as a neutral object, then you throw the blue channel away, and most likely can use green and red channels for keying. Much better option, wouldn’t you say?

Difference of blue screen and green screen keying with improper exposition

If the green value of an object on a green screen is similar to the screen itself, keying will be a problem

Of course this caveat holds true only for items with green channel level close to the level of the screen. If we want to extract shadows, it’s a completely different story – we need to get contrast in the shadows as well, and to this end green screen will most likely be more appropriate. But if we don’t, then choosing a color of the screen entails more than simply looking what color the uniforms or props are or a basic rule of the thumb that “green is better for digital”. You need to look at the exposure as well.

There are a few other ways to overcome this problem. One is to record 4:4:4 using a camera that can deliver proper signal, then you are only limited by the amount of noise in each channel. Another is to shoot at twice the resolution of final image (4K against 2K delivery), and then to reduce the footage size before keying and compositing. This way the noise will be seriously reduced, and the resolution in every channel will be improved. Of course, then it is advisable to output the intermediates to any 4:4:4 codec (most VFX software will make excellent use of DPX files) to retain the information.

Another sometimes useful – and cheap – solution might be to shoot vertically (always progressive, right?), thus gaining some resolution, however remember that in 4:2:2, and in 4:1:1 compression schemes, it is the horizontal (and now vertical) resolution that gets squashed, so the gain might not be as high as you hoped, and in the dimension that is more critical for perception, so make sure that you’re not making your situation worse.

The key in keying is not only to know what kind of algorithm or plugin to use. The key is also to know what kind of equipment, codec and surface should be used to obtain the optimal results, and it all starts – as with most things – even before the set is build. Especially if you’re on a budget.

To sum up:

  • Consult your VFX supervisor, and make sure he’s involved throughout the production process.
  • Use field monitoring to see how the exposition in the green channel looks like, and if you are gettting proper separation.
  • Consider different camera and/or codec for green/blue screen work.
  • Try to avoid chroma subsampling. If it’s not feasible, try to get the best possible signal from your camera.
  • Consider shooting VFX scenes in twice the final resolution to get the best resolution and the least noise.

Three (or more) ways to make a vignette in Premiere Pro

UPDATE: You can download the plugin that I wrote here.

One feature that I lack in Premiere Pro is masking and vignettes in its standard color-correction tools. Unless you are using plugins like Colorista, other dedicated grading software or simply send your sequence to After Effects (if you have it), there is no obvious way to make a vignette. Here are however three ways to accomplish this effect, each having their pros and cons.

The first two ways to make a vignette require use of a blending mode, and towards this you need to understand what they actually do. I recommend going to ProVideo Coalition site, they have a nice tutorial on the subject. We will be using multiply mode to darken the image or overlay to saturate and lighten/darken the image (basically increase contrast and “punch”).

Multiply mode darkens the underlying image using the luminance value of the layer (clip) to which it is applied. 100% black darkens underlying layer to 100% black, 50% gray darkens by 50%, so for example 50% gray multiplied by 50% gray is 75% gray, and 100% white is totally transparent.

Overlay mode is partly multiply, and partly opposite. In overlay mode, 50% gray is transparent, darker colors work like multiply, and lighter colors lighten the image in the opposite manner than multiply: 100% brightness (white) makes layer below white, 25% gray makes underlying 100% black 50% gray, and so on. An overall effect is an increase in contrast and saturation (if you want to get more “punch” from your footage, try making a copy of it on the layer above and applying overlay mode to it, and see what happens, it’s a common trick to use).

I hope you’re not confused yet 🙂 Now for the vignetting:

1. Photoshop file

Simply create a Photoshop file or tiff with a dimension of your sequence. Set your foreground color to black, and background color to white or gray, click on the second gradient option to select radial gradient, click on “reverse” and drag from the center of attention outwards, drawing a vignette shape. The lightest point should be placed where the center of attention should be in your footage, and the darkest on the outside. Save the file, it should look something like this:

Import the file to your project by dragging it into project window, put it on the timeline, and apply appropriate blending mode – it’s available under the opacity part of Effect Controls palette for this clip. Tweak opacity setting to achieve desired effect.

It is a very simple, method, that is also the least intensive on CPU, although it requires switching to another program to do part of the work, and does not provide easy way to change settings – you have to change the file itself. Another advantage is that you can put it on the top layer and affect all layers below.

2. Separate layer with ramp

Create a new solid in project window. The color is unimportant, make it the full size of your sequence. Then put it over the footage, put a “ramp” effect on it (it’s in “generate” sections. Select radial, reverse, and move start point towards the center, and the end point towards the edge of vignette. Your ramp should look similarly as the Photoshop file above. Then apply blending mode and adjust opacity as in method 1.

This method is a little more CPU intensive, but gives you the possibility to change the vignette without leaving Premiere, and does not require you to have Photoshop or any other such tool at all. You can even animate the vignette if you feel like it.

3. The Circle effect

If you don’t care about elliptical vignetting, you can use the Circle effect, which populates the oh-so-intuitive category of “generators”. It is a really versatile effect that I’ve found only recently. If you apply it for the first time, you will most likely dismiss it – as I did. However, it has most things that a decent vignette needs – set your blending mode to multiply, set your color to black, add feather, reverse the mask, and there you go. What is missing is the possibility to draw an ellipse instead of a circle, and to rotate it. But still it can be pretty useful, and it is not very CPU intensive. No CUDA acceleration though.

By the way, if you thought that the Ellipse effect present in the generators category would make your day, you’d be sorely disappointed. It’s a completely different effect, incidentally totally broken in Premiere Pro, even though it works well under After Effects.

4. Lightning Effects

The most demanding, but also giving you most options, including the possibility of additional color correction, is the effect that I have hardly ever seen mentioned in the context of Premiere – “Lightning Effects”. It is quite a powerful tool, giving you a lot of AE lights functionality without the need to use dynamic link or such. If you want to create a vignette, simply apply it to the chosen clip. Now do some tweaking:

  1. Select the first light as the spot light (usually set as default).
  2. Click on the effect name or the transform icon to the left of it to see visual input in viewer window.
  3. Adjust the center point, both radiuses (radiae?) and the angle so that the center is where you want to point viewer’s attention.
  4. Alternatively tweak focus (feathering) and intensity properties for additional effects.
  5. You can also tweak Ambient Light Intensity and Exposure to adjust overall lightness or darkness of the image.

Voila! This is it. Below are some pics before and after. As you can see I decided to go for rather subtle effect, but Lightning Effects is a really powerful—if CPU intensive and not supported by GPU acceleration—tool that you can add to your editing and color correction arsenal. It has enormous potential, and creating a simple vignette with it may even sound like a blasphemy, but it’s a good place to start the exploration. The only drawback is that you can’t apply it to multiple layers below like you can with other two methods. But hey, in Color you can’t do it as well, so don’t complain 😀

Visual input of Lightning Effects filter

Footage before

Footage after