Dr SG, or How I Learned to Love SpeedGrade…

sgSome time ago I mentioned that due to certain turn of events I ended up learning more about SpeedGrade than I ever expected. Since the cat is out of the bag now, let me elaborate. I was contacted – of all days on April 1st – with an offer to become the technical editor for the “Adobe SpeedGrade CC – Classroom in a Book” book authored by none other but Alexis van Hurkman himself.

After making sure that it was not April Fool’s Day joke, I was happy to accept the job. It turned out to be a great experience. Granted, Alexis is an experienced technical writer, so I ended up having very little input, but the side effect was that I learned SpeedGrade from top to bottom – something that would most likely never happen otherwise.

Regardless of my still present love for Resolve, I ended up appreciating several nifty features that SpeedGrade does have. The shortcuts to quickly adjust the interface, the ability to create grading layers spanning over several clips, quick adjustments for tonal ranges (shadows, midtones and highlights) really emphasize the “speed” part of the application.

Of course, the limitations which I described before still apply, and Resolve is still king when it comes to power windows, tracking, secondary selections and automatic grade management. But SpeedGrade definitely has potential, and from what I know, it is not going to go to waste.

I’d like to thank Senior Editor Karyn Johnson for the opportunity to be part of the team, and sincerely recommend the book to anyone interested in learning SpeedGrade. And if you are a Premiere CC user, you might need it sooner than you think. Be prepared.

Warning about using RGB and Luma Curves in Premiere Pro CC

Update: The 7.1 version due out in October is going to fix the issue altogether. Great job, Adobe!

Update: The 7.0.1 patch for Premiere Pro CC fixes some of the below mentioned issues, although unfortunately not all of them.

To my great chagrin Premiere Pro CC changed the way curves operate. Right now the curves, both RGB, and Luma, clip the superwhites and superblacks, and there is no interpolation going on after the curves hit 0 or the white level (255 or 1.0). In CS6, the curves followed the general slope, and it was possible to recover some of the “overshot” material. Right now, if you stick to curves, all clipped data is lost.

cs6

Curve's interpolation in Premiere Pro CS6 allowed to recover superwhites or superblacks, and correct the contrast in the same instance.

cc

Premiere Pro CC clamps all superwhites and superblacks, and recovering the detail is not possible with the use of RGB or Luma Curves.

This is completely new, unexpected, and if you ever used curves, it changes your workflow dramatically, even if you don’t know it yet.

It means that you must remove the superwhites and superblacks from the clip before you use RGB curves. It means that if you were like me, using curves to apply the basic correction and contrast in one go, you cannot do it now. You have to first make the signal “legal” – reduce the superwhites and raise the superblacks with for example Fast Color Corrector, so that they fit between the range that curves operate on – RGB scale that is not overshot in either direction, even if you are working in the floating point (max bit depth).

fcc

In Premiere Pro CC you need to use Fast Color Corrector or Three-Way Color Corrector to bring the superwhites back into the RGB scale. Only then you can apply curves, and be sure that you are not loosing data.

It also means that there is no real backwards compatibility within the projects that used curves. Your colors will not be the same, if you had any superwhites in the project. I highly advise you to finish your current projects in CS6, and only then create the new ones in CC, being mindful about the necessity to use Fast Color Corrector before applying curves.

Adobe is aware of this issue, and hopefully some fix will come soon, but while using CC 7.0.0 version of Premiere you need to remember about this very real problem.

D is for “Deselect Before Applying a Default Transition”

The very first thing that you should do… no, let me try again. The very first thing that you must do after installing and opening the new Premiere Pro CC is to set a keyboard shortcut for Deselect All. Trust me. This will save you a lot of trouble later.

This is something that you must do as well, if you think that applying transitions in Premiere no longer works.

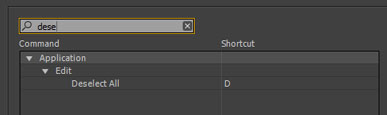
Open the Edit menu, choose Keyboard Shortcuts…, and in the search box type “deselect”. Fortunately only one option will be visible, the one that appears in the Edit group – “Deselect All”. Assign a shortcut to it which will be easy for you to remember. I sincerely recommend D , because D is also used to apply default transitions. And if you have used Premiere before CC, you will have to learn this new shortcut combination:  DCmd /Ctrl + D to apply the default video transition, or  DShift + Cmd /Ctrl +D for audio transitions.


shortcut

Set this shortcut right now!

Why?

Premiere Pro CC introduces what is called “the primacy of selection”. Translated to plain English it means, that if you have anything selected in the timeline, Premiere will attempt to use the selection for any operation you choose, disregarding track selections, playhead position, etc. While there is an argument to be made that it’s more effective, more consistent (well, perhaps some day), it is changing the behavior which was long established in Premiere – using the playhead position for applying transitions.

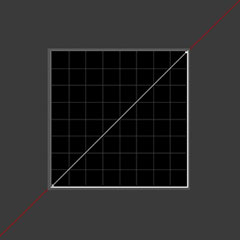
Here’s how the new behavior works: if a clip is selected, and it is between two other clips, nothing happens. If the clip has at least one edit point where it does not touch anything, then the selected transition is applied to the loose ends. And if multiple clips are selected, the transitions are additionally applied between these clips. Not very obvious, right?

before

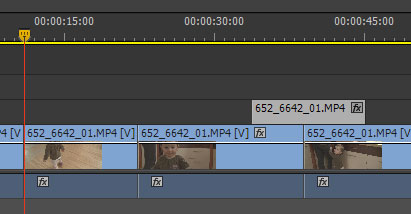
The clip on track V2 is selected. You might not even notice it. At least I didn’t!

after

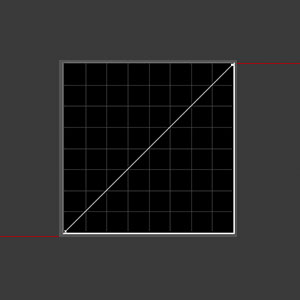
And here’s the result – instead of applying the transition to the edit point under the playhead, the selected clip receives the transitions on both sides.

If you are like me, and you select and deselect clips all the time, whether to adjust effects or for any other reason, then this new behavior is going to bite your muscle memory hard. Before you learn the  DCmd /Ctrl +D combination, you will find yourself cursing two times: once when the desired transition does not appear in the place you think it should, and the second time, when during preview you find stray transitions in various places.

This is the collateral damage or “the primacy of selection”. If you forgot to deselect, and want to use the old way of applying transitions – by the track selection and playhead position – then you are screwed, and need to adjust. It does not help to know that this behavior is the result of Final Cut Pro’s inability to select multiple edit points at once, and was introduced there as a remedy to this limitation. Supposedly a lot of FCP users asked for this functionality in Premiere. They got it, and it came at a cost to established workflows. Like the introduction of patch panels in CS4, only more mischievous, because the results may not be immediately visible.

before-2

Here the selection is a bit more obvious. Watch what happens, when the shortcut is pressed now.

after-2

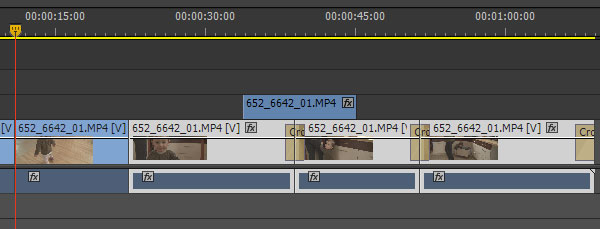
The transitions are applied at the end, and in between the clips. Remember to learn the new combination of keys – D, cmd/ctrl+D – if you want to use the playhead to apply the transitions.

To add confusion, there is a keyboard shortcut to “Apply Default Transition to Selection”, which works exactly like Apply Default Transition if clips are selected, although it applies both audio, and video transitions.

My little mind can’t comprehend the idea behind this change, especially since I’m not the only one who was taken aback upon the first encounter with the new behavior. But I know of others who are happy about it, and I found some use of it as well… only to encounter a stray transition during the final viewing of a recent production.

So remember – D , Cmd /Ctrl +D is your new shortcut for Apply Default Transition at the Playhead.

Apple’s move to FirePro GPUs in the new Mac Pro

Perhaps one of the biggest surprises during the recent sneak-peek of the new Mac Pro was the inclusion of AMD FirePro GPUs. While at first it might look like Apple again showing the middle finger to all CUDA users, and perhaps to Adobe or BlackMagic, “it ain’t necessarily so”.

Personally, I always liked AMD and ATI for their affordability, power saving, and sensible performance. Even though they usually lagged a bit behind nVidia and Intel, it was good to have competition which would keep the big players in check. In fact, the Pentium 4 fiasco was the moment when I really hoped that AMD will become the leading player in the CPU game. I have this personal love of underdogs. Alas, it was not meant to be.

The trouble began when Adobe started to use nVidia’s CUDA technology for acceleration, and when the performance of Intel’s new iCore series left AMD far behind. Essentially, if one wanted to use Adobe software, the choice was completely gone. It was Intel CPU and some kind of CUDA GPU. Adobe officially pushed heavily for Quadro solutions, which were way overpriced, and in terms of performance always behind the latest GTX series. Personally, I never bought into Quadro hype, because the benefits were not there.

On the other hand, Apple stuck to ATI cards, giving the users very limited offer, if they wanted to profit from CUDA. It was GT8800, GTX 285, or Quadro 4000. All terribly outdated or pricy. Now, this could really have been considered the middle finger to Adobe, considering FCP and Motion as competing products, and we know that Adobe engineers were not happy about the turn of events. Of course, it was also Apple’s way of promoting their own standard – OpenCL – which came about partly as the competition to nVidia’s CUDA. So the situation was a bit complicated, especially for Mac users.

Granted, nVidia was collaborating with Apple, AMD, IBM, and Intel on OpenCL since its inception, as part of the Khronos Group. Therefore the support for OpenCL soon became a standard for nVidia GPUs. Also, while CUDA is proprietary and optimized for Fermi/Kepler architecture and performance, OpenCL is open, and able to utilize any device, which can support its extensions. In OpenCL even CPUs can be put to work using the same code that programs GPUs. Of course, while there are only 4 to 12 cores in a single CPU, as compared to about a thousand in a decent GPU, the CPU input tends to be neglible, but it is there. The performance on equal hardware lagged until very recently, but last year OpenCL bridged the gap, and the two seem to operate on the parity level now.

Besides, Adobe has supported OpenCL in Premiere since CS6. BlackMagic claims that Resolve 10 will also have OpenCL support, and they seem to be pretty happy about it. The end user should not experience any problems, perhaps with the sole exception of the Ray-traced 3D engine in After Effects, which requires CUDA for accelerated processing. But this will most likely change in some future version as well.

I should indeed be cheering for OpenCL for having finally taken off. After all, it’s superior to CUDA in all but performance, and Adobe users should in fact be happy that the new, open, and less expensive alternative to nVidia/CUDA has been created. Especially if you consider that the hardware is not equal, and the recent AMD W-series GPU cards seem to fare pretty well against its Quadro equivalents. I might consider it myself in my future upgrades. My lack of enthusiasm stems perhaps from the fact that I wanted to add GPU acceleration to my plug-ins, and invested a bit in researching the CUDA engine, and not OpenCL.

After giving it some thought I agree with Philip Hodgetts, that there is no point in panicking, and that CUDA is the solution that will either go away in the future, or be relegated to some obscure niche in certain specialized applications. OpenCL is indeed the future. So at least in this regard the Apple’s bet is absolutely spot on.

And the new Mac Pro? Well… it’s a completely different story.

Label users, beware!

Beware of a nasty bug in CS6:

If you import the footage in such a way that a bin or a number of bins is created upon import, and you label your clips on the timeline, you might be in for a nasty surprise at some point.

If you choose to move your files from the bins, or sometimes even simply select them by the innocent “Reveal in Project” command or so much as click on them, you are going to loose labels in the timeline for selected footage in the given folder. *Pooof*, gone. Like this. Without any possibility of undoing it. If you have not saved your project for some time, you face either loosing the labels, or loosing the changes since your last save, because I tell you, these labels are not coming back!

Now, if you are lucky to have a saved project with your labels still applied, don’t breathe with relief yet, because they are not safe! First follow the following steps to the letter:

  1. Save the broken project under a different name
  2. If your Premiere window is maximized, click the maximize icon and set the window size as you like, just so that it is not maximized.
  3. Open the old project.

This bug propagates across projects! If you have Premiere opened in the maximized window – as most of us usually do – then the moment you open your project, the labels will evaporate as well. But if for some reason you do not have your window maximized (it might be larger than one screen, but it must not have the maximized icon turned on), you are safe for the time being. The labels will remain on the timeline until you trigger the bug again by selecting your files or moving them.

I have no idea why, but having your window non-maximized gives you a chance to save your work. This is the weirdest bug I have ever seen, and it is a nasty one.

The solution is to either import media in such a way that no folder is created, or to move them to another folder immediately after import. It does nothing to save your existing projects, but it will protect you in the future.

I stand corrected…

In an excellent recent article on Pro Video Coallition Alexis van Hurkman explained how the terminology which I use in my Power Window filter, and in my Lift, Gamma, Gain tutorial is incorrect. The control called “Lift” should in fact be called “Offset”, based on the way it works.

Similarly, the formula which I used to calculate the resulting pixel value in the filter is also a bit different than the approved ASC CDL standard. In my case I decided to apply the power function (gamma) to the input value of the pixel, and the CDL order applies gamma as the last operation, affecting the result of the offset and gain corrections. Come to think about it, it makes a bit more sense than the way it is implemented now, especially for the footage which was shot in log space. If you set your black (offset) and white (gain) levels, you don’t want them to move, when you change the midtones (gamma).

Perhaps for the compatibility sake I should add another (sigh…) control where the user would be able to choose between color calculations, but after giving it some thought, I will definitely correct the order of operations in the next release of Power Window plugin.

The Case For Three-Button Mouse Editing

RzrNaga2012_view3Mouse-driven editing has usually been associated with the lower end of video editing, and to a certain extent justifiably so. If I see a person using only his or her mouse to edit, I don’t consider them very seriously. Editing is a tough job, and a human being has two hands, so why not put both of them to work? Put that left hand on the keyboard right now!

The question of whether the right hand should spend more time there as well or not is debatable. Even though I have been driven through CS6 mixed bag of innovations to make more extensive use of my touch-typing skills during editing, I am still looking to improve on the mouse side of things, because the hybrid mouse + keyboard editing has been historically the fastest way to use Premiere.

When it comes to mouse mastery, nothing can beat 3D artists, especially modellers. The necessity to constantly change the point of view in three dimensions clearly showed that not only a single mouse button is not enough, but that even two will not suffice. You need a 3-button mouse to work in a 3D application. Period.

Granted, using the middle button with most mice is something that requires a bit of practice, since often it entails pushing on the scroll wheel. However, the newly acquired skill gives you more flexibility, and options. Why then not use a 3-button mouse in editing? And why not take advantage of the fact, that pushing the middle button is not as easy, as pushing the other ones?

One thing that I found myself using a lot during mouse-driven editing was delete and ripple delete. Even after remapping my keyboard, it still remained a two-click process. First select the clip, then hit delete. Fortunately you can use both hands, but still, there is some space for optimization here. The middle mouse button could be used to perform a single click ripple delete.

Another idea for middle mouse button is to map it to “Deselect all”, and it might become pretty handy with the incoming CS Next confusion about the primacy of selection over playhead, or targeted tracks for example during applying transitions.

Both of these options are available now via many macro recording and automation pieces of software. Personally I use the ones that came with my mice – either Microsoft’s IntelliMouse or Razer Synapse. They both allow remapping the middle mouse click for certain applications to a macro or a shortcut key (and much more, if you wish to explore them further). Therefore I first make sure to create the keyboard shortcuts to “Ripple Delete” or “Deselect All”, and then to map these shortcuts to the middle mouse button. And voila! Single click ripple delete or deselect all are literally at your fingertips now.

The quest for ever more efficient editing continues, and I hope to have some exciting information for you soon.

Adobe Anywhere – Currently An Enterprise Solution Only

On NAB we’ve seen a few reveals from Adobe, and among them also the premiere of Adobe Anywhere. I speculated extensively on Anywhere in the past, and I was perhaps a bit too optimistic in my assessment for required hardware and bandwidth, motivated mostly by the hope that we would be able to install it in our small facility as well. Alas, it’s not going to happen.

As of now, Anywhere requires at least 4 servers to run: one being a collaboration hub, and 3 Mercury Streaming Engines. Karl Soule explained, that this is a required minimal structure, because the MSE machines also take care of the rendering. This hardware should cover the needs of 6-8 editors, and supposedly scales well by adding additional machines. It’s certainly not inexpensive (starting at $5000 but most likely achieving $15,000 to $20,000 per piece), and the cost is certainly increased by Windows 2008 Server Enterprise Edition (about $2300 per license) and MSE requiring at least one Tesla K10 processing unit costing $3000 each.

I was not mistaken though about replacing expensive SAN licences with something a bit more affordable. The two currently recommended systems (Harmonic MediaGrid and Isilon X400 series) sport their own filesystems which cover most of the SAN benefits, without incuring the overhead. Plus they work via Ethernet, lowering the price of backbone architecture even further. However, don’t get your hopes up, these solutions are still pretty expensive, going into hundreds thousands of dollars.

Obviously, Anywhere is not a plug and play solution, it requires tailoring to the specific workflow and solutions in one’s facility, and Adobe has their own servicemen who will install and configure it. Judging by the fact that the cost of software and installation is also not publicly available, it is safe to assume that it does venture into the “if you have to ask, you can’t afford it” territory.

My bandwidth estimation was also too optimistic. The suggested pipe for seamless experience seems to be 25-40 Mbps, which is not insignificant, and in fact might be the biggest limiting factor to the actual spread of Anywhere. While it’s easily achievable locally, it is far beyond standard 3G data rates (2 Mbps), requiring LTE or HSPA+ connections, not always easily available, and is slightly beyond WiFi 802.11 a and g standards, requiring at least 802.11n communication using multiple antennas. It is also at the edge of what the most recent ADSL modems can provide (40 Mbps in the ideal conditions). So perhaps Bob Zelin’s dream of remote editing will still be limited by the last mile infrastructure, at least for a time.

In the end, the message is pretty clear: right now Adobe Anywhere is aimed at the enterprise players like CNN and large post houses who can afford the necessary equipment or perhaps can fit it into an already existing hardware structure. Certainly, the benefits are great, but the little folk can only hope that at some point these solutions will trickle down.

NAB Special – KEM roll and a multicam trick in Premiere Pro next

No typical tutorial this week, but a small demonstration of the KEM roll (sequence editing) feature in the next version of Premiere Pro, and a little multicam trick which can help you to “unnest” your clips from a sequence. I hope you’ll enjoy it, even if the software is not available yet.

NAB Special – SpeedGrade revisited

Today at NAB Adobe revealed the next version of their video tools. From my perspective, the most interesting developments happened on the Premiere Pro front, and the next note will deal exactly with that. As of now, let’s take a look at another promising part of the suite – the new SpeedGrade.

SpeedGrade interface in its full glory. Quite a lot of things are going on, and certainly it’s an improvement over the previous version to have these panels all on a single screen.

Courtesy of Adobe development team I had an opportunity to take a sneak peak at the pre-release version. I played with it long enough to see how much of my integration wish list has been adressed, and I have mixed feelings about it:

  1. Monitoring on different hardware – half check. Right now it’s possible to get the output on AJA and Matrox devices, or the second monitor. Bluefish and Blackmagic (which I’m personally the most interested in) support still remains vague.
  2. Control surfaces – half check. Tangent Elements is supported, but Avid Artist not so much. I’ve been considering buying one for some time, so it’s again a mixed blessing. The “virtual trackball” behavior for tablets, most likely an attempt to simulate the behavior of actual trackballs, is something that personally I’d be glad to turn off, and perhaps then it would be easier to actually use the software with Wacom.
  3. Premiere Pro integration – not as of now, but the newest version of Premiere has tightly integrated “Lumetri effect” which allows one to apply a look from SpeedGrade to any clip on the timeline. Will the release version of SpeedGrade be able to read Premiere projects and apply the effect? And then read it back for round-tripping? We shall see.
  4. File support – half check. What might break it all down is the fact that not all file formats that Premiere supports, are supported by SpeedGrade. I use XDCAM EX on a daily basis, and this is not supported. Granted, it’s also not supported by Resolve, so I’d be inclined to do the transcoding.
  5. XML import and export – nope. Hopefully it is amended by feature number 3 at certain point, but on the other hand, implementing it might be a tad easier.
  6. More Adobe-like UI – half-check. A few tweaks to the interface here and there, some unification of the icons, but we’re still in a bit different world. Granted, it’s not that important an issue, UI can be learned, and should be dictated by the needs of the application, and in this regard the flexible layout of SpeedGrade has a distinct advantage over Resolve or other applications.

You can quickly turn on and off the panels, to focus on the actual footage that you intend to grade.

As you can see most of the issues have been addressed in some manner, so there certainly is some progress, although for the seamless integration into the pipeline we will still have to
wait. It is kind of disappointing, especially after seeing how Premiere changed within past year. Certainly the goal of creating the default color grading application for Premiere editors remains unachieved.

Unfortunately as of today, mostly due to the points 1 and 4, the ease of use, and the number of available features, Resolve Lite still remains my software of choice, unless I’d be grading in 2K or higher, which currently I’m not. I wish SpeedGrade team all the best in their efforts, and I shall monitor their progress with interest, waiting for the moment when I can use the software for one of our productions.

There has also been an interesting development for me in terms of SpeedGrade, but right now I am not at liberty to say anything more than I will most likely learn this software much better than I ever wanted to at present moment. Life goes mysterious ways.