
The newest tutorial is a continuation of part one, and is mostly an overview of the Vingette plugin interface, at the same time showing how you can use this filter to lighten part of the scene:


The newest tutorial is a continuation of part one, and is mostly an overview of the Vingette plugin interface, at the same time showing how you can use this filter to lighten part of the scene:

It’s the highest time for the new brief tutorial. This time I’m covering the basic application of the CI Vignette effect, and how to use the GUI to quickly adjust its shape and effect.
Summary: Always apply your 8-bit effects as the last ones in the pipeline.
A few years ago Karl Soule wrote a short explanation of how the 8-bit and 32-bit modes work in Premiere Pro. It’s an excellent overview, although it is a bit convoluted for my taste (says who), and does not sufficiently answer the question on when to use or not to use 8-bit effects, and what are the gains and losses of introducing them in the pipeline. Shying away from an Unsharp Mask is not necessarily an ideal solution in the long run. Therefore I decided to make a few tests on my own. I created a simple project file, which you can download and peruse ( 8-bit vs 32-bit Project file (10081 downloads ) ).
In essence, the 32-bit mode does affect two issues:
For the purposes of testing them, in a Full HD sequence with Max Bit Depth enabled, I created a black video, and with a Ramp plugin I created a horizontal gradient from black to white, to see how the processing will affect the smoothness and clipping of the footage.

Settings for a simple horizontal ramp to test it.
Next I applied the following effects:

Settings for the first Fast Color Corrector.

Master curve in the first RGB Curves effect

Master curve in the second RGB Curves effect.

Settings for the second Fast Color Corrector.
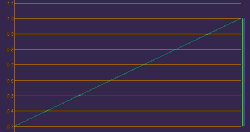
To assess the results I advise opening a large reference monitor window in the YC Waveform mode. Looking at Program monitor will not always be the best way to check the problems in the video. You should see the diagonal line running through the whole scope, like this (note, that the resolution of Premiere’s scopes is pretty low BTW):

This is how the ramp looks like without any effects applied.
Now perform the following operations, and observe the results:

The effect of the first Fast Color Corrector on the ramp. Notice the clipping.

The effect of the second Fast Color Corrector on the ramp. Notice the lack of clipping.

The effect of the first RGB Curves on the ramp.

The effect of the second RGB Curves on the ramp.

All four 32-bit effects on.

All filters on with Offset in the last place. Notice a bit less smoothness in scopes.

All filters on with Offset before the second FCC. 8-bit filter makes the data irrecoverable, and clips the highlights.

All filters on with Offset between the RGB Curves. Notice the irregularity in the curve, showing rounding errors and compounding problems.

All filters on with Offset after the first FCC. The curve is not as irregular, but the clipping is still present.

All filters on with Offset in the first place. Notice the similarity to the Offset in the last place. The 32-bit pipeline is not broken afterwards, although the footage is converted to 8-bit because of the filter pipeline.
This simple experiment allows us to establish following best practices on applying 8-bit effects in Premiere Pro:
And that’s it. I hope this sheds some light on the mysteries of Premiere Pro’s 32-bit pipeline, and that your footage will always look great from now on.
Since it’s the Christmas season, I hope you’ll appreciate the new addition to the Creative Impatience toolbox: meet the Power Window filter.
After creating the Vignette plugin, I decided that even though it did most of the things that I wanted it to, there were still some image manipulations which were pretty hard to achieve. For example, a simple operation of lightening the inside of a selected shape, turned out to be pretty problematic to perform in a decent manner.
Therefore, I set out to create a variant of the CI Vignette, which would manipulate directly lift, gamma, gain and saturation values of the pixels inside, and outside of the shape. Most of the code was reused from the Vignette, and the rest was pretty uncomplicated to write. Frankly, I spend most of the time trying to figure out how to circumvent something that I perceive to be a bug in Premiere. But then, this is the life of a software developer. We have to live with what we are given.
Without further ado: Power Window plugin for After Effects and Premiere is up and running. Be sure to visit the download page for the file, read the instructions on how to install it, and if you have problems operating the plugin, take a look at Instructions and Tutorials.

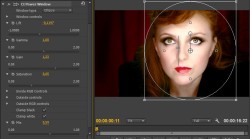
Power Window Interface.
Hopefully some day I will manage to create some decent videocast on how to use these tools. In the meantime, feel free to experiment, and let me know how it goes.
Merry Christmas, and a Happy New Year!
Quite recently I commented on what kind of features are important in my opinion for the popularity of SpeedGrade to rise. This interview with the creators and developers of SG is the proof that they do understand what is the key feature to fix:
There are three things in this interview that I wanted to take a closer look at.
One, it’s excellent that sending frames from the GPU will not require a major rewrite of FrameCycler. This was the basic hurdle, and it looks like it’s going to be amended pretty soon.
Two, it’s great to see that Photoshop does allow for LUTs to be applied to an image. In fact, it’s a very cool technique. Create and adjustment layer “Color lookup”, and in the properties panel for the layer you can select or load any .look, CUBE or 3DL LUT. For some reason I seems to have a problem with SpeedGrade’s .look files, but it’s a great tool nevertheless. One that is similar to Apply Color LUT that can be found in After Effects, and I hope is coming to Premiere as well.
Three, and most important, it is clear that they understand the next logical step for color grading – democratization.
Up until recently – and most of the colorists will most likely argue that even now – color grading has been serious business, that required proper hardware, proper monitoring, and proper place. Grading suites are still one of the most expensive facilities for post, even though the cost of components has dropped dramatically during recent years. And the prevailing opinion is that if you attempt to do it on a lesser equipment, you might as well not do it at all, because you’ll never going to get good results.
But you know what? The same argument was being made some time ago with regard to pre-press, and photo correction. You need a calibrated, expensive monitor to see all the nuances of color, you need profiles and color management, you need properly lighted room, Pantone color guides, proofs, etc. And at certain level you want and need all of that. But for most publications that see the light of day, you don’t. The reality is that even on a $299 24″ IPS monitor one can get a decent match in color, that will allow you to output great material. Heck, Dan Margulis, an acclaimed Photoshop expert, claims that you can color correct the pictures if you’re a color-blind or using a monochromatic monitor. And if you know what you are doing, most people will not see the difference.
Granted, video signal is a bit special, and you do need some kind of hardware to output it to your monitor to see the possible artifacts. And DI, projection or film is another league altogether. But at the same time, unless you are heading for a theatrical projection (and in some cases even then) you have no control on how your movie is going to be watched, and what the improperly setup TV or laptop screen will do to it. Even broadcast these days with higher and higher compression ratios, is not what it used to be. The question then becomes, what the real entry level is, and what kind of deviation from your reference point you are willing to accept.
And SpeedGrade creators seem to understand this simple fact, that in order to pick up color grading tools, you don’t need the million-dollar equipment and software any longer. You can try it at home, similarly as you can try your best using Photoshop or Lightroom to correct your photos, Premiere to edit your videos, or a word processor to write your novels. Does it mean that just because you have an access to a tool, you automatically become a great colorist? Or that the fruits of your attempts will be as great as those of the master colorists? No more than each of us is a successful, popular, and talented writer.
But somewhere in the realms of high-end entertainment industry the message of having fun is being lost. Creativity is the ultimate freedom of exploration. It does not respect borders or limitations. And playing with ideas is its integral part. To experiment, to play, you don’t necessarily need high-end tools. You need toys and imagination. And toys for aspiring colorists is what we need. Now. Especially when your home PC can handle HD footage with color correction in real time without a problem.
The sad part is that Adobe is not a hardware company, so I guess I won’t expect them to make an affordable color grading surface to play with anytime soon. We still have to wait for BlackMagic Design or some other party, even less invested in the grading market, to fill this niche, and earn millions of dollars. And I do believe that it will happen sooner or later.
The craft of color grading is expanding. More and more people know about it, more and more people like to do it, find it interesting and fun. Of course, the professional colorist is not going to disappear, like professional editors did not disappear when NLE became something one could run at his home computer. But I’m going to agree with Lawrence Lessig, Philip Hodgetts and Terence Curren – video is the new literacy. And color grading is its important part.
In the end, such democratization will only benefit the craft, even though it might make some craftsmen seem more like human beings, and less like gods and magicians. The change is inevitable. And it’s exciting to see some players embracing it.
SpeedGrade seems like a very promising addition to Adobe Creative Suite, which I have already mentioned. However, after playing with it for a short moment, I found with regret that it does not fit our current infrastructure and workflows. Below is a short list of what kind of changes that I consider pretty important. These requests seem to be quite common among other interested parties, judging by the comments and questions asked during Adobe SpeedGrade webinar.
First, as of now the only way to output a video signal from SpeedGrade is via very expensive SDI daughter board to nVidia Quadro cards. This is pretty uncommon configuration in most post facilities. These days a decent quality monitoring card can be bought for less than 10 times the price of nVidia SDI. If the software is to gain wider popularity, this is the issue to be addressed.
Adobe seems to have been painfully aware of its importance, even before the release. I’m sure that had it been an easy task, it would have been accomplished long ago. Unfortunately, the problem is rooted deep in the SpeedGrade architecture. Its authors say, that SG “lives in the GPU”. This means that obtaining output on other device might require rewriting a lot – if not most – of an underlying code – similarly to what Adobe did in Premiere Pro CS5 when they ditched QuickTime and introduced their own Mercury Playback Engine. Will they consider the rewrite worthwhile? If not, they might just as well kill the application.
Second, as of now SG supports a very limited number of color surfaces. Unless the choice is widened to include at least Avid Color, and new Tangent Elements, it will push the application again into the corner of obscurity.
Third, the current integration with Premiere is very disappointing. It requires either using an EDL, or converting the movie into a sequence of DPX files. It’s choice of input formats is also very limited, which means that in most cases you will have to forget about one of the main selling point of Premiere – native editing. Or embrace offline-online workflow, which is pretty antithetical to the flexible spirit of other Adobe applications.
The integration needs to be tightened, and (un)fortunately Dynamic Link will not be an answer. DL is good for single clips, but a colorist must operate on the whole material to be effective. Therefore SG will have to read whole Premiere sequences, and work directly with Premiere’s XML (don’t confuse with FCP XML). It also means that it will have to read all file formats and render all the effects and transitions that Premiere does. Will it be done via Premiere becoming a frame server for SpeedGrade, as is After Effects for Premiere when DL is employed? Who knows, after all, Media Encoder already runs a process called PremiereProHeadless, which seems to be responsible for rendering without Premiere GUI being open. A basic structure seems to be in place already. How much will it conflict with SpeedGrade’s own frame server? How will effects be treated to obtain real time playback? Perhaps SpeedGrade could use Premiere’s render files as well?
An interesting glimpse of what is to come can also be seen in an obscure effect in After Effects which allows to apply a custom look from SpeedGrade to a layer. Possibly something like this is in store for Premiere Pro, where SG look will be applied to graded clips. The question remains, if the integration will follow the way of Baselight’s plugin, with the possibility to make adjustments in Premiere’s effect panel, or will we have to reopen the project in SG to make the changes.
This tighter integration also means that export will most likely be deferred to Adobe Media Encoder, which will solve the problem of pretty limited choice of output options presently available in SpeedGrade.
As of now SpeedGrade does not implement curves. Even though the authors claim that any correction done with curves can be done with the use of other tools present in SG, curves are sometimes pretty convenient and allow to solve some problems in more efficient manner. They will also be more familiar to users of other Adobe applications like Photoshop or Lightroom. While not critical, introducing various curve tools will allow SG to widen its user base, and will make it more appealing.
Talking about appeal, some GUI redesign is still in order, to make the application more user friendly and Adobe-like. I don’t think a major overhaul is necessary, but certainly a little would go a long way. Personally I don’t have problems with how the program operates now, but for less technically inclined people, it would be good to make SpeedGrade more intuitive and easier to use.
These are my ideas on how to improve the newest addition to Adobe Suite. As you can see, I am again touting the idea of the container format for video projects – and Premiere Pro’s project file, being an XML, is a perfect candidate. Frankly, if SpeedGrade will not be reading .prproj files by the next release, I will be very disappointed.
Recently I was doing a small editing job for a friend, and ran into a few interesting problems.
The footage provided was shot partially on a Canon Powershot, which saves it as an AVCHD MTS stream. My computer is not really up to editing AVCHD, so I decided to transcode the clips into something less CPU intensive. The final output would be delivered in letterboxed 640x480p25 because of the limitations of the second camera, so the quality loss was of little concern. Having had decent experience with AVID’s DNxHD codecs, I decided to convert it to 1080p25 36 Mbps version. And then, the problems began.
Even though Premiere Pro did import the file without a problem, Adobe Media Encoder did hang right after opening the file for transcoding. I decided to move the footage to AVID thinking that perhaps it would be a good project to hone my skills on this NLE, but it was complaining about Dolby encoding of audio, and didn’t want to import the footage. I then tried to use Sorenson Squeeze to convert it, but it also threw an error, and crashed. Even the tried MPEGStreamclip did not help.
I was almost going to give up, but then came up with an idea to use Premiere’s internal render to transcode the footage by putting it on an XDCAM HD422 timeline, rendering it (Sequence -> Render Entire Work Area), and then exporting it with the switch that I almost never use – “Use previews“. I figured, that once the problematic footage is already converted, then the Media Encoder will handle the reconversion using previews without problems. I was happily surprised to have been proven correct. And because Premiere’s internal renderer was able to cope with the footage without a glitch, it all worked like a charm.

“Use Previews” can sometimes save not only rendering time, but also allow for encoding problematic files.
Afterwards the edit itself was relatively swift. I encountered another roadblock when I decided to explore DaVinci Resolve for color grading, and exported the project via XML. Resolve fortunately allows custom resolutions, so setting up a 640×480 project was not a problem. I also had to transcode the files again, this time to MXF container. This was a minor issue, and went relatively fast. However, due to the fact that some media was 480p, and some 1080p, and I have done quite a lot of resizing and rescaling of the latter, I wanted to use this information in Resolve. Unfortunately, Resolve did not want to cooperate. It’s handling of resize was very weird, and every time I clicked on the resized clip to grade it, it crashed. I’m certain that the scaling/panning was responsible, because when I imported the XML without this information, everything worked great. It might have something to do with the fact, that I was running it on an old GTX260, but still, I was not able to use the software for this gig.
In the end I graded the whole piece in Premiere Pro on its timeline. Here’s the whole thing for those of you who are interested:
Peter Chamberlain from BlackMagic Design did deny any rumors (guess which ones?) that they are working on the cheaper control surface, believing that the segment is well saturated by other manufacturers. This is of course based on an assumption that the lowest segment is the price range that AVID, Tangent and JL Cooper are targetting, ie. around $1500-$2000. I must admit, that the release of Tangent Element, with the basic control surface at the cost of about $1200 is interesting, however it is still far above what I would consider the real democratization barrier – around $500-$700.
I understand all the limitations of such pricing, including the fact that this kind of surface would be looked by all proffessionals as a toy, which it would indeed be out of necessity of using cheap materials. I still believe it can be done, if R&D costs can be covered, and that it would introduce more people to color grading, than all the plugins combined.
It might of course be my wish to have at my disposal something that I’m currently not able to afford. But I also can’t help but to notice certain wording in Peter’s message. Namely:
…we have no plans for a cheaper panel at NAB. (emphasis added)
So… will anyone pick up the challenge? Or is my premise inherently flawed, and the future of color grading lies somewhere else?
This is my latest production. It’s a promotional spot for a non-profit organization that is dedicated to another passion of mine – historical personal combat.
What follows is an overview of the production of this short movie, including how the screenplay changed during production, breakdown of my editing process, and a few techniques that we used in post-production to achieve the final result.
It was a collaborative, voluntary effort, and included cooperation from parties from various cities in Poland. The Warsaw sequences (both office and training) were shot with Sony EX-1R, 1080i50, with the exception of slow-motion shots that were recorded at 720p60. Sequences from Wroclaw and Bielsko Biala were shoot with DSLRs at 1080p25. Therefore the decision was made to finish the project in 720p25, especially since the final distribution would be via youTube.
The most effort went into filming the Warsaw training, where we even managed to bring a small crane on set. Out of two shots that we filmed, in the final cut only one was partially used – the one where all people are running on the open clearing. We envisioned it as one of the opening shots. As a closing shot we filmed from the same place the goodbyes and people leaving the clearing, while the camera was moving up and away. It seemed a good idea at that time, one that would be a nice closure of the whole sequence, and perhaps of the movie as well.
We had some funny moments when Michal Rytel-Przelomiec (the camera operator, and the DOP) climbed up a tree to shot running people from above, and after a few takes he shouted that he can last only one more, because the ants definitely noticed his presence and started their assault. What a brave and dedicated guy!
A few days later we were able to shot the office sequence. The first (and back then still current) version of the screenplay involved a cut after the text message was send to what was supposedly a reminiscence from another training, and finished up with coming back to office, where Maciek (the guy in office) would pick up a sword and rush at the camera. Due to the spatial considerations on set (we were filming in Maciek’s office after hours), we decided to alter the scenario, especially since we had already filmed the training sequences, including the farewell closing shot.Therefore instead of Maciek picking up a sword and attacking the camera, he actually rushed away to training, leaving the office for something dearer to his heart. It was also Michal’s idea to shot the office space with 3200K white balance to create more distant, cold effect, and it worked really well.
All footage (about 2 hours worth) was imported into Adobe Premiere CS5, that allowed skipping transcoding and working with the source files from the beginning right to the end. After Effects CS5 and Dynamic Link were used for modest city titles only, although perhaps it could have been used to improve a few retimed shots. Music and effects were also mixed in Premiere.
The promo was in production for over half a year, mostly because we were waiting for footage from other cities, some of which never materialized, and we decided to finish the project with what we had. Actual cutting was pretty quick, and mostly involved looking for the best sequences to include from other cities. Some more time was spend on coming up with a desired final look for the short movie.
The general sequence of events was laid out by the screenplay written by Maciek Talaga. At first the clip started immediately with corporate scene. We were supposed to have some similar stories from other cities, and I was ready to use dual or even quadruple split screen for parallel action, but since the additional footage never materialized, I decided to pass on this idea. In the end it allowed us to focus more on Maciej Zajac, and made him the main hero of our story, what was not planned from the start.
After leaving the office we had to transition to the training, and preferably to another place. Wroclaw had a nice gathering sequence, and completely different atmosphere (students, backpacks, friendship and warmth), which constituted excellent contrast to the cool corporate scenes from Warsaw, presenting another kind of people involved in pursuing the hobby.
The order of following cuts was determined by the fact, that we had very little material from Bielsko-Biala, and it all involved the middle of the warm-up. We had excellent opening shots from Warsaw, which were great for setting the mood, and adding some more mystery. I used them all, and even wanted to transition to push-ups and other exercises, however when the guys already stopped running, coming back to it in Bielsko sequence ruined the natural tempo of the event. Therefore with great regret I had to shorten the crane shot to the extent that it most likely does not register as a crane shot at all, and transition to Bielsko for the remaining part of the warm-up.
Coming back to Warsaw seemed a little odd, so I decided to cut to Wroclaw to emphasize the diversity, and a short sequence with a few shots of a warm-up with swords. Here I especially like the two last cuts, where one cuts on action with the move of the sword, that is underlined by the camera move in the next shot, and then the one that moves the action back to Warsaw, when a guy exits the frame with a thrust. I was considering using a wipe here, but it looked too cheesy, so I decided to stick to a straight cut.
As an alternate to this choice, I could at first come back to Warsaw, and move the Wroclaw sequence between the warm-up and sparrings, but this would then create an alternating cadence Warsaw-other place-Warsaw and I wanted to break this rhythm and avoid that. Therefore I was stuck in Warsaw for the remaining of the movie, even though it had at least two distinctive parts left. We had an ample selection of training footage from Wroclaw, however it was conducted in a gym, and including it would ruin the overall mood and contrast closed office space vs. open training space, so in the end we decided against it.
Unfortunately we did not have any footage from gearing up, so the transition between the florysh part in Warsaw to the sparrings is one of the weakest parts of this movie, and I would love to have something else to show. I did not come up with anything better than the cut on action though.
The sparring sequence is mostly cut to music selection of the most dynamic and most spectacular actions from our shoot (not choreographed in any way), including a few speed manipulations here and there to make sword hits at proper moments or to emphasize a few nice actions, including the disarm at the end. There were a few lucky moments during shooting, where Michal zoomed in on a successful thrust, and I tried to incorporate them as much as I could, to obtain the best dynamics, and to convey as much of the atmosphere of competitive freeplay as was possible.
The sequence ends on a positive note with fighters removing masks and embracing each other. I tried to avoid cutting in the middle of this shot, but it was too long, and I wanted to have both the moment where the fencing masks come off, and the glint on the blade of the sword at the end (which was not added in post). In the end the jump cut is still noticeable, but it defends itself. There is a small problem with music at the end, because I had to cut it down and extend a little bit to hold it for the closing sequence, but it is minor, and does not distract too much from the overall story.
Apart from the serious and confrontational aspect of the training, we wanted to stress the companionship, and I believe that both the meeting sequence in Wroclaw, and the final taking off the masks and embrace did convey the message well.
During cutting I realized that regardless of the added production value of the crane farewell shot, there is no way to include it at the end. It was too long, it lessened the emotional content, and paled in comparison to the final slow motion shots that I decided to use, including the final close-up of Maciek, that constituted the ellipse present in the first version of the screenplay. Therefore it had to go, regardless of our sentiment towards it.
The feedback from early watchers was that Maciej Zajac was not easily recognizable for people who did not know him, and made us wish for something more. The idea of the beginning with sounds and no picture came from Maciek Talaga, and I only tweaked it a little bit. We first thought about putting as the first shot the one where Maciej takes off the fencing mask, however it did not look good at all, and the transition to the office scene was awkward at best. In the end I proposed the closing close up as the first shot, which in our opinion nicely tied the whole thing together, being both introduction of Maciek, setting focus on him as a person, and also nicely contrasting the “middle ages dream or movie” with his later work at the office. Excellent brief textual messages authored by Maciek Talaga added also a lot to the whole idea.
All color correction was done in Premiere Pro with the use of standard CC filters and blending modes. I experimented with the look in the midst of editing, trying to come up with something that would best convey the mood. I started with high-contrast, saturated theme, and moved quickly to a variation of bleach bypass with a slightly warmer, yellowish shift in midtones. However, it still lacked the necessary punch, and in the end I decided to over-emphasize the red color (an important one for the organization as well) with a slight Pleasantville effect. It gave the movie this slightly unreal, mysterious feeling, and the contrast underlined the seriousness of effort.
The office sequence did not need much more than the variation of bleach bypass, not having anything actually red. The increase of contrast and slight desaturation was mostly enough to bring it to the desired point, thanks to Michal’s idea of shooting it at lower Kelvin. Warsaw sequence required additional layer of “leave color” effect where everything apart from red was partially desaturated, a little more push towards yellow in highlights and in midtones, all blended in color mode over previous bleach bypass stack. I will do the detailed breakdown of color correction I used in a separate entry, although perhaps with the introduction of SpeedGrade in Adobe CS6 this technique might become obsolete.
Michal also suggested a clearer separation between the various cities, so I pushed Wroclaw more towards blue, as it involved more open air, and Bielsko more towards yellowish-green, to emphasize its more “wild” aspect. In the end, I had the most trouble with footage from this place, because as shot it was dark, had bluish tint, and involved pretty heavy grading, which on H.264 is never pleasant. Overall I’m satisfied with the results, although there are a few places that could benefit from perhaps a few more touches.
The blooming highlight on the fade out of the opening and closing shot was a happy accident and a result of fading out all corrected layers simultaneously mixed with “Lightning effects”, at first intended only for vignetting (as mentioned in my another entry).
I like the overall result. I also enjoyed the production on every step of the way, and even though it could still perhaps be improved here and there, I am happy. It was an excellent teamwork effort, and I would like to thank all people who contributed to its final look.
Yesterday BlackMagic released an upgrade to its free version of the industry standard grading tool, daVinci Resolve. The biggest and most influential change was surely removing the limit of 2 nodes that was present in previous Lite version. This bold move essentially makes the professional color correction software available to everyone for free. I am still waiting for the announced Windows version, that would make it even more accessible, but it’s almost a given at the beginning of the next year.
There still are limitations – you can at most output at HD resolution, even though you can work with footage that is much bigger than that, you won’t get noise reduction, you are limited to a single GPU. That said, most of the people to whom this version of software is directed hardly ever yet think about projects in 2K and above and have not considered buying a second GPU except perhaps for gaming purposes. However you choose to look at it, BlackMagic did surprise everyone by providing amazing piece of truly professional software for free. This kind of democratization of grading tools is certainly terrific, and unexpected. It is however not yet disruptive enough. What will BlackMagic next move be?
I see this release as a preemptive strike against Adobe (see my previous post on Adobe acquiring Iridas) and following Apple recent “prosumerisation” trend. In Adobe CS6 we will almost certainly see integrated SpeedGrade color-correction software – to many it means that they will get this tool almost for free (for the price of upgrade, but you would most-likely want to upgrade anyway). To attempt to win the new users, there was little else that BlackMagic could do. However the question still remains, why would BlackMagic voluntarily resign from some part of their income? Why not sell the newly unlocked Lite version for $99 or $199 and profit handsomely? What’s in it for them, apart from perhaps profiting from monitoring interfaces that they already sell? Let’s speculate a little bit.
One of the things that distinguishes “real” from “would-be” colorists is a control surface. It’s a tool dedicated towards increasing speed and ease with which to operate the software. All companies that provide serious grading software also sell special panels that go with it. This hardware is extremely expensive, costing anywhere from ten thousand to several hundred thousand dollars. BlackMagic does have its own model, which costs about $20 grand. Of course, in the world of high-turnover, high-end productions, such costs are quite quickly recovered. But this highly demanding pro world is relatively small, and competing companies rather numerous: BlackMagic, Digital Vision (former Nucoda), Baselight, Autodesk, Quantel, to name a few important ones.
Certainly no home-grown editor would-be colorist will shell out $20k for a tool that will sit idle 90% of their working time. Towards this end companies like Euphonix (now Avid), and Tangent Devices developed less sophisticated models that cost about $1500. For a pro it is often a very reasonable price for an entry-level piece of hardware that will pay for itself pretty quick. However, for a prosumer it is still at least two to three times too much, especially considering very limited use of the said tool. Regular consumers are willing to pay $499 for a new iPhone, avid gamers usually spend this much on a new GPU, and I guess this is about the limit that a prosumer color-grading surface would have to cost to catch on big time.
From a business perspective, selling 10 000 pieces of hardware costing $500 each earns you more than selling 10 $20k ones. Apple knew that when they released Final Cut Pro X (regardless of what you think about the program). Professional market is quite saturated, and there is not much to be gained there. It is also very demanding. Prosumers are much easier to appease, and their tools do not have to withstand the amount of abuse that pros require. Following the Apple model – giving the tool to prosumers – is a surer promise of profit, than appealing to the demanding pros.
The question is – who will make this move? Two years ago I would say that Apple might be one of the best candidates, but after introducing weird color control in Final Cut Pro X, and focusing all their efforts on touch panels I’m pretty sure they are not the ones. I don’t expect Tangent Devices or Avid to undercut the sales of their relatively low-cost models, especially after Tangent recently revamped their panels. BlackMagic is the most likely candidate, because right now they only have their high-end model. Creating a new version takes a lot of R&D resources, both time and money, and it is pretty hard to compete in this segment. BlackMagic also always did appeal to those with lower budgets, and this kind of disruptive move is something that is the easiest to expect from this company.
Therefore I am waiting for a simple control surface that will cost about $500-$700, will be sturdy enough to last me two years of relatively light to moderate use, and sensitive enough for the kind of color grading that I presently do – nowhere near truly professional level, but sometimes quite demanding nevertheless. I understand the big problem is producing decent color wheels, but I don’t loose hope that somebody will come up with some neat idea, and implement it. And no, multitouch panel will not do. If you wonder why, read another of my articles on the importance of tactile input. The whole point of control surface is that you don’t have to look at it while grading.
Finally, is the realm of professional colorists in any danger from the newcomers? To a certain extent perhaps. The field will certainly become more competitive, and even more dynamic, perhaps a few players will drop out of the market. On the other hand, more people will be educated about the quality of good picture, and more will require this quality, and also will be able to appreciate excellent work that most of the professionals do. All in all it probably will influence more the job of an editor than a colorist, bringing the two even closer together – the editors will be required to learn color correction to stay in business. In the high-end productions not very much will change, the dedicated professionals will still be sought for both for training and for expertise. Perhaps some of the rates will go down, but most likely in the middle range. In the end I think it will have net positive effect on what we do and love.
Will we then see a new product during NAB 2012 or IBC 2012? I would certainly be the first in line with my credit card. And if we do – you heard it here first. 🙂

