
The third, and most likely last of the Feathered Crop basics, this time on how to animate your feathered crop using GUI in the program monitor to hasten your workflow. It’s very likely you already know it, but just in case, here it is:


The third, and most likely last of the Feathered Crop basics, this time on how to animate your feathered crop using GUI in the program monitor to hasten your workflow. It’s very likely you already know it, but just in case, here it is:
In late September 1944 Field Marshall B. L. Montgomery, a very bold and talented British commander, led an ambitious offensive whose objective was to force an entry into Germany over Rhine. He aimed to capture a series of bridges with the help of paratroopers, who would have to defend them until the main forces arrived.
Him and Premiere Pro have a few things in common: they are both audacious and tend to overreach. Monty’s boldness and wits won him a few battles, especially during his campaigns in Northern Africa. However, in this case his arrogance went a bit too far. Similarly, Premiere Pro also has its Arnhem moments.
Premiere has always included the current frame in the in/out timeline selection, but until the latest release, it has not bothered me much. CS6 introduced a plethora of new features, which made me change my previous workflow from mouse and keyboard driven to more keyboard oriented, mostly due to the new trimming interface, and the unpredictability of the ripple tool, making the problem more pronounced.

A frame too far…
It used to be, that the arrow tool (
Easy and fast. Combine that with a few shortcuts to add default transitions, and it turns out that using mouse and keyboard seems to be the most efficient way to go. The simplicity, ease, and flexibility of the timeline manipulation in Premiere was amazing. And for anyone using this method, opening Final Cut Pro legacy was sometimes pretty annoying. And Avid, especially before MC5? Don’t even get me started…
Then comes Premiere CS6 with its ability to select edit points, and improved trimming. And suddenly, this old workflow seems less and less viable. The hot zones for edit point selections are pretty wide. One has to be careful not to suddenly click on an edit point, because then the trimming mode will be activated, and ctrl will no longer act in predictable manner, giving you the ripple trim as you’d expect. It will change its behavior based on what is selected, and in general make manipulating timeline with a mouse much less efficient.
It’s understandable then, that I found myself drifting more towards the keyboard-oriented workflow, using trimming mode (
And all would be fine and dandy, were it not for the already mentioned fact, that Premiere marks the currently displayed frame as part of the selection. Which means, that if you position your playhead on the edit with the nicely defined shortcut keys (up and down arrow in my case), and press
This is a bit problematic.
I admit I have seen it before – this has been the standard behavior of Premiere from the beginning – but because I hardly ever used in and out in the timeline, this has not bothered me much. However, when the selection started to become the core of my workflow, I found it terribly annoying, and slowing down my work. When I do any of the following operations, I need to constantly remind myself to go back one frame, to avoid the inclusion of the unwanted material:
I enjoy editing in CS6 a lot, but this “feature” literally keeps me up at night. It’s such a basic thing, that even Avid got this one right… When the playhead is positioned on an edit point, the out point is selected as the last frame of the incoming clip.
Why then does Premiere behave like Montgomery and has to go one frame too far? British Field Marshall also wanted to eat more than he could chew, and in the end he had to withdraw. Every time I have to go back a frame, I feel like I’m loosing a battle. Why?
Not one frame back, I say!
Summary: Always apply your 8-bit effects as the last ones in the pipeline.
A few years ago Karl Soule wrote a short explanation of how the 8-bit and 32-bit modes work in Premiere Pro. It’s an excellent overview, although it is a bit convoluted for my taste (says who), and does not sufficiently answer the question on when to use or not to use 8-bit effects, and what are the gains and losses of introducing them in the pipeline. Shying away from an Unsharp Mask is not necessarily an ideal solution in the long run. Therefore I decided to make a few tests on my own. I created a simple project file, which you can download and peruse ( 8-bit vs 32-bit Project file (7319 downloads ) ).
In essence, the 32-bit mode does affect two issues:
For the purposes of testing them, in a Full HD sequence with Max Bit Depth enabled, I created a black video, and with a Ramp plugin I created a horizontal gradient from black to white, to see how the processing will affect the smoothness and clipping of the footage.

Settings for a simple horizontal ramp to test it.
Next I applied the following effects:

Settings for the first Fast Color Corrector.

Master curve in the first RGB Curves effect

Master curve in the second RGB Curves effect.

Settings for the second Fast Color Corrector.
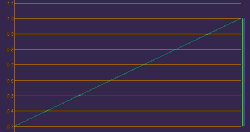
To assess the results I advise opening a large reference monitor window in the YC Waveform mode. Looking at Program monitor will not always be the best way to check the problems in the video. You should see the diagonal line running through the whole scope, like this (note, that the resolution of Premiere’s scopes is pretty low BTW):

This is how the ramp looks like without any effects applied.
Now perform the following operations, and observe the results:

The effect of the first Fast Color Corrector on the ramp. Notice the clipping.

The effect of the second Fast Color Corrector on the ramp. Notice the lack of clipping.

The effect of the first RGB Curves on the ramp.

The effect of the second RGB Curves on the ramp.

All four 32-bit effects on.

All filters on with Offset in the last place. Notice a bit less smoothness in scopes.

All filters on with Offset before the second FCC. 8-bit filter makes the data irrecoverable, and clips the highlights.

All filters on with Offset between the RGB Curves. Notice the irregularity in the curve, showing rounding errors and compounding problems.

All filters on with Offset after the first FCC. The curve is not as irregular, but the clipping is still present.

All filters on with Offset in the first place. Notice the similarity to the Offset in the last place. The 32-bit pipeline is not broken afterwards, although the footage is converted to 8-bit because of the filter pipeline.
This simple experiment allows us to establish following best practices on applying 8-bit effects in Premiere Pro:
And that’s it. I hope this sheds some light on the mysteries of Premiere Pro’s 32-bit pipeline, and that your footage will always look great from now on.
Taking advice of other creatives, I decided to forego the unattainable expensive gear, and use whatever I had at my disposal to create a series of short tutorial on how to use my plugins.
The first installment is already available, and I plan on putting out one of these every week, keeping under 3 minutes for all of you impatient types. I’m pretty happy with the result, since it’s my very first screencast. The audio quality is not very good, but I hope the content will defend itself, and that you will find these series useful.
Comments and donations welcome.
Yesterday a few pieces of the puzzle came together in my head, and I realized that Adobe Anywhere in no way was conceived as a brand new solution, and is in fact a result of a convergence of many years of research and development of a few interesting technologies.
A couple years ago I saw a demonstration of remote rendering of Flash files and streaming the resulting picture to a mobile device. For a long time I thought nothing about it, because Flash has always been on the periphery of my interests. But yesterday I suddenly saw, how relevant this demonstration was. I believe it was a demo of Adobe Flash Media Server, and it was supposedly showing a great way to allow users with devices not having enough power to enjoy more advanced content without taxing the resources too much, and possibly streaming content to iOS devices not running Flash. Granted, the device had to be able to play streamed video, but it didn’t have to render anything. All processing was done on the server.
Can you see the parallels already?
Recently Adobe Flash Media Server – which Adobe acquired with Flash when it bought Macromedia in 2005 – changed its name to Adobe Media Server, proudly offering “Broadcast quality streaming”, and a few other functionalities not limited to serving Flash anymore. The road from Adobe Media Server to Adobe Anywhere Server does not seem very far. All you need is a customized Premiere Pro frameserver and project version control, which in itself perhaps is based on the phased out Version Cue. Or not. The required backbone technologies seem to already have been here for a while.
Mercury Streaming Engine backbone
What follows are a few technical tidbits that came with this realization and a few hours of research. Those of you not interested in these kind of nerdy details, skip to the next section.
To deliver the video at astonishing speed Adobe Anywhere most likely uses the protocol called RTMFP (Real Time Media Flow Protocol) which had its roots in the research done on MFP protocol by Amicima. Adobe acquired this company back in 2006. RTMFP, as opposed to most other streaming protocols, is UDP-based, which means that there is much less time and bandwidth spent on maintaining the communication, but also there is no inherent part of the protocol dedicated to finding out if all data has been sent. However, some of the magic of RTMFP makes the UDP-based protocol not only inherently reliable, but also allows for clever congestion control, and “absolute” security, at the same time bypassing most of NATs and firewall issues.
The specification of RTMFP has been submitted by Adobe in December 2012 to Internet Engineering Task Force (IETF), and is available on-line in its drafts repository.
More in-depth information about RTMFP can be found at two MAX presentations from Adobe. One of them is no longer available through the Adobe website, but you can still access its Google’s cached version: MAX 2008 Develop, and another from MAX 2011 Develop, and still available on the site. Note, that both are mostly Flash specific, although the first one has great explanation of what the protocol is and what it does.
It is still unclear what type of compression is used to deliver the footage. I highly doubt it is any inter-frame codec, because the overhead in compressing a number of frames would introduce a noticeable lag. Most likely it is some kind of intra-frame compressor, perhaps a Scalable Video Codec version of H.264 or JPEG2000 and its Motion JPEG 2000 version that would change the quality setting depending on the available bandwidth. The latter is perhaps not as efficient as the former, but even at full HD 1920×1080 JPEG2000 file at quite decent 50% quality is only 126 kB, 960×540 only 75 kB, and if you lower the quality to viewable 30%, you can get down to 30 kB, which requires about 5 Mbps to display 25 frames in real time, essentially giving you a seamless experience using Wireless connection. And who knows, perhaps even some version of H.265 is experimentally employed.
Audio is most likely delivered via Speex codec optimized for use in UDP transmission, and live conferencing.
Ramifications and speculations
There are of course several performance questions, some of them I already expressed – are you really getting the frame rate that your sequence is in (1080p60 for example) or is there a temporal compression to 24 or 25 frames as well – or any number, depending on the bandwidth available. And how is the quality of picture displayed on a broadcast monitor next to my edit station affected? Yes, I know, Anywhere is supposed to be for the lightweight remote editing. But is it really, once you have the hardware structure in place?
When it comes to server, if I had to guess today, a relatively fast SAN, and an equivalent of HP Z820 including several nVidia GPUs or Tesla cards is enough to take care of a facility hosting about half a dozen editors or so. Not an inexpensive machine, although if you factor in the lower cost of editing workstations, it does not seem so scary. The downside is that such editing workstations would only be feasible for editing in Premiere Pro, and most likely little else. No horsepower for After Effects or SpeedGrade. Which brings me to the question – how are the Dynamic Link and linked AE comps faring under Anywhere? How is rendering and resources allocation resolved? Can you chain multiple servers or defer jobs from one machine to another?
Come to think of it, in the environment only using Adobe tools, Anywhere over local ethernet might actually be more effective than having all the edit stations pull required the media from the SAN itself, because it greatly reduces bandwidth necessary for smooth editing experience. The only big pipe required goes between the storage and the server. And this is a boon to any facility, because the backbone – be it fiber, 10-Gig ethernet, or PCI-Express – still remains one of the serious costs, as far as installing the service is concerned. I might even go further, and suggest abandoning SAN protocol altogether, when only Adobe tools are used, thus skipping SAN overhead, both in network access, and in price, although I believe in these days of affordable software from various developers it would be a pretty uncommon workflow.
In the end I must admit that all of it is just an educated guess, but I think we shall soon see how right or wrong I was. Since Al Mooney already showed a custom build of the next version of Premiere Pro running Adobe Anywhere, it is almost certain, that the next release will have Anywhere as one of its major selling points.
There’s a tip that I wanted to share with you, which increased my productivity with Premiere Pro tremendously. And it’s very simple: customize your keyboard shortcuts. But make it wisely.
First tip: make use of the search box which is present in Keyboard Shortcuts dialog in Premiere. There is a ton of shortcuts, and if you know the proper name, or even part of the name, it’s easier to type it in the search box, and browse among the remaining entries, than to wade through all the options.
Separated from source patching in CS4, constantly improved, but still hardly perfect, track selection tends to be one of the most annoying things if you don’t remember about it (like wondering why match frame shortcut does not work). It has also been pretty cumbersome. But in CS5 we got a nice addition that allows us to finally make it more of a feature than a nuisance.
Assign keyboard shortcuts
Then assign
Track selection is vital to every editing operation in Premiere, and once you get used to the new shortcuts, I assure you, that you will never go back, and will be ready to strangle anyone who would like to take it away from you.
Perhaps you might also find it useful to assign Toggle Target Audio 1-8” to
Be mindful that shift+number shortcuts are assigned to panels, but if you change them you will not be notified about it! And there will be no undo, you’ll have to revert these changes manually.
And while we’re at it, why not map labels to
Setting the In (
The most important one: Clear In/Out – map it to
Clear In and Clear Out is not something I use very often. If I want to change the In, I just set an In in another place. However, if you find yourself using them often,
On the other hand Go To In, and Go To Out tend to be useful, and I map them under
Mark Clip also tends to be useful for many reasons, gap removal included, and I tend to have it under the slash key
Setting Render Entire Work Area to
An idea that navigating markers should use the
Another function that I often use is Add edit, and Add edit on all tracks. Default
Speed/Duration and Audio Gain – who says that invoking dialogs needs a modifier key? Map them to
Ripple Delete – default
The next two will save you tremendous amount of time during editing. I used to perform this operation with a mouse – when I felt that I had to make a cut, I ripple-trimmed my next edit point by dragging it with a
They take time to get used to, because the shape of the characters is opposite to what it does, but their position is correct. I still sometimes press the incorrect one, but they are a real timesaver, especially in connection with track selecting. However, if you find yourself thinking too much, you might consider switching them, and seeing if it doesn’t work better for you.
There are also two of the less often used – Extend Next Edit to Playhead and Extend Previous Edit to Playhead, which I tend to map to
I have never used Extend Selected Edit to Playhead. Ever. Perhaps I still don’t know something about editing, but I have not come upon a situation where I couldn’t replace it with any other available option.
Sometimes however I find it useful to immediately move to the nearest edit point and select correct trim mode. Therefore I usually map the following:
For a moment I toyed with an idea to assign
Interestingly, in CS6 you can specify a separate shortcut to add each of the following transitions:
If you tend to use any of these, definitely apply a shortcut to it. Also, if you use any other transition often, like for example Dip To Black (why it’s not in the list I have no idea), then use this one as a default transition, and apply a shortcut to Crossfade. Possibilities are really interesting, and I sincerely urge you to explore them.
Here is the .kys file for all of you lazy and impatient people to download:
Bart's keyboard shortcuts (47221 downloads )
Feel free to use it and distribute it as you wish. However, I strongly urge you to explore keyboard shortcuts on your own.
To install the shortcut keys you need to exract the .kys file to the following folder (substitue $username and $version for appropriate values):
I hope you’ll find these tips as useful, as I do. Enjoy.
While doing research for a commission that I recently received, I found out that Premiere Pro CS6 does not export markers of 0 duration to FCP XML. This proved to be a bit of a surprise, and also turned out to be a major flaw for the software that I am supposed to develop.
I had to find out the way to automatically convert all the markers into the ones with specified duration. Fortunately, as I wrote many times, Premiere Pro’s project file itself is an XML. Of course, as it was kindly pointed out to me, it’s pretty complicated in comparison to the exchange standard promoted by Apple, however it is still possible to dabble in it, and if one knows what one is doing, to fix a thing or two.
Marker duration proved to be a relatively uncomplicated fix.
In the project file, markers are wrapped into the <DVAMarker> tag. What is present inside, is an object written down in JavaScript Object Notation. I’m not going to elaborate on this here, either you know what it is, or you most likely wouldn’t care. Suffice to say, that the typical 0 duration marker looks like this:
<DVAMarker>{“DVAMarker”: {“mMarkerID”: “3cd853f0-c855-46de-925c-f89998aade87”, “mStartTime”: {“ticks”: 6238632960000}, “mType”: “Comment”}}</DVAMarker>
and the typical 1 duration marker looks like this:
<DVAMarker>{“DVAMarker”: {“mComment”: “kjhkjhkjhj”, “mCuePointType”: “Event”, “mDuration”: {“ticks”: 10160640000}, “mMarkerID”: “7583ba75-81f5-4ef2-a810-399786f3a75d”, “mStartTime”: {“ticks”: 4049893512000}, “mType”: “Comment”}}</DVAMarker>
As you can see, the mDuration property is missing in the 0 duration marker, and the duration 1 marker is also labeled as “Event” in the “mCuePointType” property. It turns out, that it is enough to insert the following string:
“mDuration”: {“ticks”: 10160640000},
right after the second curly brace to create the proper 1 frame marker that gets exported. You can do it in your favourite text editor yourself, and then the corrected marker would look like this:
<DVAMarker>{“DVAMarker”: {“mDuration”: {“ticks”: 10160640000}, “mMarkerID”: “3cd853f0-c855-46de-925c-f89998aade87”, “mStartTime”: {“ticks”: 6238632960000}, “mType”: “Comment”}}</DVAMarker>
Granted, it’s a bit tedious to do it by hand for hundreds of markers (as was my client’s request), and unless Adobe decides to fix it in the near future (I already filed a bug report), or Josh from reTooled.net releases it first on his own, some time at the beginning of the next year I might have a piece of software that will automatically convert the 0 duration markers to 1 frame ones, so that they get easily exported to FCP XML. I understand that this is a pretty rare problem, but perhaps there are a few of you who could benefit from this solution.
The main bugger? Most likely it will be Windows only, unless there is specific interest for the Mac platform for something like this.

SIYAH: Premiere Pro for rendering divides the timeline into sections based on clips and edit points. If you cancel the rendering process it discards the results of the section that was being rendered at the time, not the whole render.
Many people who switched from Final Cut Pro to Premiere are thrown off by the fact that if they cancel rendering, Premiere seems to throw away what has been rendered so far. At least this is the impression that you would get listening to several opinionated individuals like Chris Fenwick (whose point of view I like to listen to, especially at the Digital Convergence Podcast, even if I disagree with him from time to time). However, the way Premiere handles renders is a bit different.
First, let’s give credits, where they are due – Final Cut Pro had a great feature: when you stopped rendering, it did not discard anything that you rendered. I wish Premiere were as clever as that.
However, not all is rotten in the state of Denmark. The way Premiere handles rendering might not be as clever as many would like, but it is not as dumb, as this single problem might lead you to believe.
In the rest of my article I’m going to assume that you indeed have to render clips in question, especially since Premiere does so much stuff in the real-time these days.
Premiere handles renders on the sub-clip basis. At the simplest level, the timeline is divided into sections based on clips’ visibility and edit points. Therefore each applied transition creates its own section, because it consists of two clips. Also, if you stack clips one on top of the other, each start or end point on the top layer creates a new render section. Opacity and blending modes are a bit more complicated, but it mostly comes down to which edit points and transitions are visible. Once you understand that, it’s really not that complicated.

Premiere Pro divides the timeline into sections called Video Previews, and after cancelling discards only this section that was being rendered at the time. All the remaining previews are kept.
Take a good look at Premiere’s render progress window, and apart from the number of frames, you will also see the number of video previews – this is the amount of sections that the selected part of the timeline was divided into. If you cancel your rendering at any point, you lose “only” what was rendered within the last clip. Granted, if this was a long – or time consuming – part, you might be a bit unhappy, and justifiably so. However this is a bit different, than the picture painted by a few prominent individuals.
What is perhaps most funny is that at least some of the code necessary for the so-called Smart Render is already in place. If you start rendering in the middle of a clip (via Render Work Area or Render In To Out options), then the new section will be created at the point where the render started. Rendering will also stop at the end point, even if it is in the middle of a clip. So partial renders are already possible. It’s just that for some reason these few lines of code necessary for saving them after hitting “cancel” are still waiting to be written. Hopefully not for that long.
That said, there is one exception, when you can indeed lose all your currently rendered files – it happens if the application crashes (unlikely, however possible), and/or if you don’t save your project after render. The render files will be present on your drive, but there will be no way to link them, because Premiere did lose reference. Come to think of it, unless the render sections’ IDs (and filenames) are calculated randomly, there is little reason for it, and it should be possible to find the missing render files and relink them even after a crash. A feature request perhaps?
Another not so clever way of handling renders is the visibility problem – if you have two clips stack upon each other, even of the base layer is not visible, and you manipulate it, for example by changing an effect underneath, Premiere will force you to render again. Which is plain stupid in my not so humble opinion, and if my memory serves well, it was not always the case, although I might be wrong.
Premiere’s rendering however is smart in a different way – it does not lose what it once rendered. If you stack two clips one upon another, add some effects, render them, and then move them or change the keyframes, it will of course make you render again. However, if you move the clip back at some point, change the keyframes back, or in any other way return to a previously rendered state, Premiere is wise enough to bring back the rendered files. Good luck trying it with FCP with anything except an immediate undo!
That said I am waiting for the moment when Premiere Pro embraces Really Smart Rendering, perhaps on the par of Global Performance Cache in After Effects, Background Rendering on the par of Digital Vision Film Master (which unlike FCP X does manage resources and allows you to work during rendering) and Smart Auto-Save during render. At that point the editing is going to be strictly fun, and you’d better enjoy it, because your coffee breaks will be gone 🙂

SIYAH (Summary If You Are in a Hurry): If you want your clip to fade to black, apply simple cross-fade at its end. Use dip to black only as a transition between two clips, not at the beginning or at the end of a clip.
There seems to be some misunderstanding about how and when to apply transitions like Dip to Black or Dip to White in Premiere Pro. It is even propagated in some training videos and this is pretty unfortunate. I hope this article makes the issue clearer.
First, let’s take a look at how transitions work in Premiere in general.
You can apply any transition as a transition between two clips (“Normal transition”). By default it will be centered on the edit point, although you can easily change it either in the timeline, or in the effect control panel. The transition will then be applied between the two clips – applying the cross-fade, slide, wipe, swush and any other wild effect that you choose to use.

Standard cross-fade transition applied between two clips gives an expected result.
You can also apply a transition at the beginning, or at the end of a given clip (“Single transition”). In that case, Premiere will act as if it was applied between your clip, and a transparent video clip, revealing (but not proplerly transitioning to) the layers beneath, and if there are no layers, the black background.

Cross-fade transition applied at the beginning of a single clip. It is the proper way to fade the clip from or to black.
Push is a good example of the difference between transition and reveal. If you apply it between two clips, you will see both pictures moving. However, if you only apply it to a clip on a layer above, only the clip with the transition will move, revealing a static clip beneath. There are times that you might want to use one way or the other, depending on your artistic preference. No way is necessarily more proper than another, just be aware of the difference.
Push transition applied as the transition between two clips. Both clips take part in the movement.

Push transition applied at the end of a clip reveals the underlying static layer. Only the clip with the transition is moving.
Now let’s take a look at how Dip to Black or Dip to White transitions work.
Each is an equivalent to creating a single frame of black or white, and cross-fading first the outgoing clip into the given color, and then fading in the incoming clip from this color.

Dip to Black as a transition fades the outgoing clip to black, and then reveals the incoming clip by fading from black.
It means, that if you apply it at the beginning, or at the end of the clip you will see the clip fading to the color in the middle of the transition, not at the end of it. I’ve seen people compensating for it by tweaking the transition end point in the effect panel, which seems to me the worst possible way to do it. Let me repeat: you should never use Dip to Black or Dip to White at the beginning or at the end of a single clip. Use it only as a transition between two clips.

Dip to Black applied to the beginning of the clip will produce the first half of the transition as black frames. You should never do that. Ever.
Dip to black might also produce some weird results with multiple layers or transitions stacked upon each other. It used to be worse in previous versions (the example shown in the video mentioned at the beginning would fade the whole sequence to black upon encountering the video due to a bug in render order in CS3), but still dip to black will fade all layers below itself to black, not only the clip that you apply the transition to. It might surprise you, especially if you don’t know how exactly the effect works.

Dip to Black applied to a given layer will fade to black not only this layer, but also all the layers beneath, and in earlier versions of Premiere also the layer above. Unless you know what you are doing, stay away from this method of applying this effect.
I hope this clears the issue.
Additionally I’d like to offer a few productivity tips regarding the transitions in Premiere Pro CS6:
At NAB 2012 Adobe made an intriguing sneak peek at the technology for collaborative editing. At IBC 2012 Michael Coleman introduced the new Adobe Anywhere and presented its integration with Adobe Premiere. Like most demos, this one looked pretty impressive, and even gave away a few interesting developments in the upcoming version of Premiere, but it also left me pondering on the larger picture.
Indeed, Mercury Streaming Engine’s performance seems impressive. Ability to focus on the whole production, instead of on its single aspect, automatic (?) file management (and backup?), use of relatively slow machines on complex projects, working at long distance – all this is really promising. There is no doubt about it. However…
No back end and management application was presented. No performance requirements were given. How soon does a server saturate its own CPU, GPU and HDD resources? Apart from performing all the usual duties, it must now also encode to the Adobe streaming codec, and all the horsepower must still come from somewhere. If the technology uses standard current frame servers developed for Dynamic Link and Adobe Media Encoder, how are the resources divided, and how is the Quality of Service ensured? How effective is the application, and more important – how stable? I hope the problems with database corruption in Version Cue are things of the past, and they will not happen with Anywhere at any time.
Adobe engineers have been working on the problem for about 4 years, so there is a high chance that my fears are unwarranted. At the same time though I’ve learnt not to expect miracles, and there will always be some caveats, especially with the early releases of the software.
Of course, it explains why Adobe wants to first target Anywhere to their broadcast clients. Perhaps there is some of the sentiment, that since the video division finally has the enterprise clients, it needs to take care of them – hopefully not at the expense of smaller businesses and freelance editors like me. But setting up the servers, managing hardware and the whole architecture, takes expertise, and it is mostly the big guys who have the resources to implement the recommendations. We still do not know what the entry-level cost is going to be, but I highly doubt it’s going to be cheap.
Not that small post-houses would not profit from Anywhere. I can easily see how it could be incorporated in our workflow, and how it could easily resolve a few problems that we have to manage on a daily basis. But will we be able to supply the back-end architecture? It remains to be seen.
Interestingly, this approach of beefing up one’s machine room contrasts another trend that we have been seeing – the horsepower of average desktops being more than enough to handle pretty complex projects. All this remains totally unused in the model promoted by Adobe Anywhere. I wonder what Walter Biscardi thinks of it, and does he plan on using it at all.
I’m also curious how the version control is resolved? How are the changes propagated – can you in some way unify the conflicting projects, or do you need to choose one over the other? It is important. I gather that you can always go back to previous versions, but will they be available only from administrative panel, or also from applications themselves? Only time will tell.
It’s good that there is a possibility of expanding the system. I think a natural application that will be developed very shortly after the release, will be some kind of review player, where you can see the recent final result of the project, add markers and possibly annotations (why not? as a Premiere Pro title for example). Especially useful for mobile platforms, like iPad, where Premiere or even Prelude is not available. Such tools could become crucial for the approval and collaborative workflow in general.
There is also another point, which gave rise to the question in the title of this note. Is it the conforming uber-app that I’ve been arguing for? From the limited demonstrations to date unfortunately the answer is still no. We are not there yet, even though Adobe Anywhere seems very promising for collaborative editing, it is not yet there for collaborative finishing (and archiving for that matter).
The elephant in the room seems to be client’s review and approval. It’s OK to serve a 1/4th resolution of the picture if you are editing on a laptop without an external monitoring. But once you get into the realm of finishing, especially with your client at the back, you want the highest quality picture that you can get, with as little compression as you can. Anywhere is most likely not going to be able to serve that. Would you have to leave the ecosystem then?
Even though the support exists for After Effects, Premiere Pro and Prelude, the holy grail still remains the ability to take Premiere’s project in its entirety and work on it in Audition or SpeedGrade, and then bring it back to Premiere for possible corrections in picture edit with all the changes made in other programs intact. Or to export an XML or EDL without a hassle of hours of preparation if custom plugins, effects or transitions are being used. Nope – not there yet.
There is also a question of its integration in larger, more diverse pipelines, involving other programs and assets, not only from Adobe, but from other vendors, like The Foundry or Autodesk. It’s true, that Anywhere does have it’s own API for developers, although it remains to be seen, how open and how flexible the system will be, especially in terms of asset management.
Yet, despite all these doubts and supposed limitations, it seems to be a step in the right direction. And, as Karl Soule claims, the release of Anywhere is going to be big.

